Stop buying those overpriced, generic cards from the pharmacy.
Your mom deserves better than a mass-produced poem about ”guidance.”
I’ve spent far too many nights covered in glitter to tell you that handmade is the only way to go.
These 13 DIY Mother’s Day cards offer that personal touch Mom actually wants.
Let’s get crafty before Sunday arrives! 🙂
Why Handmade Always Wins Every Single Time
I honestly think store-bought cards feel a bit lazy.
You spend five dollars on a piece of cardstock that thousands of other people bought?
Mom knows you can do better.
A handmade card shows you actually spent time thinking about her.
It creates a keepsake she will likely keep in a shoebox for twenty years.
Trust me, “effort” factor scores you major points.
- Handmade cards show genuine effort and care.
- You save money while creating something unique.
- Personalization beats generic rhymes every day.
1. The Classic Pressed Flower Masterpiece
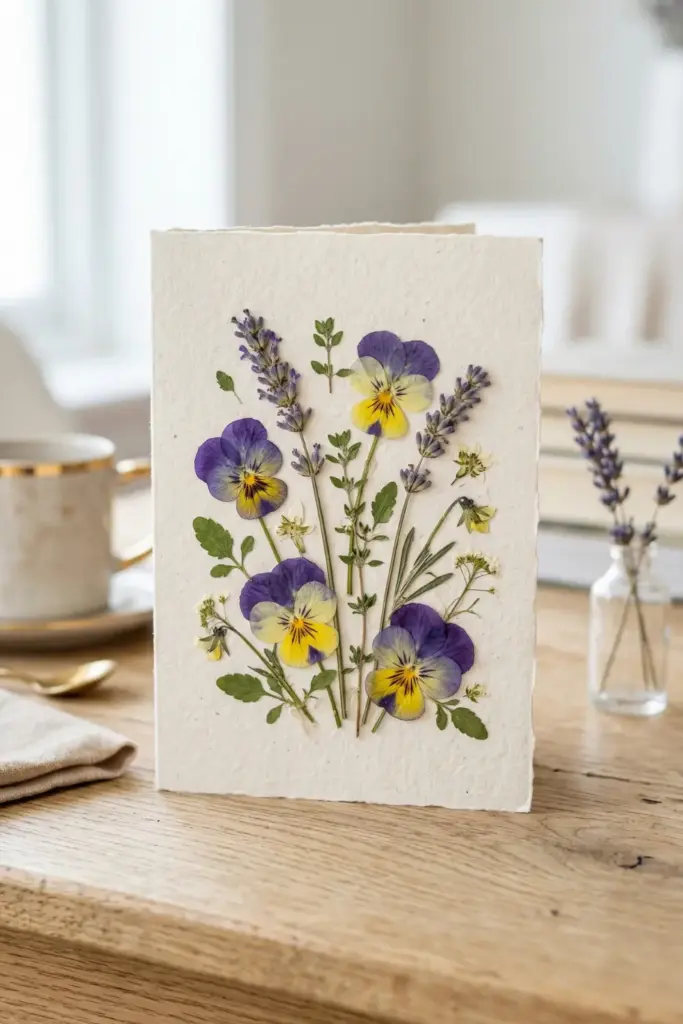
I find that nothing beats the timeless beauty of real nature.
You just need to raid your garden (or the neighbor’s garden; I won’t tell). Press some tiny blossoms between heavy books for a few days first.
Glue them onto high-quality cardstock in a minimalist pattern.
This design screams sophistication and thoughtfulness.
Does Mom appreciate elegance?
This card delivers exactly that without requiring a fine arts degree.
- Pick vibrant colors like pansies or lavender.
- Use clear-drying glue to avoid messy spots.
- Add a handwritten note to finish the look.
2. The Geometric Washi Tape Delight
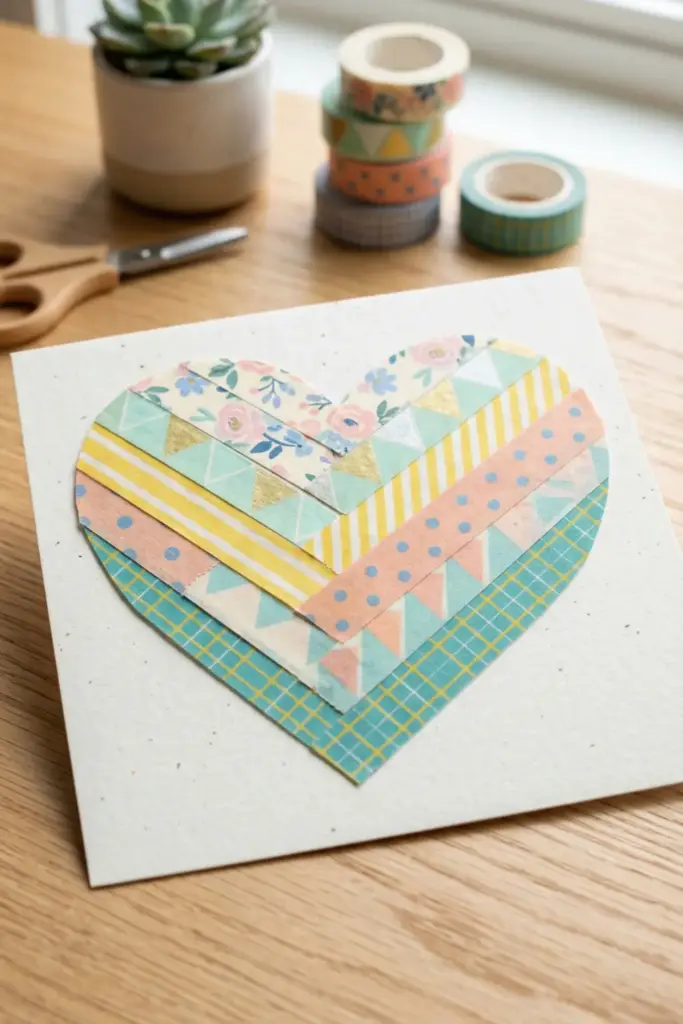
Washi tape is basically cheating because it makes everything look professional.
I love how you can just slap down a few strips and call it “modern art.”
Create a heart shape or “MOM” using different patterns.
It’s colorful, texture-rich, and incredibly difficult to mess up.
This works perfectly for those of us who lack a steady hand with a paintbrush.
Precision matters less than color coordination here.
- Layer different patterns for a textured effect.
- Use a craft knife for perfectly clean edges.
- Stick to a color theme like pastels.
3. The Pop-Up Heart Surprise Card
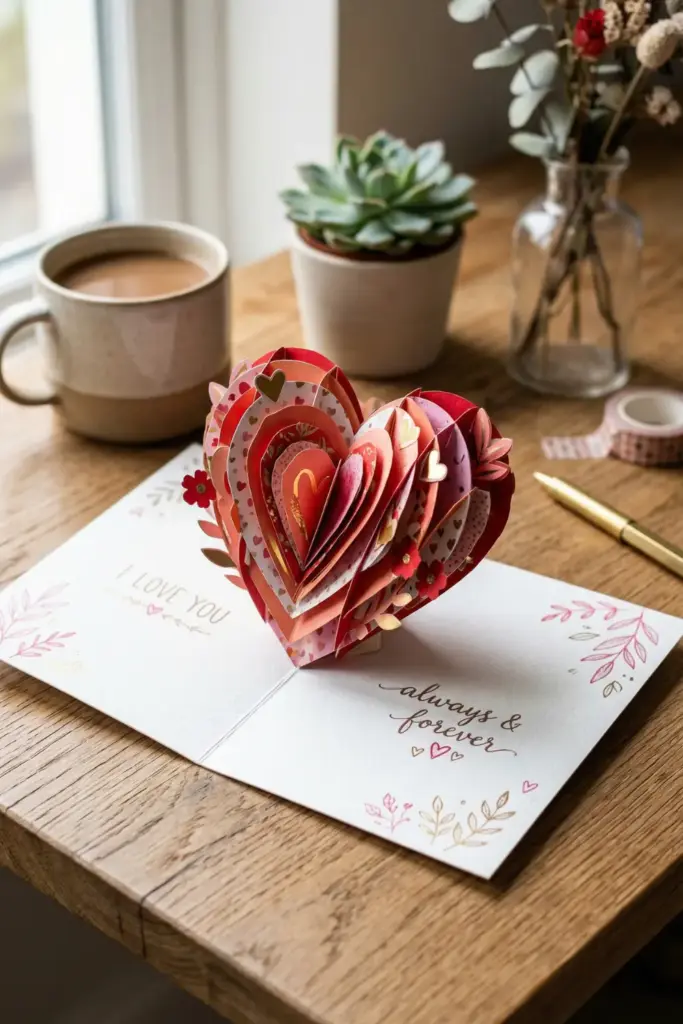
Ever wanted to impress someone with engineering” skills?
A pop-up card looks way more complicated than it actually is.
You just need two pieces of paper and a few strategic snips.
When Mom opens it, a vibrant 3D heart jumps out at her.
It provides a “wow” moment that flat cards just can’t achieve.
IMO, this is the gold standard for DIY cards.
- Use contrasting colors for the heart and base.
- Check your folds twice before you apply glue.
- Keep the exterior simple to hide the surprise.
4. The Button Flower Garden Greeting
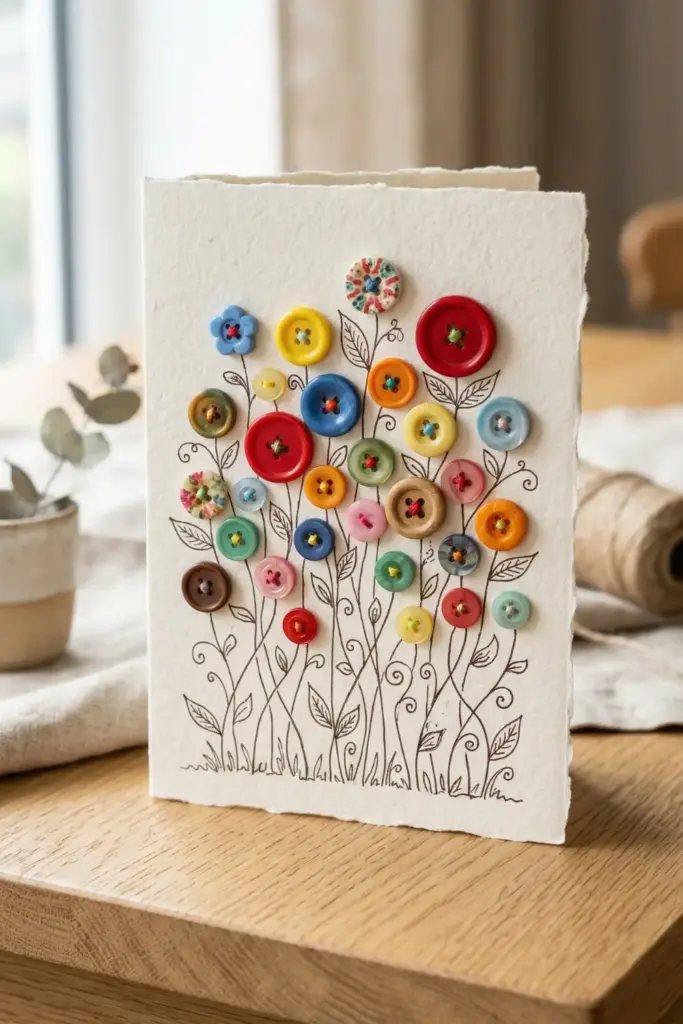
Buttons aren’t just for shirts that don’t fit anymore.
I think they make the cutest flower centers you’ve ever seen.
Glue a few colorful buttons onto the card and draw simple stems and leaves beneath them.
It adds a playful 3D element that catches the light.
This project works great if you have a random jar of buttons lying around.
Moms love a bit of whimsical charm!
- Mix different sizes for a natural garden look.
- Use strong liquid glue to keep buttons secure.
- Draw curly stems for an extra cute vibe.
5. The Watercolor Abstract Bloom Card
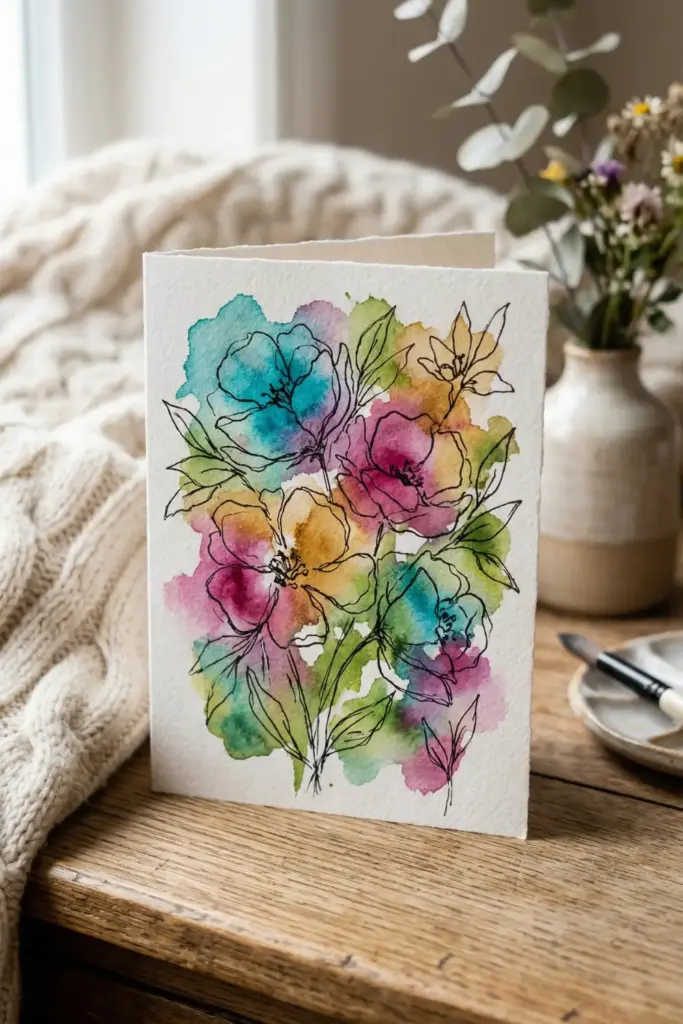
You don’t need to be Van Gogh to pull this off.
I usually just splash some water and paint onto thick paper and let the colors bleed together.
Once it dries, use a black fine-liner pen to draw rough flower outlines over the blobs.
The “messy” look is actually the goal here.
It looks artistic and intentional rather than accidental. Plus, every single card turns out thoroughly unique.
- Use heavy watercolor paper to prevent warping.
- Wet the paper first for smoother color blends.
- Let it dry completely before adding pen details.
6. The String Art Heart Technique
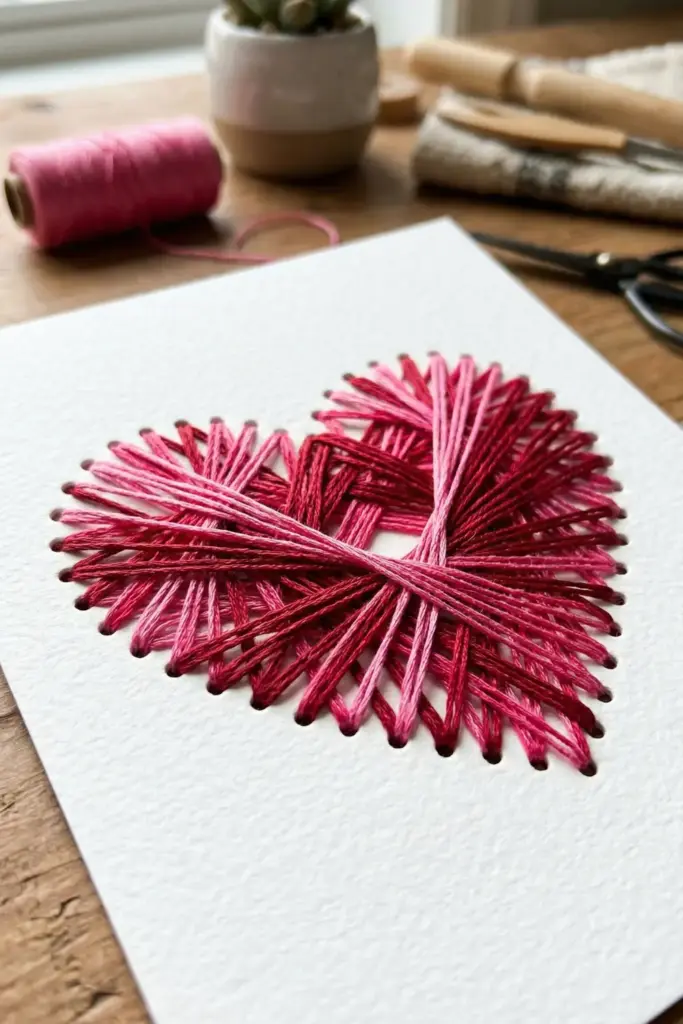
This one requires a bit of patience, but the result looks stunning.
You poke small holes in a heart shape and weave embroidery floss through them.
It creates a geometric, tactile pattern that people frequently buy on Etsy for twenty bucks.
I suggest using a bright pink or deep red thread against a white background.
It feels sturdy, professional, and very “craft fair chic.” FYI, your fingers might get a little tired.
- Space your holes evenly using a ruler.
- Use a thick needle to avoid tearing the paper.
- Tape the thread ends on the inside.
7. The Tea Bag Holder Pocket Card
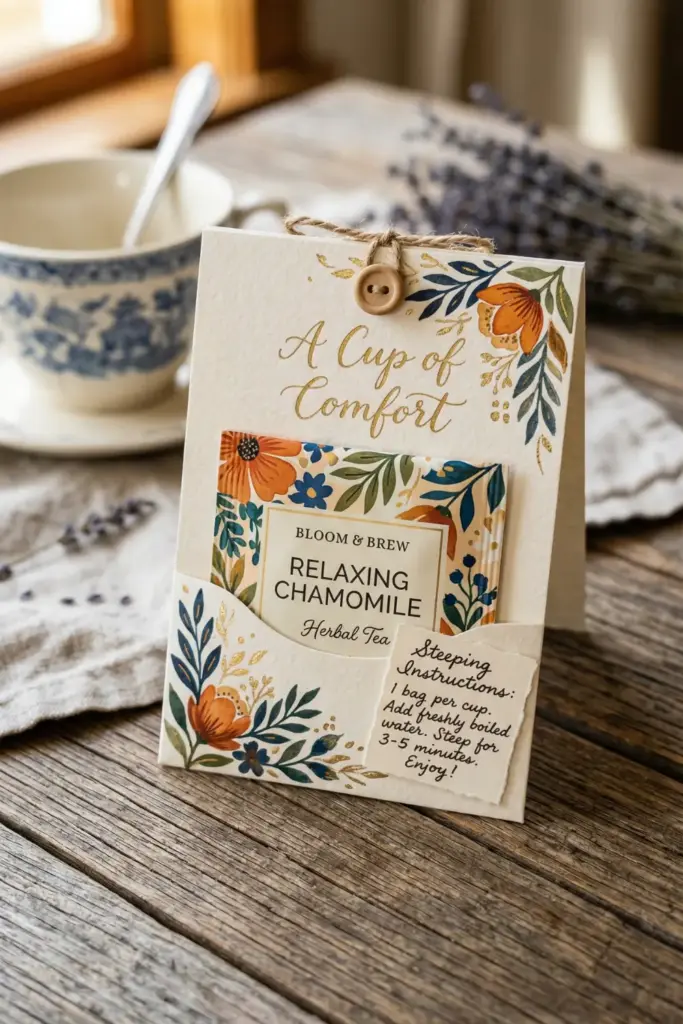
Is your mom a tea fanatic? This card doubles as a gift, which is a total win-procrastination move.
Pocket all the “pocket” onto the front of the card and tuck in her favorite tea blend.
I love adding a pun like “You’re terrific” because I enjoy making people cringe slightly.
It’s functional, cute, and practical. She gets a card and her afternoon caffeine fix all in one go.
- Choose a pretty tea wrapper that matches the card.
- Secure the pocket edges with double-sided tape.
- “Steeping” tiny instruction note inside.
8.“Mom” Mom” Embroidered Script Card
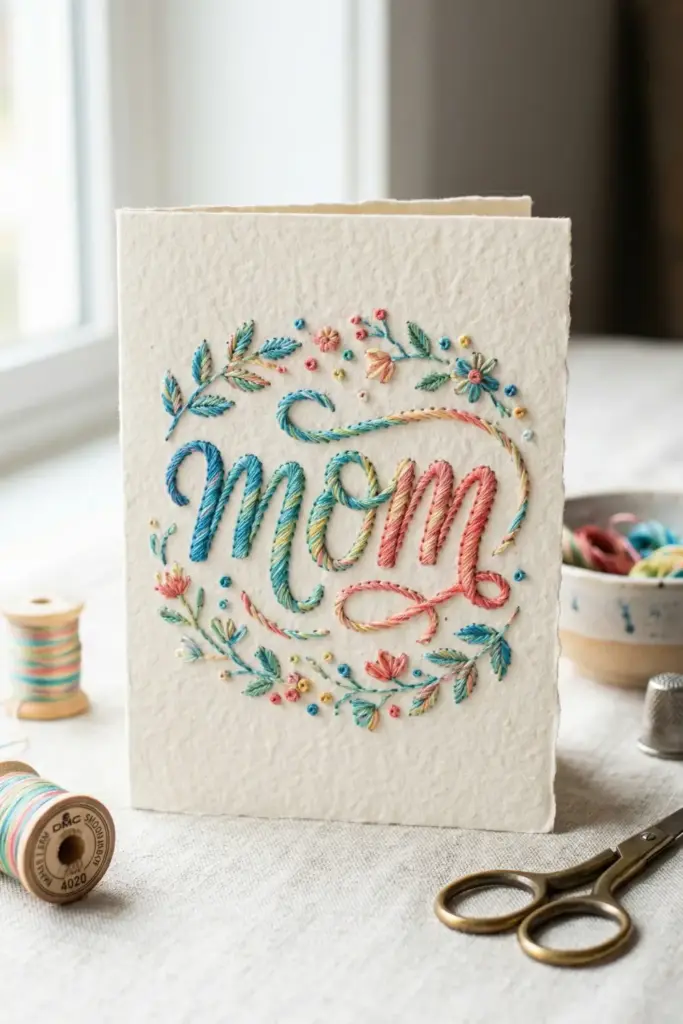
If you can sew a “write,” you can “write” with thread.
Lightly write the word “Mom” in cursive and then stitch over it with colorful yarn or floss.
I find that the raised texture of the thread adds a premium feel.
It’s like a hug for her eyes. Select a thick cardstock so the paper doesn’t rip while you work.
This card looks like it took hours, even if it only took twenty minutes.
- Poke holes first to make the sewing easier.
- Use variegated thread for a cool color-change effect.
- Knot the thread tightly on the back side.
9. The 3D Paper Bouquet Card
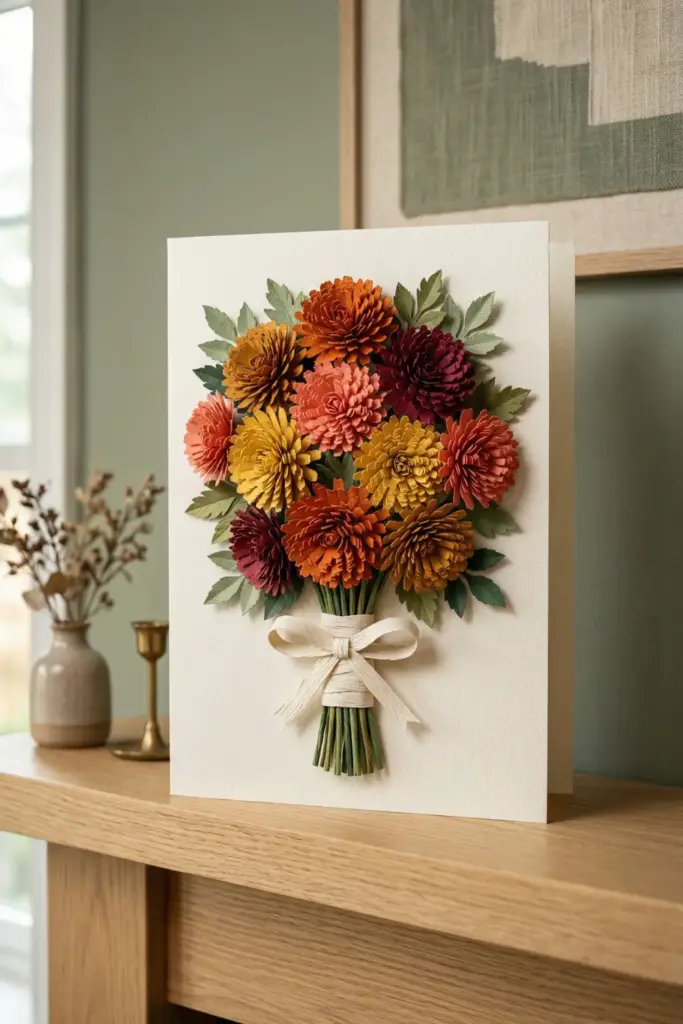
Why give Mom flowers that die in three days? I prefer making paper ones that last forever.
Cut out several small paper circles and fringe the “edges“ to create “mums.”
Glue them in a cluster on the front of the card to create a bursting bouquet.
It looks incredible on a mantel and never needs watering.
This design adds shelf presence to her Mother’s Day display.
- Crumple the paper slightly for a realistic petal tex“ribbon”
- Add a paper “ribbon” around the flower stems.
- Use different shades of green for the leaves.
10. The Polaroid Memory Snapshot Card
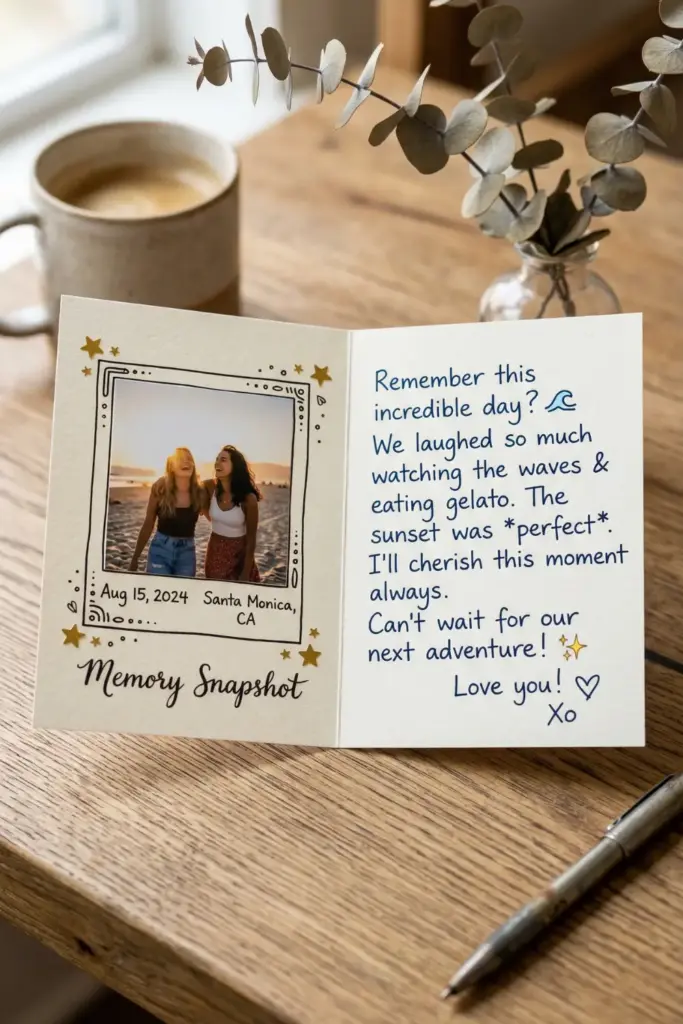
Nothing triggers the waterworks like a good old-fashioned memory.
I like to glue a small photo of us “Polaroid-style” and draw a frame around it.
It turns a simple card into a portable photo frame.
You can write the date and location at the bottom of the frame for that nostalgic touch.
It’s simple, effective, and focuses entirely on your relationship.
This one usually gets the best reaction.
- Use a high-quality photo print for the best look.
- Write a specific memory on the inside page.
- Decorate the frame corners with tiny gold stars.
11. The Coffee Filter Butterfly Card
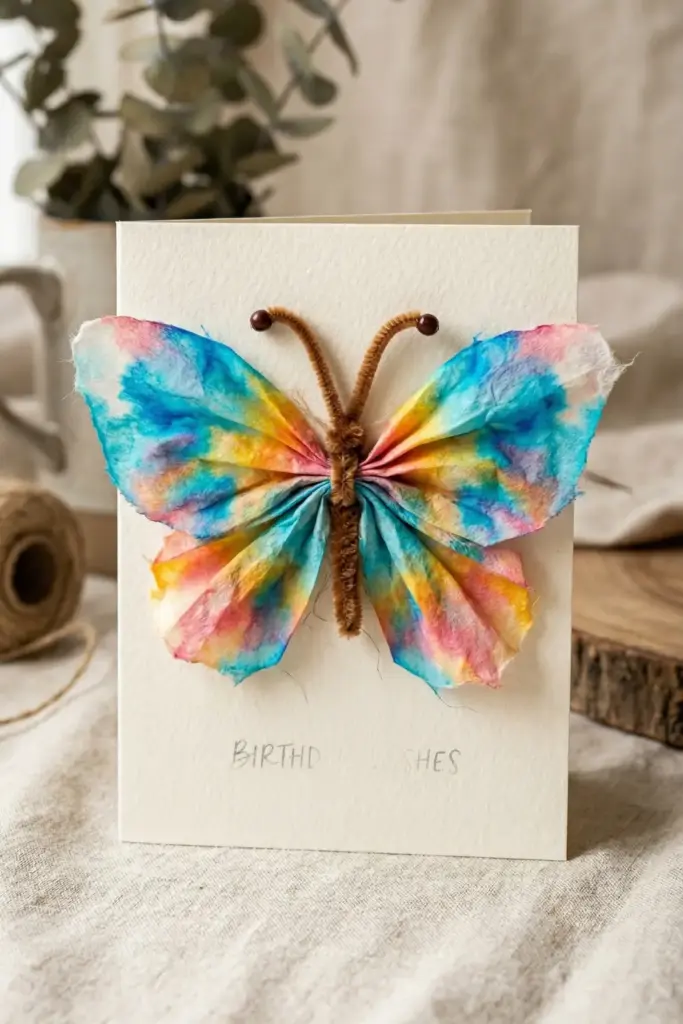
Do you have coffee filters and markers?
Then you have a card. I love coloring the filters and spraying them with water to make the ink spread.
Once dry, pinch the center with a pipe cleaner to create a vibrant, translucent butterfly.
Glue it to your card base for a light, airy decoration.
It’s a classic craft that actually looks quite sophisticated when you use the right colors.
- Use washable markers for the best color spread.
- Wait for the filters to dry before assembly.
- Bend the pipe cleaner antennae for extra personality.
12. The Minimalist Fingerprint Tree
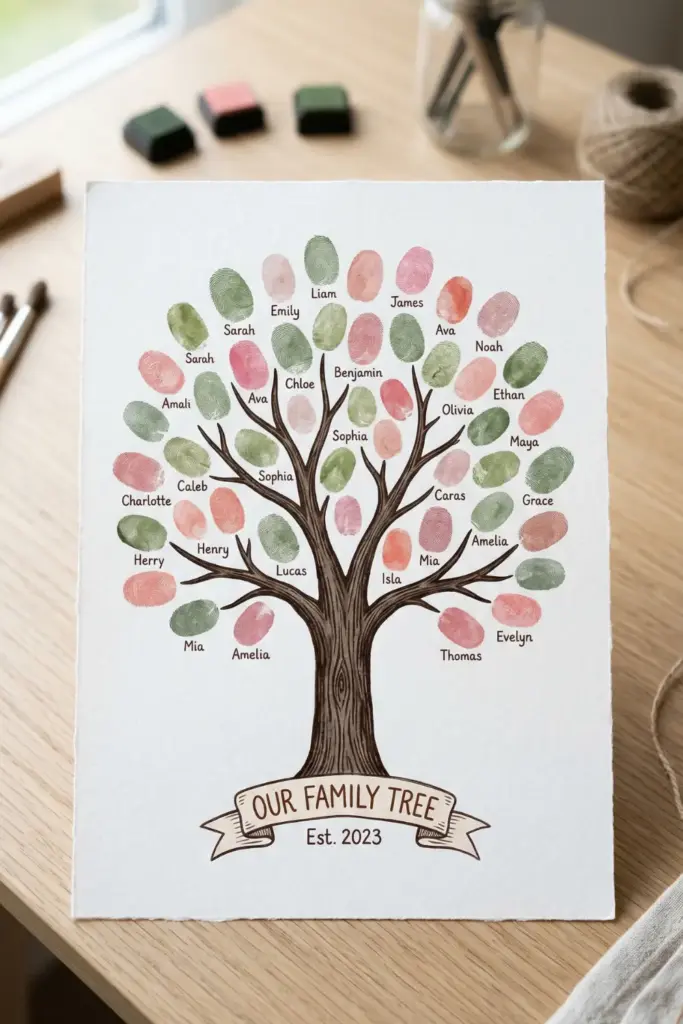
This one works incredibly well if you have kids or siblings involved.
You use your fin “leaves” to create the hand-drawn tree trunk.
I find this deeply personal because it literally carries your DNA (not in a creepy way).
It represents growth and family in a very visual way.
Mom will love seeing the “leaves” in sizes of the leaves from all her branches.
It’s a sentimental powerhouse.
- Use multiple shades of green or pink ink.
- Label each fingerprint with the person’s name.
- Draw a sturdy trunk to symbolize Mom’s strength.
13. The Elegant Origami Fold Card
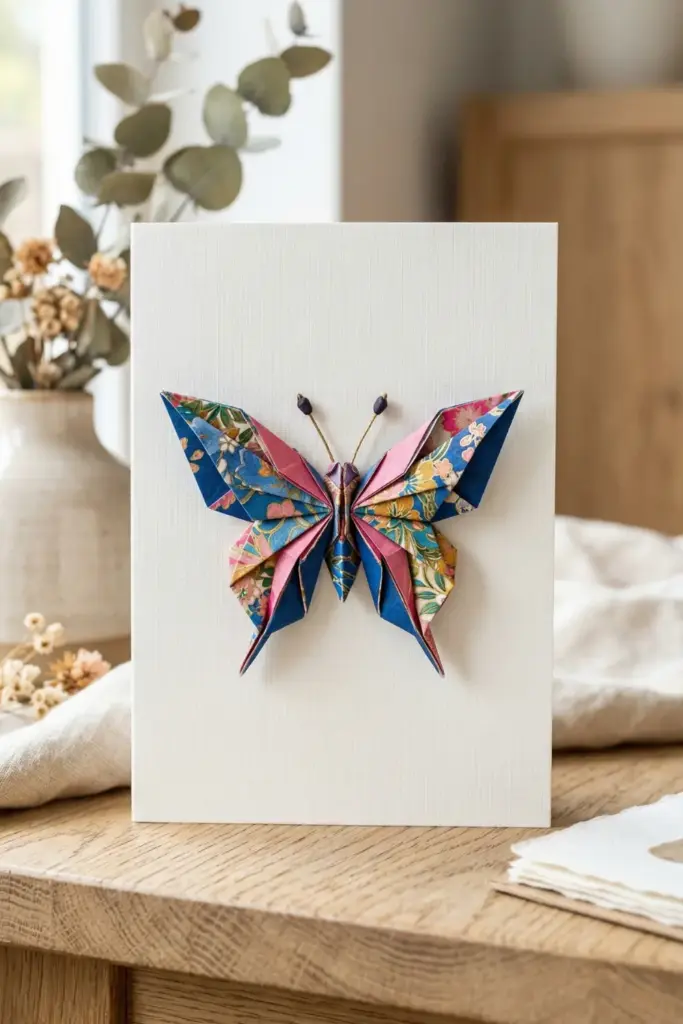
Origami isn’t just for paper cranes.
I like folding a simple butterfly or flower and mounting it to the center of a plain card.
The clean lines and sharp folds provide a very professional aesthetic.
It strongly suggests that you have precision and patience.
You don’t need glue for the origami itself, just a tiny dab to stick it to the card.
It’s a very “classy” way to say “I love you.”
- Use double-sided origami paper for extra color.
- Follow a tutorial closely to ensure crisp edges.
- Keep the background white to let the fold pop.
Choosing the Right Supplies for Success
You cannot build a masterpiece on flimsy printer paper.
I always suggest buying a pack of heavyweight cardstock from a craft store.
It handles glue and ink without turning into a soggy mess.
Furthermore, grab some double-sided tape because liquid glue often warps the paper.
Having the appropriate tools makes the process fun rather than frustrating.
Don’t let a “glue-tastrophe” ruin your afternoon of crafting!
- Invest in sharp scissors for clean, professional cuts.
- Use archival-quality pens so the ink never fades.
- Keep a damp cloth nearby for sticky finger emergencies.
Writing a Message That Doesn’t Suck
The front looks great, but the inside matters too.
I avoid those cheesy, rhyming poems at all costs.
Instead, mention a specific memory or something you appreciate about her.
Does she make the best lasagna? Does she always answer your frantic 11 PM phone calls? Tell her that!
A few honest sentences beat a Hallmark poem every time.
Keep it real, keep it sweet, and maybe add a little joke.
- Mention a specific inside joke you both share.
- Thank her for something specific she did recently.
- Keep your handwriting neat and legible for her.
Mastering the Art of the Envelope
The envelope is the first thing she sees, so don’t ignore it.
I like to line the inside of the “boutique” with patterned paper for a “boutique” feel.
You can also use washi tape to seal the back instead of just licking it (gross).
If you have nice handwriting, try a bit of faux calligraphy for her name on the front.
It sets the stage for the fantastic card waiting inside.
- Use a metallic marker for a fancy address look.
- Add a small sticker near the postage stamp.
- Ensure the card fits snugly without bending corners.
Making Mom’s Day Truly Special
At the end of the day, Mom just wants to know you’re thinking of her.
Whether your card looks like a “charming” professional gallery piece or a “charming” mess, she will love it.
I’ve realized that the imperfections are what make DIY cards so special anyway.
They prove a human made it.
So, grab your supplies, clear off the kitchen table, and start creating something memorable.
You’ve got this!
Which card idea will you try first for Mom? Would you like me to help you write a heartfelt, personalized message to go inside one of these?
Best DIY Mother's Day Cards – Easy Handmade Card Ideas for Mom
Looking for the best DIY Mother’s Day cards? These simple, heartfelt handmade card ideas are perfect for kids and adults alike. From pop‑up designs to sweet messages, you’ll love making something special for mom. Save this pin for your next craft session! #DIYMotherDayCards #HandmadeCardsForMom #EasyCrafts
Pin it on Pinterest