Looking to make Mom feel special without emptying your wallet?
It’s totally doable.
Creating a beautiful atmosphere doesn’t require expensive floral arrangements or imported linens.
You just need a little creativity and a few basic supplies.
If you’re hunting for genuine Mother’s Day Decor on a Budget ideas, you’re in the right place.
Let’s look at twenty simple, cost-effective ways to dress up your space for her big day.
1. The Classic Balloon Garland
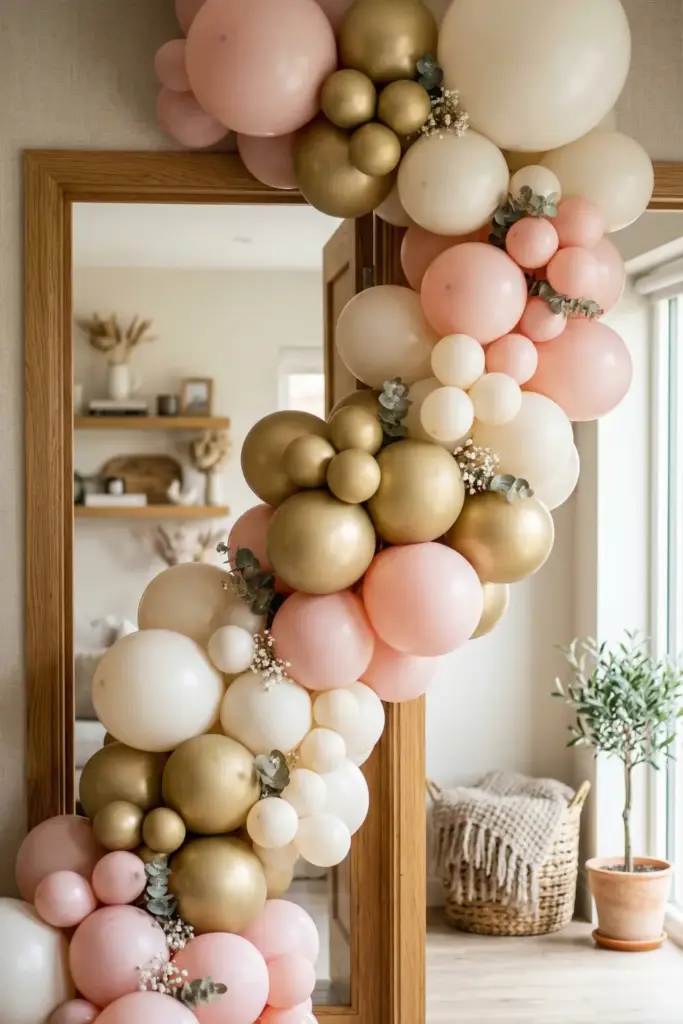
Balloons pack a massive visual punch for pennies.
You can frame a doorway or create a stunning backdrop for brunch.
It looks intricate but assembling one is mostly just tying knots.
Steps:
- Blow up balloons in three different sizes.
- Tie the knots directly to a fishing line or a plastic balloon decorating strip.
- Attach the strip to the wall using temporary adhesive hooks.
- Fill in any gaps with the smallest balloons using double-sided tape.
Tip: Stick to a maximum of three coordinating colors to keep it looking elegant rather than chaotic.
2. Upcycled Mason Jar Centerpieces
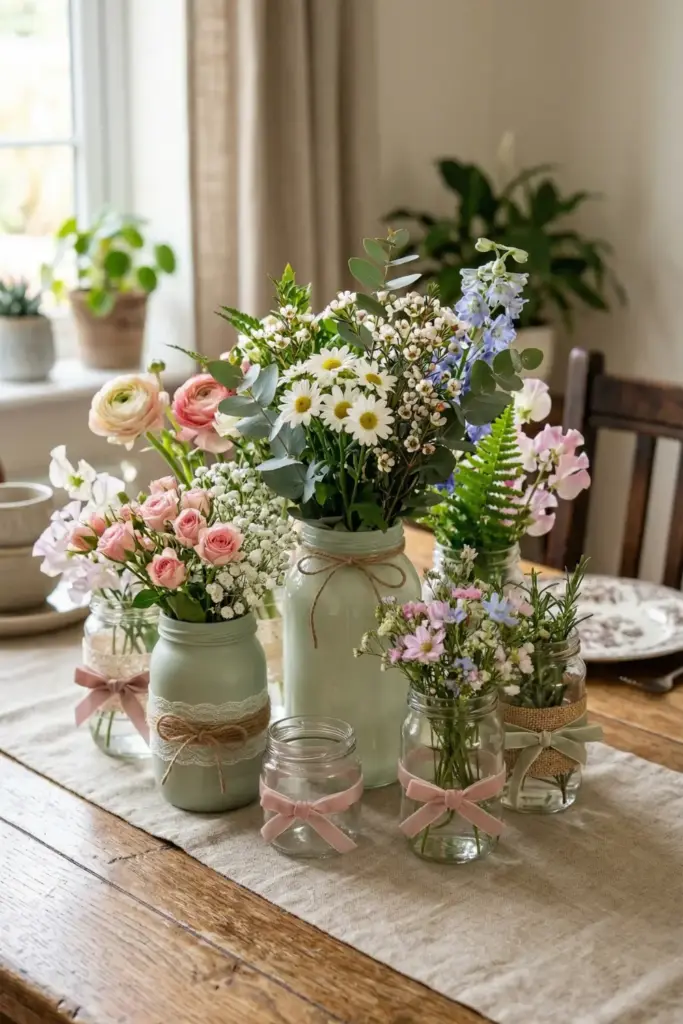
Empty jam and pasta sauce jars are essentially free vases waiting to happen.
Grouped together, they bring a charming, rustic vibe to the dining table.
Add some twine or lace and they look store-bought.
Steps:
- Clean the jars thoroughly and remove all sticky label residue.
- Wrap the center of each jar with burlap or ribbon.
- Secure the fabric with a dab of hot glue.
- Fill with water and inexpensive supermarket blooms or yard clippings.
Tip: Paint the inside of the jars with pastel acrylic paint for an opaque, shabby-chic look.
3. Nostalgic Photo Bunting
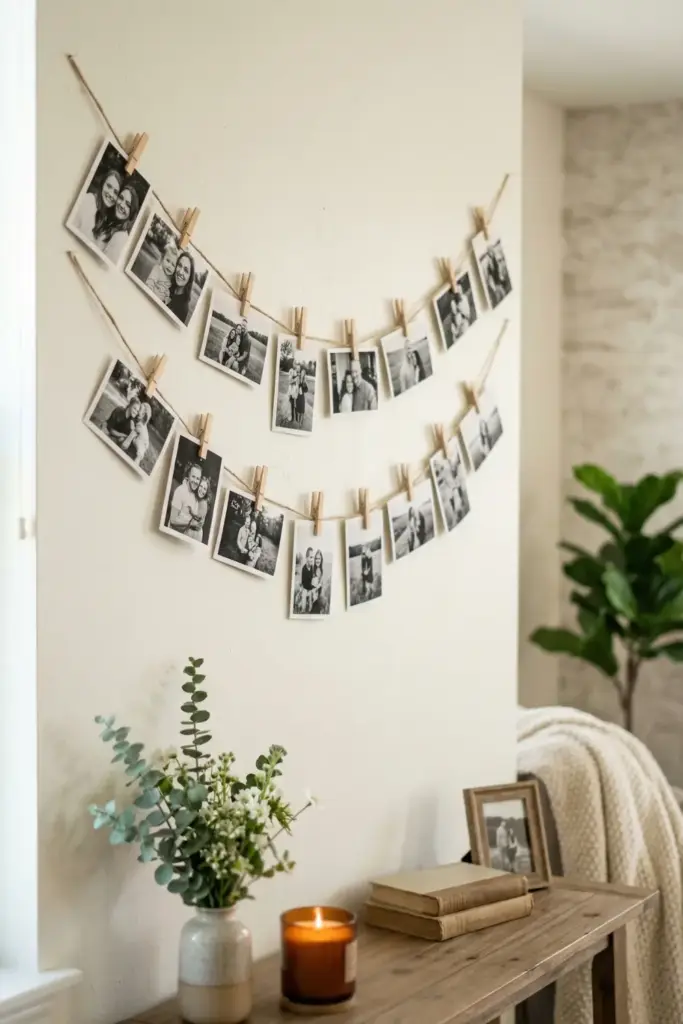
Moms usually love a walk down memory lane.
Turning family photos into a decorative banner serves as both room decor and a conversation starter during the celebration.
Steps:
- Print out 10-15 favorite family photos (black and white looks very cohesive).
- Cut a long piece of twine or thick string.
- Clip the photos to the twine using mini wooden clothespins.
- Hang the banner across a mantel or blank wall.
Tip: Leave a small blank border around the printed photos so they stand out against darker walls.
4. Tissue Paper Pom-Poms
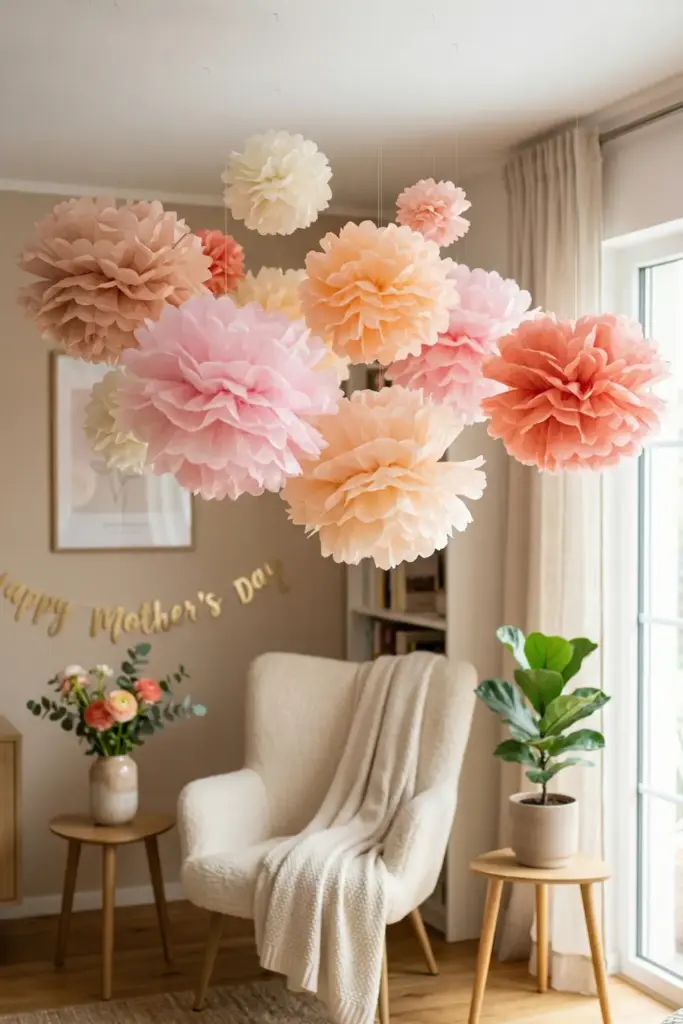
Tissue paper is incredibly cheap, yet it can transform a room when shaped into massive, fluffy pom-poms.
Hang them from the ceiling at varying heights for a whimsical, airy effect.
Steps:
- Stack 8-10 sheets of tissue paper and accordion-fold them.
- Tie a string tightly around the exact middle of the folded stack.
- Trim the ends into rounded or pointy shapes with scissors.
- Gently pull apart each layer of tissue toward the center to create the sphere.
Tip: Hang them using clear fishing line so they appear to be floating mid-air.
5. Citrus Slice Water Pitchers
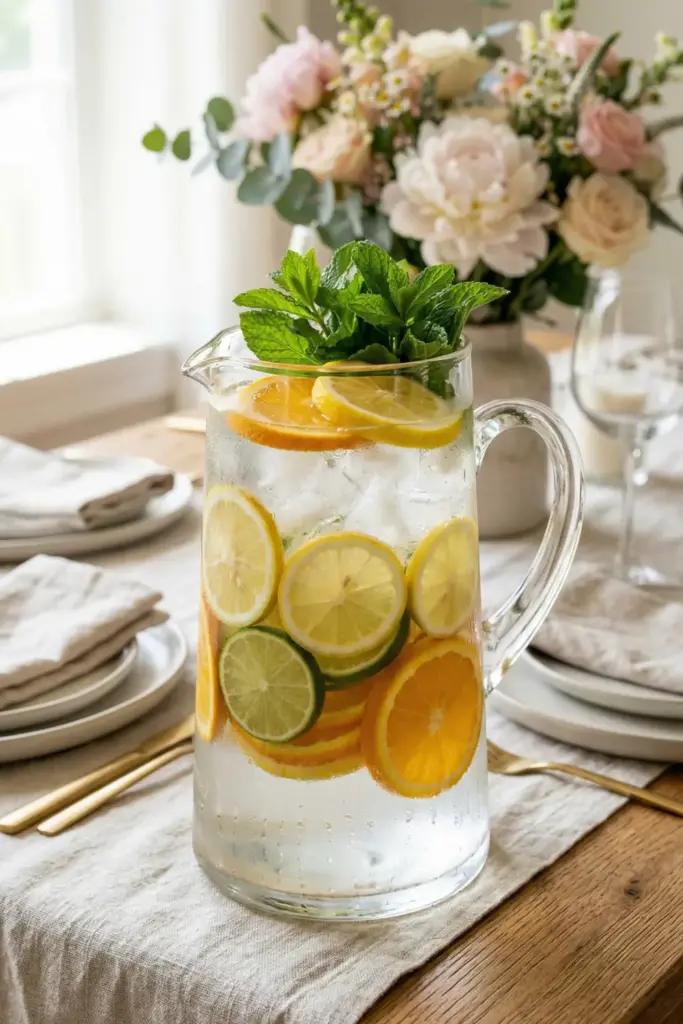
Sometimes the decor is actually the food and drink.
Clear pitchers filled with water, ice and bright fruit double as table centerpieces that look refreshing and vibrant.
Steps:
- Slice lemons, limes, and oranges into thin, even rounds.
- Layer the slices against the inside glass of a clear pitcher.
- Fill carefully with ice to hold the fruit tightly against the sides.
- Top off with water and a few sprigs of fresh mint.
Tip: Prep these right before guests arrive so the fruit doesn’t turn mushy.
6. DIY Paper Flower Backdrop
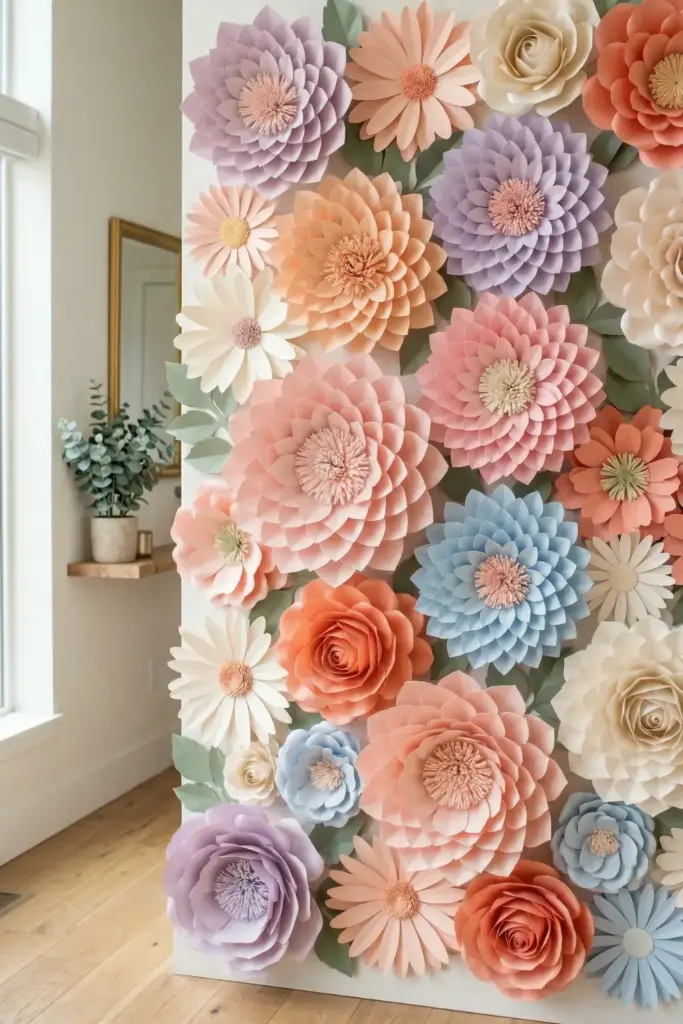
Real flowers die!
Giant paper flowers last forever and make an amazing photo booth background.
They take a bit of folding but cardstock is super cheap.
Steps:
- Cut large teardrop shapes out of colored cardstock to act as petals.
- Cut a small slit at the base of each petal and overlap the edges to create a bowl shape.
- Glue the petals in a circle onto a cardboard base, working from the outside in.
- Add a fringed paper center.
Tip: Curl the outer edges of the petals around a pencil for a realistic 3D effect.
7. Floating Candle Bowls
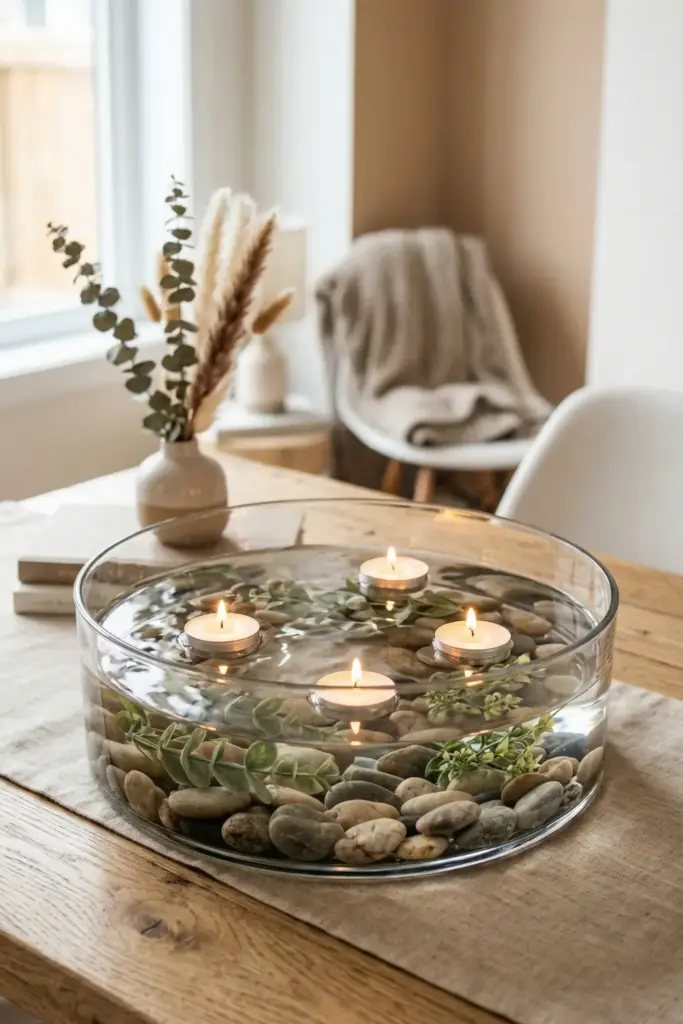
Water and candles create instant ambiance.
A wide glass bowl from the dollar store can look like a high-end spa feature with just a few natural additions.
Steps:
- Fill a large, shallow glass bowl with tap water.
- Submerge a few faux greenery leaves or smooth river stones at the bottom.
- Gently place three or four floating tealights on the surface.
- Light the candles just before Mom walks in.
Tip: Add a few drops of essential oil to the water for a subtle room scent.
8. Kraft Paper Table Runner
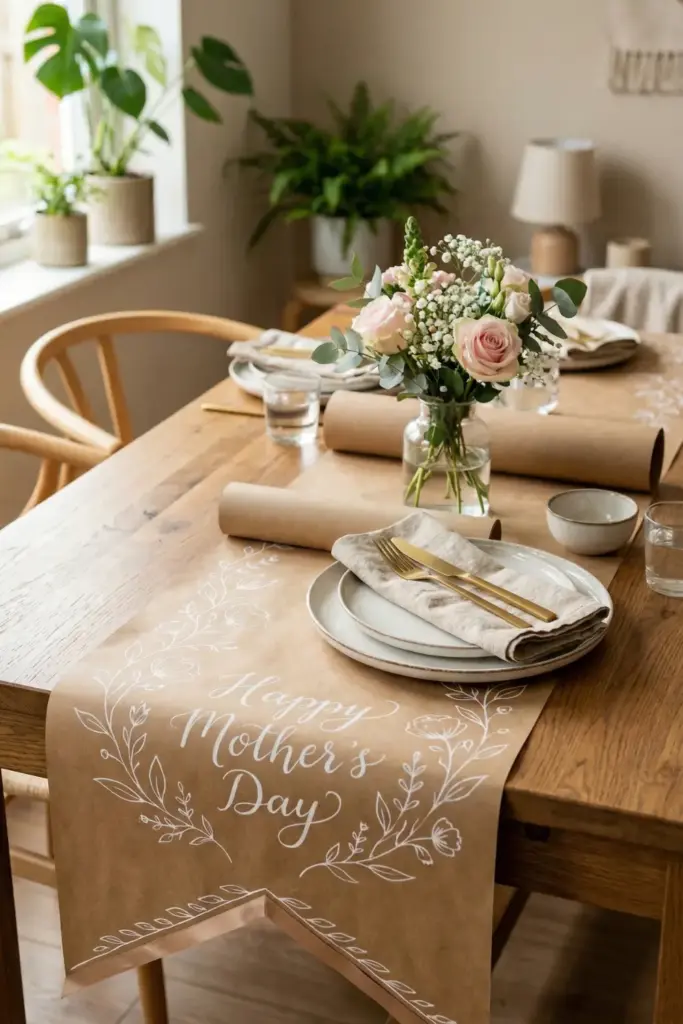
Skip the expensive linen tablecloths.
A roll of brown kraft paper is inexpensive, rustic and fully customizable.
Plus, cleanup is literally just throwing it away.
Steps:
- Roll out the kraft paper down the center of the table.
- Cut the ends cleanly or cut them into a ribbon-like “V” shape.
- Use a white paint pen to write “Happy Mother’s Day” or draw floral vines along the edges.
- Place your centerpieces directly on top.
Tip: Write each person’s name directly on the paper runner to act as built-in place cards.
9. Painted Tin Can Vases
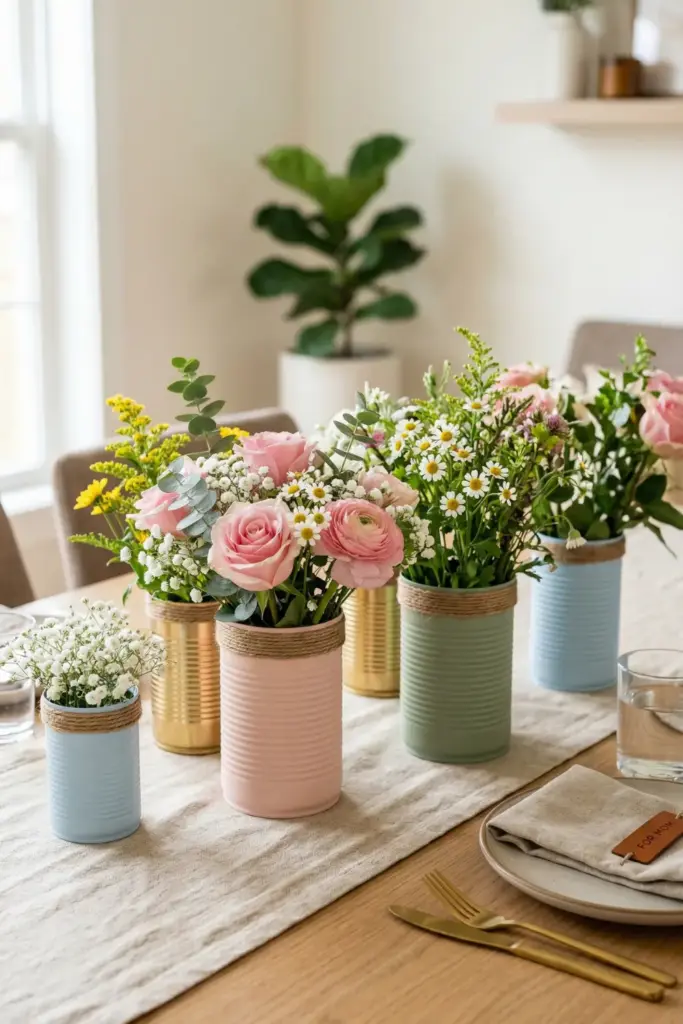
Don’t throw away those empty soup cans.
With a little effort, ribbed tin cans turn into trendy industrial-chic containers for flowers or table cutlery.
Steps:
- Wash the cans and ensure there are no sharp metal edges at the top.
- Spray paint them in matte pastel colors or metallic gold.
- Let them dry completely in a well-ventilated area outside.
- Group them in odd numbers (threes or fives) on the table.
Tip: Tie a piece of rough twine around the top rim to hide any uneven edges.
10. Origami Crane Garland
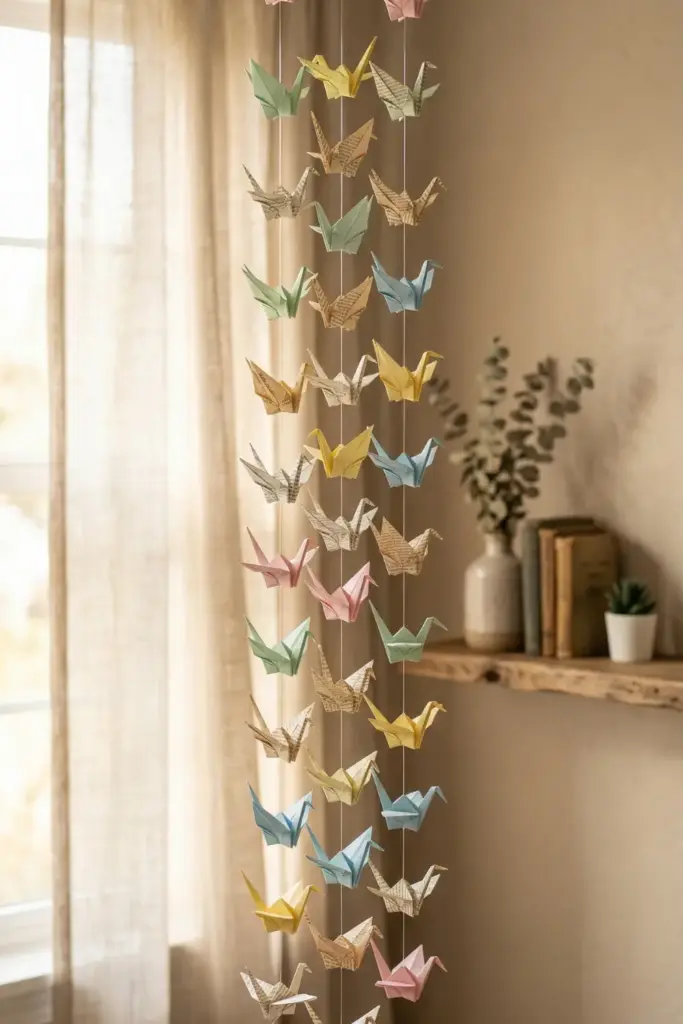
Origami paper is incredibly budget-friendly.
Folding paper cranes is a relaxing activity and stringing them together creates a delicate, elegant decoration.
Steps:
- Fold 20-30 paper cranes using square paper.
- Thread a needle with thick thread or transparent fishing line.
- Carefully push the needle through the bottom of the crane and out the top point.
- Knot the string to keep the crane in place and repeat for the rest.
Tip: Use pages from an old, damaged book instead of origami paper for a vintage, literary look.
11. Repurposed Teacup Planters
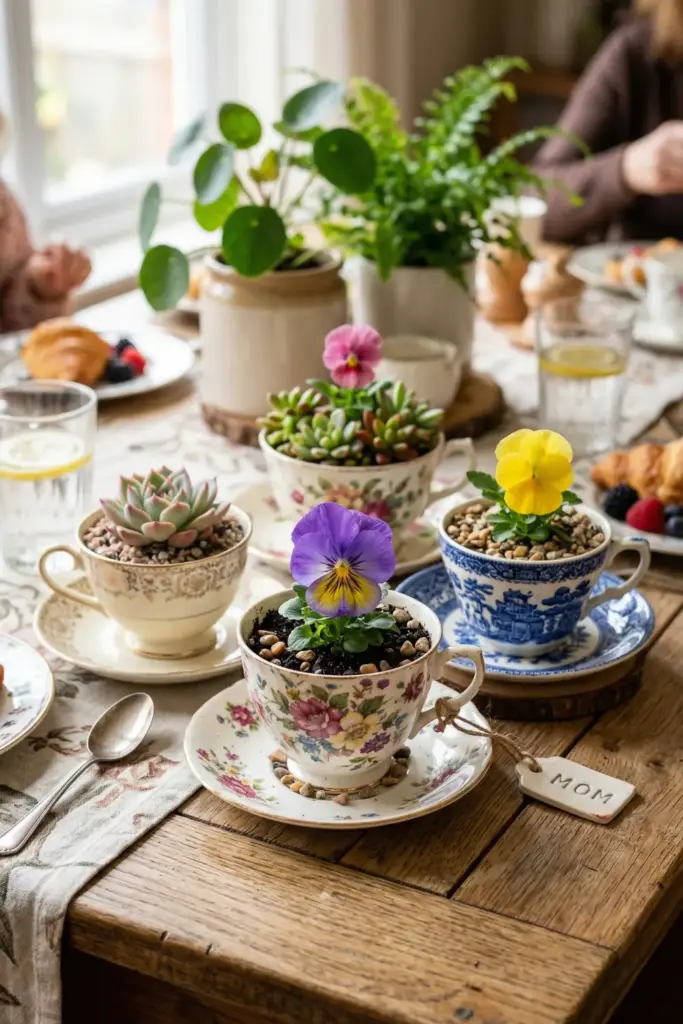
Thrift stores are usually overflowing with mismatched vintage teacups.
They cost almost nothing and make adorable mini-planters that Mom can actually keep afterward.
Steps:
- Buy a few inexpensive teacups and a small bag of potting soil.
- Place a few tiny pebbles at the bottom of the cup for drainage.
- Add soil and plant a small succulent or a bright pansy.
- Arrange them around the brunch area.
Tip: Since there are no drainage holes at the bottom, water these very sparingly using a spray bottle.
12. Washi Tape Wall Art
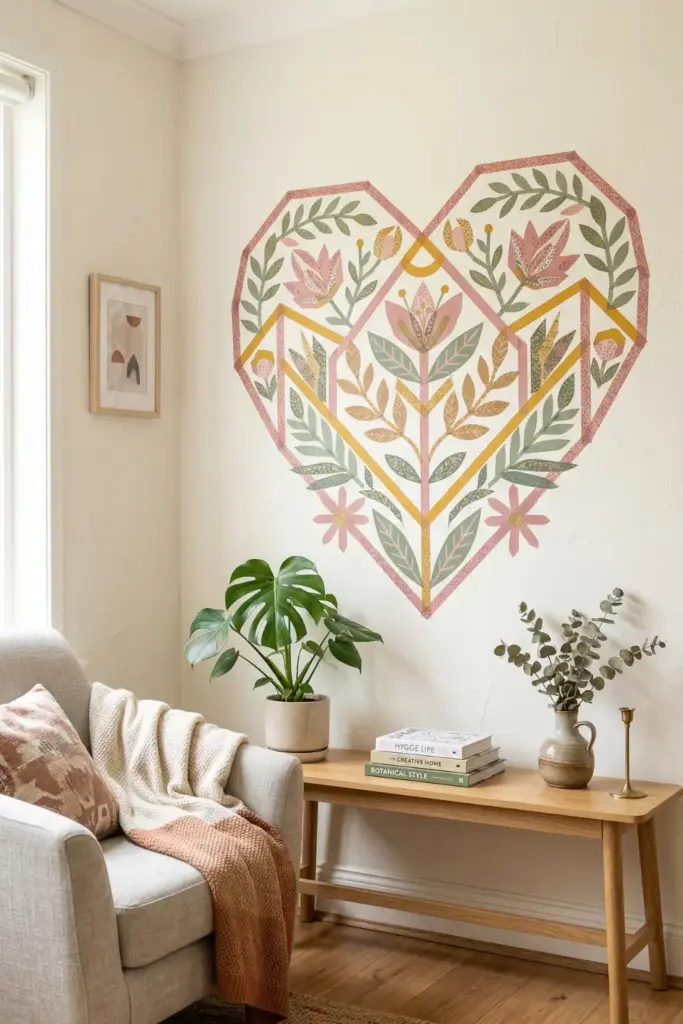
Need to dress up a blank wall fast?
Washi tape is temporary, cheap and comes in hundreds of patterns.
You can create geometric designs or faux picture frames effortlessly.
Steps:
- Choose two or three coordinating colors of washi tape.
- Map out a simple geometric heart or floral design lightly with a pencil.
- Apply the tape over the pencil lines, smoothing it flat against the wall.
- Peel it off easily when the day is done.
Tip: Use a level to make sure your straight lines are actually straight before pressing the tape down firmly.
13. The Chalkboard Welcome Sign
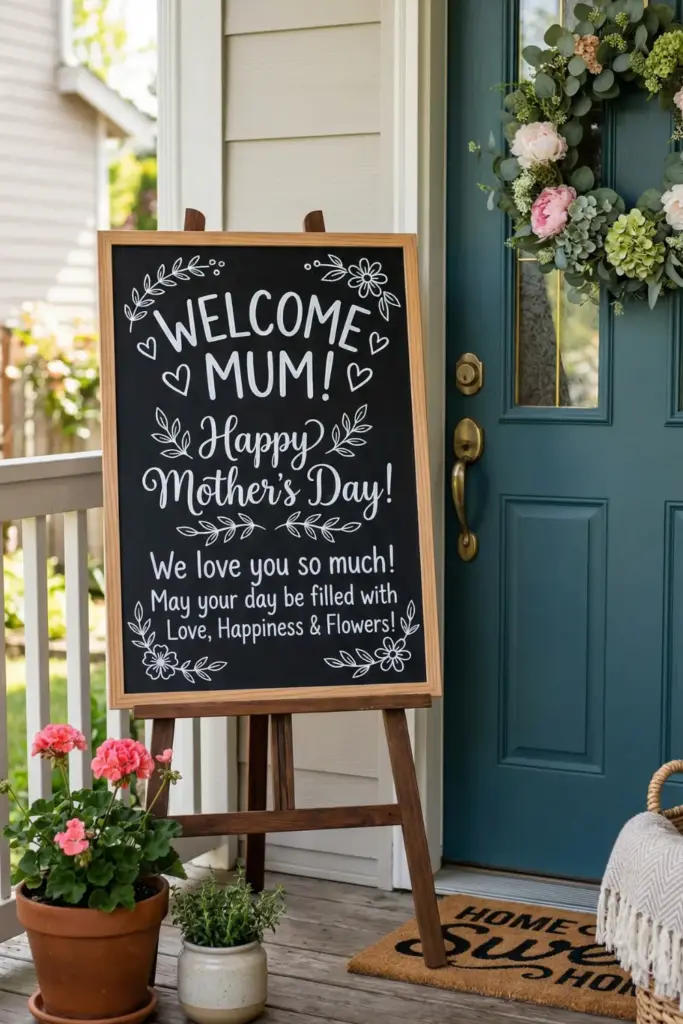
A personalized greeting sets the mood immediately.
If you have an old picture frame or a cheap piece of MDF, a little chalkboard paint goes a very long way.
Steps:
- Paint a flat piece of wood or sturdy cardboard with two coats of chalkboard paint.
- Season the board by rubbing the side of a chalk stick all over it, then wiping it off.
- Write a sweet welcome message for Mom.
- Prop it up on a chair or easel near the front door.
Tip: Dip your chalk in a tiny bit of water before writing; it goes on dim but dries bright, solid white.
14. Ribbon Chair Ties
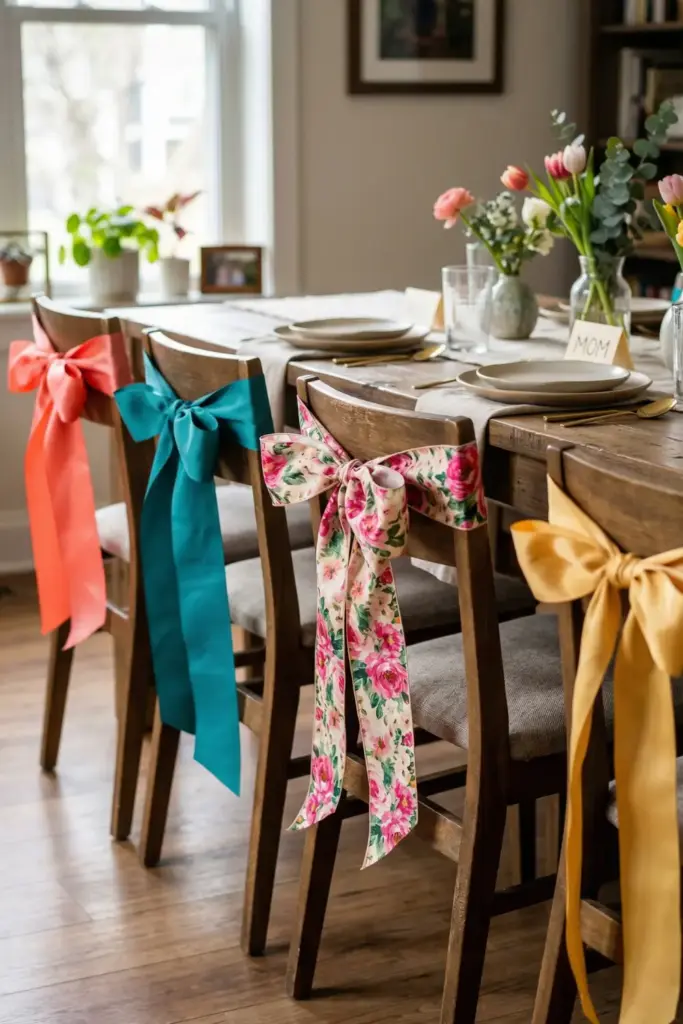
The dining chairs usually get completely ignored when decorating.
Tying ribbons to the backs of the chairs adds an instant pop of color to the dining room.
Steps:
- Buy spools of thick satin or grosgrain ribbon from the craft store.
- Cut long strips that will drape nicely down the back of the chairs.
- Tie them in large, floppy bows around the top rail of each chair.
- Trim the ends of the ribbon at a sharp angle to prevent fraying.
Tip: Use a completely different colored ribbon for Mom’s chair to make her seat stand out.
15. Foraged Branch Centerpieces
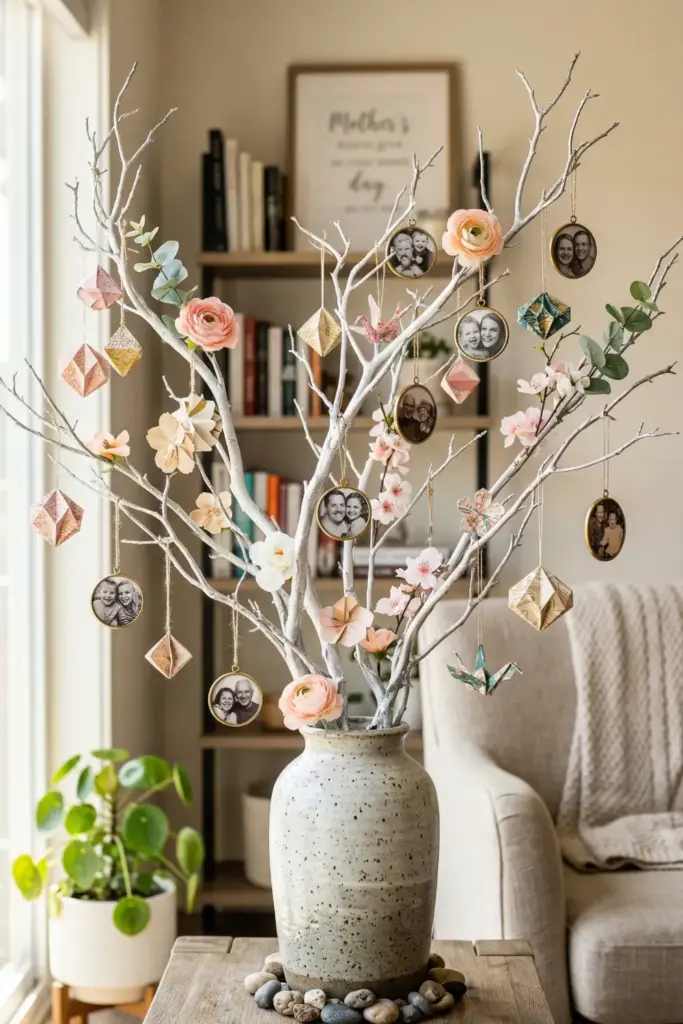
Nature provides some of the best free decor.
A sturdy, interestingly shaped branch from the yard can look stunningly modern when styled correctly.
Steps:
- Find a clean, dry branch with multiple offshoots.
- Place it in a heavy, tall vase (weigh the bottom down with rocks so it doesn’t tip).
- Hang lightweight paper ornaments, family photos or faux blossoms from the twigs.
Tip: Spray paint the entire branch white or silver for a more stylized, contemporary appearance.
16. Free Printable Quote Cards
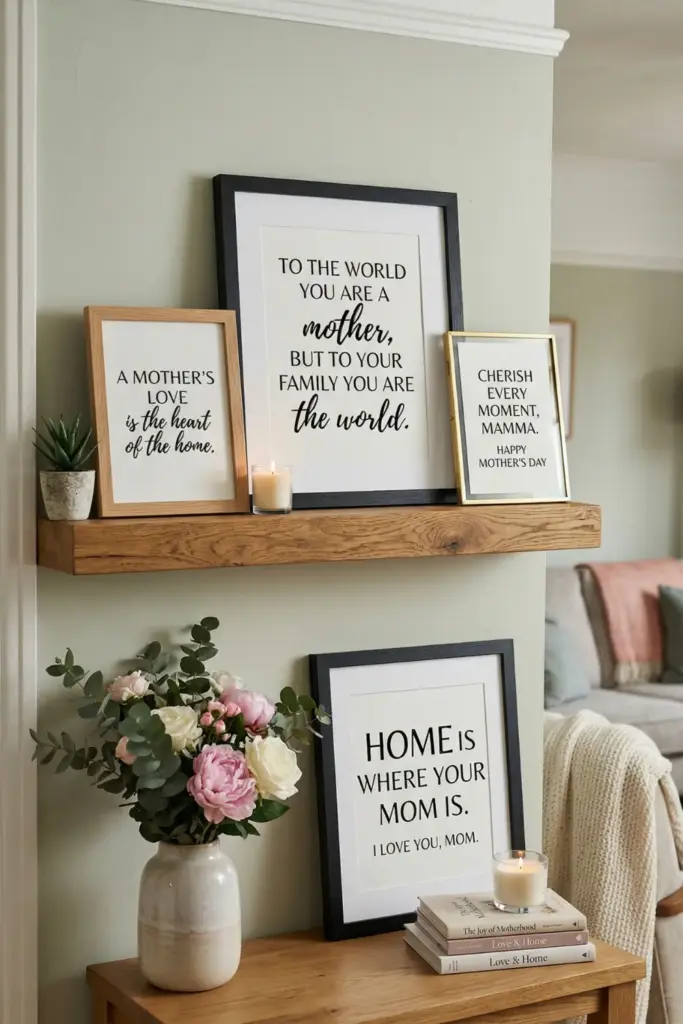
The internet is absolutely full of beautiful, free printables.
Framing sweet quotes about motherhood around the house adds a lovely sentimental touch for very little cash.
Steps:
- Search online for “free printable Mother’s Day quotes”.
- Print them out on heavy cardstock.
- Place them in frames you already own (just temporarily swap out the photos).
- Scatter them on side tables in the bathroom and on the kitchen counter.
Tip: Print them in standard sizes like 5×7 or 8×10 so they easily fit into your existing frames without trimming.
17. Painted Wine Bottles
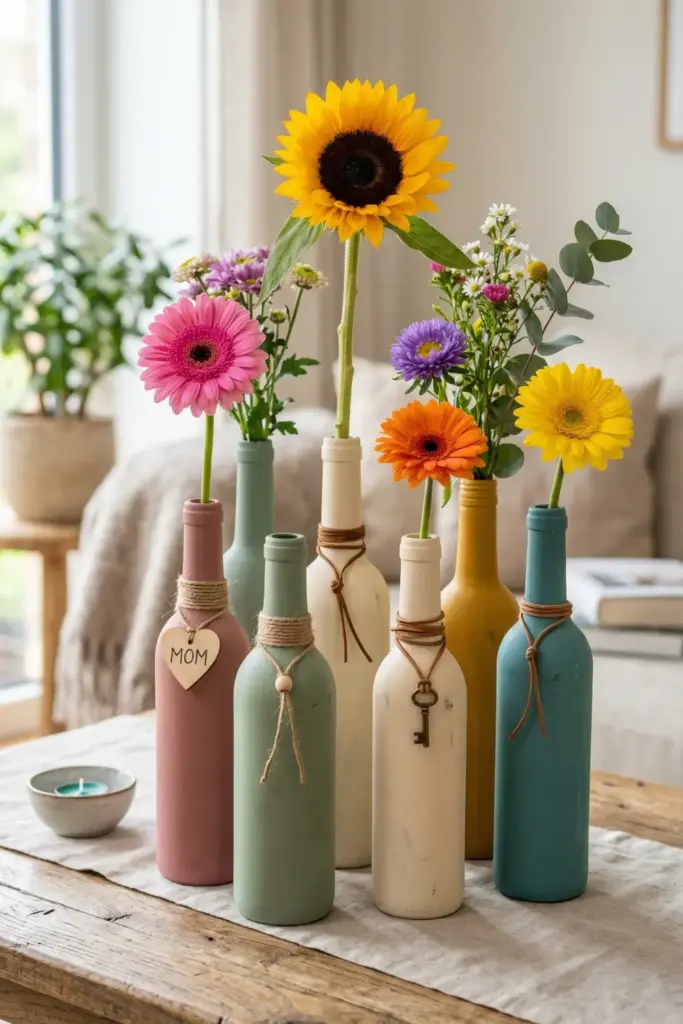
Stop tossing out those empty glass bottles.
Their tall, slender shape makes them perfect for single-stem flowers.
Grouping different heights looks fantastic.
Steps:
- Soak the bottles in hot, soapy water to easily scrub off the labels.
- Apply two coats of matte or chalk paint to the outside of the dry bottle.
- Let them dry completely between coats.
- Stick a single bright flower, like a sunflower or a gerbera daisy in the top.
Tip: Wrap the neck of the bottle in a little bit of twine or a thin leather cord to add rustic texture.
18. Crepe Paper Streamer Backdrop
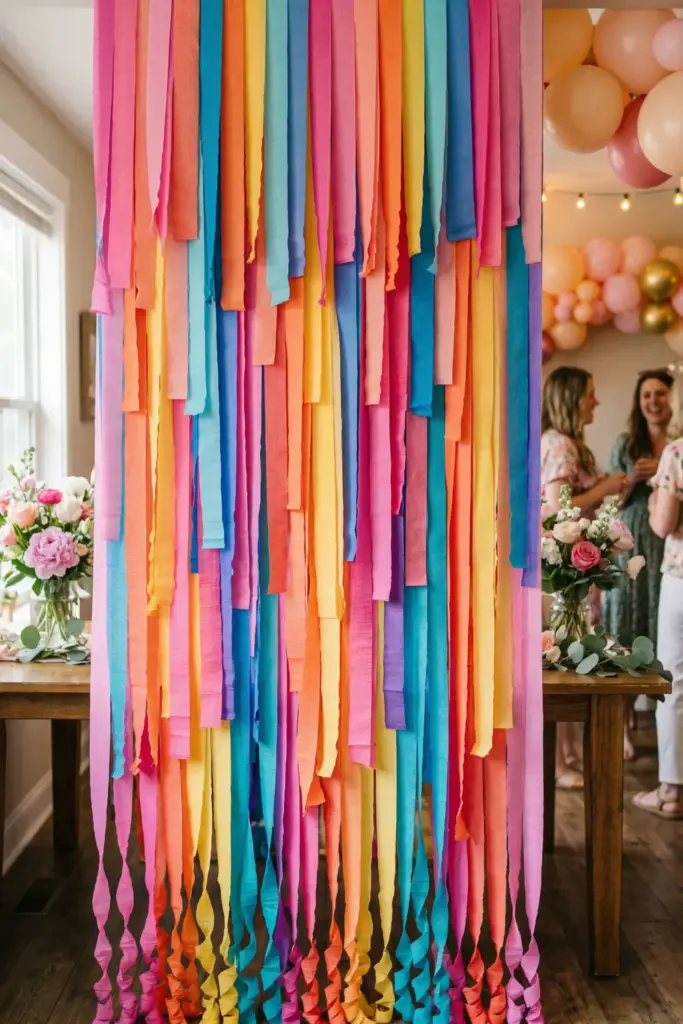
Streamers aren’t just for kids’ birthdays.
When layered vertically, they create a colorful, highly textured backdrop that completely hides a boring wall.
Steps:
- Run a string or piece of painter’s tape horizontally across the top of the wall.
- Cut long lengths of crepe paper streamers.
- Tape the top of each streamer to the horizontal line, letting them hang down to the floor.
- Overlap the colors slightly to avoid empty gaps.
Tip: Twist the streamers tightly before taping the bottom down for a textured, spiral effect.
19. Pressed Leaf and Flower Coasters
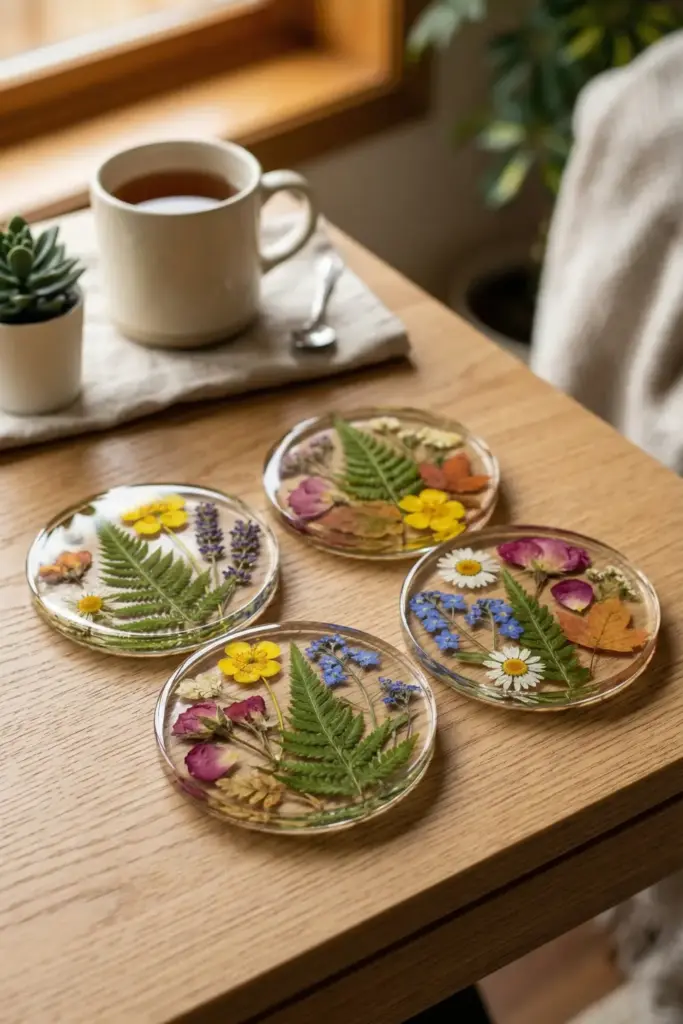
Protect the tables while adding a botanical vibe.
You can make gorgeous, temporary coasters using things you find right outside your front door.
Steps:
- Gather flat leaves or small, thin flowers from the garden.
- Cut squares of clear contact paper.
- Place the leaf on one square and carefully place another square on top to seal it.
- Trim the edges neatly with scissors.
Tip: Press the flowers inside a heavy book for a few days beforehand so they lay perfectly flat in the contact paper.
20. Layered Doily Table Setting
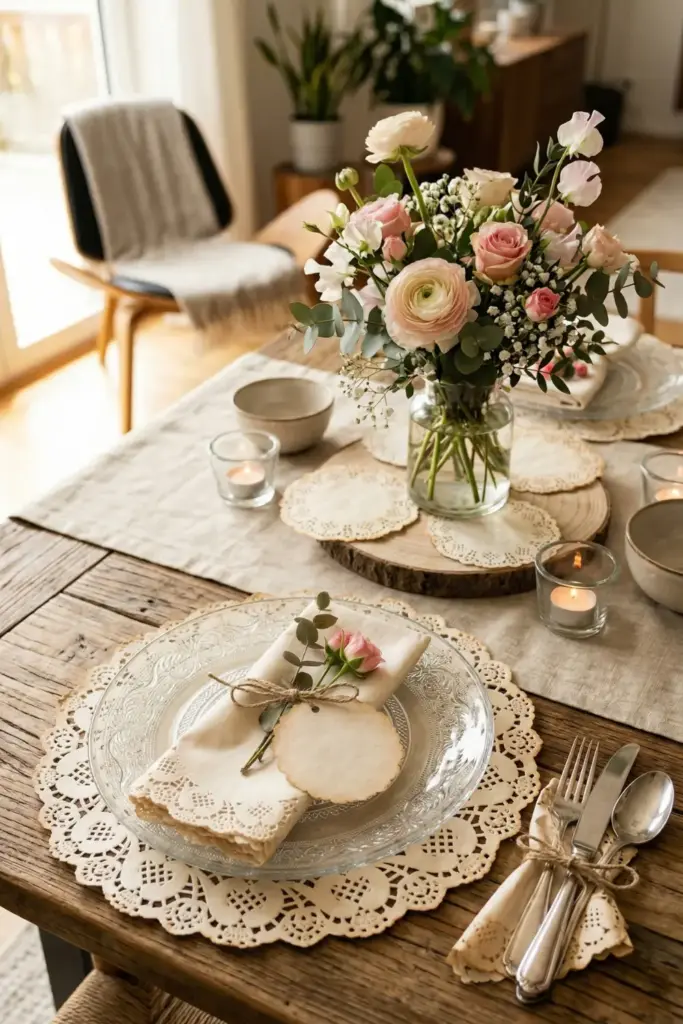
Paper doilies are incredibly cheap and instantly make a table setting feel delicate and fancy.
They are perfect for a traditional Mother’s Day brunch setup.
Steps:
- Buy a pack of large paper doilies from the dollar store.
- Place one doily under each clear glass plate to show off the lace pattern.
- Fold smaller doilies in half over the cutlery and tie them with string.
- Scatter a few extras around the centerpieces.
Tip: Lightly dye the edges of the doilies by dipping them in a shallow dish of brewed tea for an antique, vintage look.
Final Thoughts
Decorating for Mom shouldn’t cause financial stress.
The real magic happens when you put effort into the little details.
Whether you’re stringing up photos or folding paper napkins into fancy shapes, she’ll notice the time you spent creating a beautiful space for her.
Focus on what makes her smile, keep the atmosphere warm and remember that the best part of the decor is the people gathered in the room to celebrate.