Summer is basically here, and honestly?
My coffee is iced, my mood is rising, and my nails are screaming for a refresh.
We’ve all seen the neon pinks and loud oranges that usually dominate the heat, but this year, things are shifting.
There’s something so effortlessly cool—yet totally soft—about a muted palette.
If you’re looking to level up your aesthetic without looking like you tried too hard, you’re in the right place.
Pastel shades are the ultimate “clean girl” summer vibe, offering a sophisticated pop of color that works for brunch, weddings, or just scrolling through your phone at the beach.
In this guide, I’ve rounded up 20 stunning top pastel nail art trends and summer nail design ideas that will make your Pinterest boards weep.
From dreamy marbles to buttery yellows, you’ll get the exact inspo and steps needed to achieve these looks.
Let’s dive in.
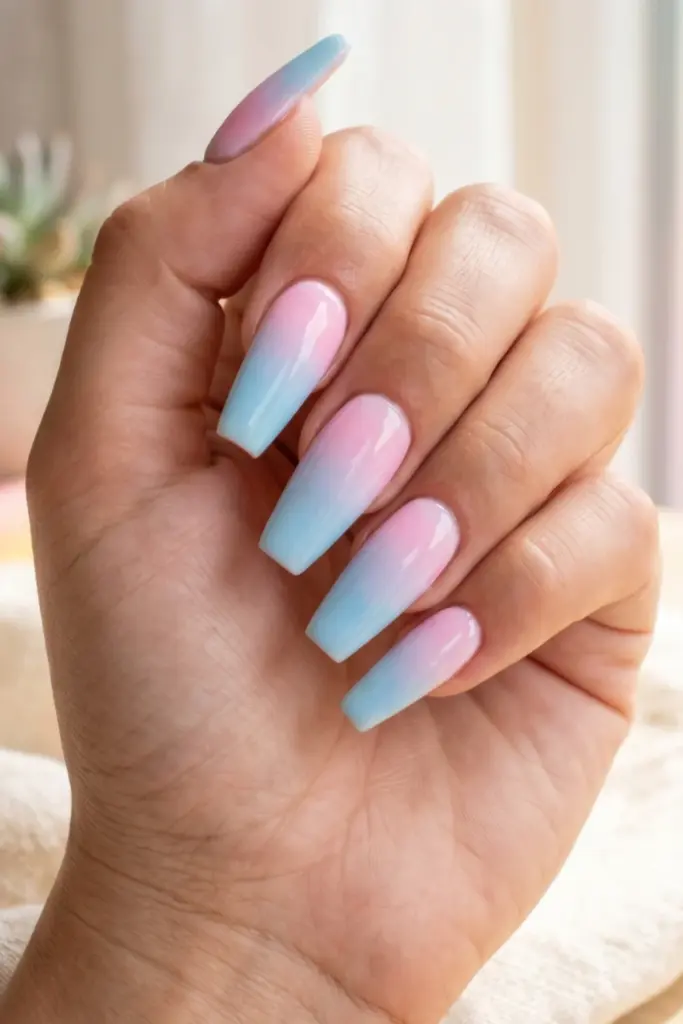
1. Cotton Candy Ombre
There is nothing quite like the whimsical blend of pink and blue to kick off the season.
It’s nostalgic, sweet, and looks incredible under the bright sun.
This look mimics a sunset without the harshness of darker tones, making your hands look soft and tanned.
- Steps:
- Apply a white base coat to make the colors pop.
- Sponge a mix of light pink and baby blue onto the center of the nail.
- Repeat until the blend is seamless.
- Seal with a high-gloss top coat.
Pro Tip: Use a latex barrier around your cuticles for an easy, mess-free cleanup.
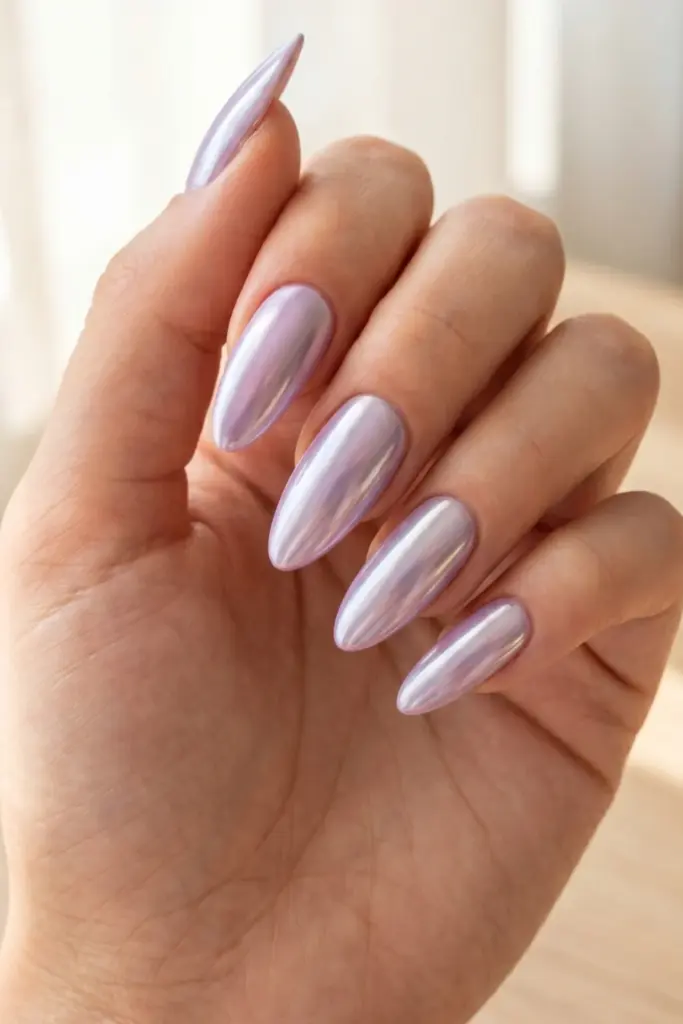
2. Lavender Chrome
Chrome isn’t just for silver anymore.
This lavender version feels futuristic but remains grounded in that soft, floral aesthetic we love.
It catches the light in a way that regular cream polishes just can’t, giving you a metallic edge that is still totally “office-appropriate.”
- Steps:
- Paint your nails a solid lavender shade.
- Apply a no-wipe top coat and cure.
- Buff in a pearl or silver chrome powder.
- Finish with one more layer of top coat.
Pro Tip: Use an eyeshadow applicator to buff the powder for the smoothest finish possible.
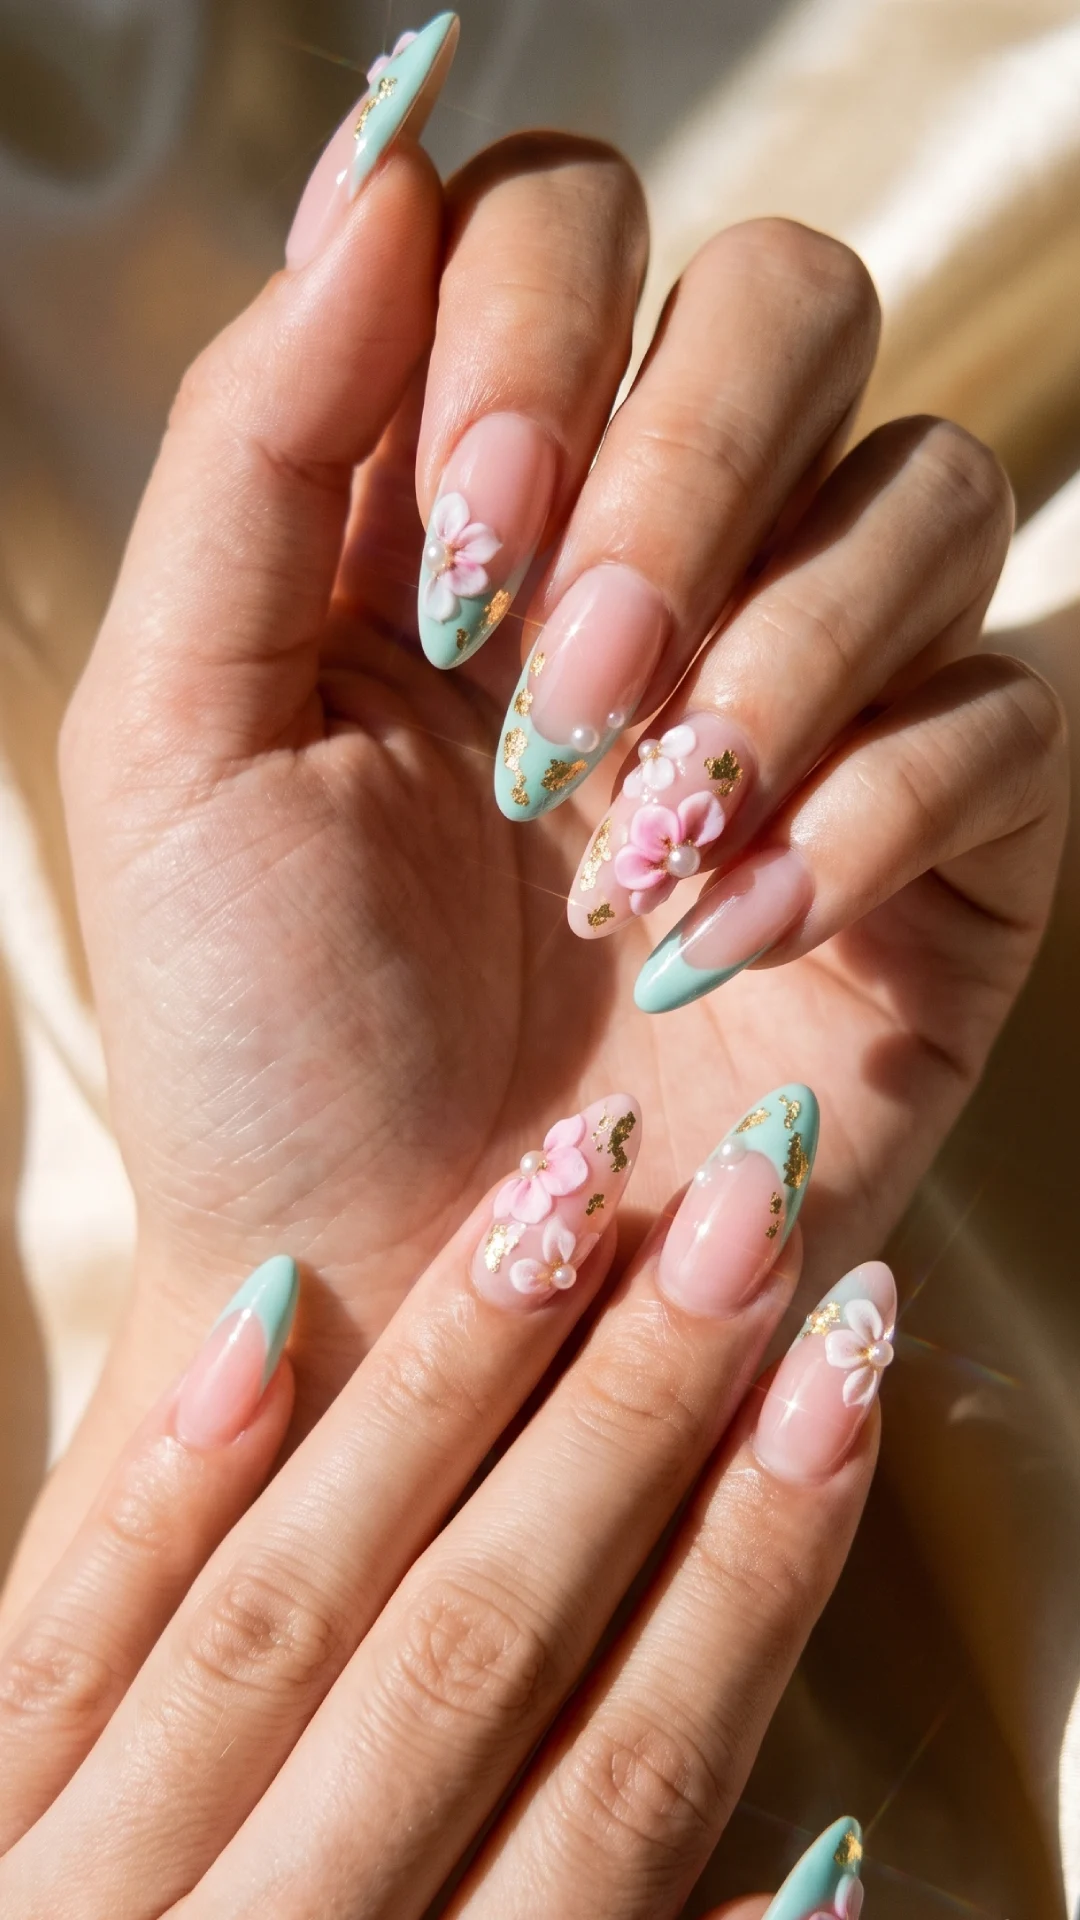
3. Mint Green French Tips
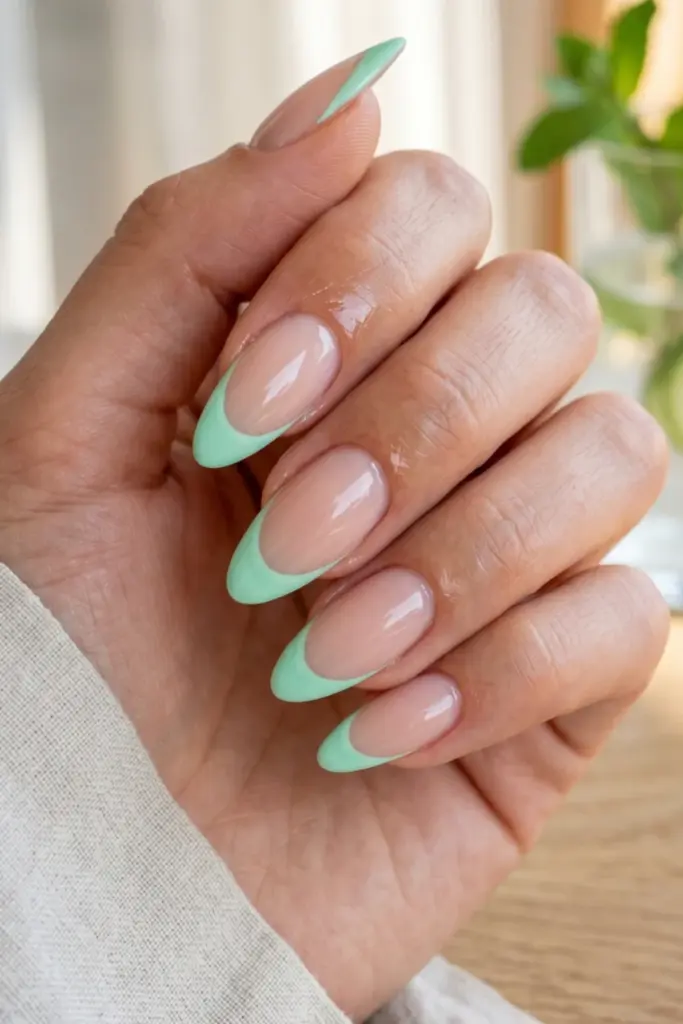
The classic French manicure just got a cool, refreshing makeover.
Mint green is the ultimate “it” color for summer because it feels crisp and clean.
By swapping out the white tips for mint, you’re adding a modern twist to a timeless silhouette.
- Steps:
- Start with a sheer nude or pink base.
- Use a thin detail brush to paint a curved mint green line at the tip.
- Clean up the smile line with a brush dipped in acetone.
- Apply a shiny top coat.
Pro Tip: If you struggle with freehanding, use French tip guides or a silicone nail stamper.
4. Butter Yellow Daisy Accents
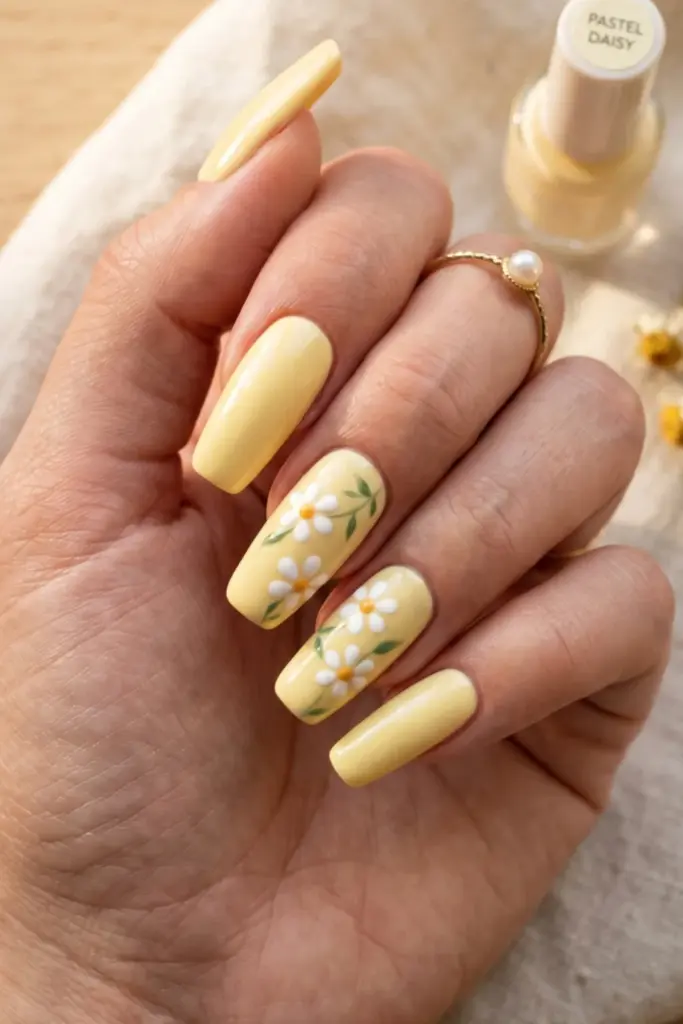
Yellow can be intimidating, but a soft butter shade is surprisingly flattering on all skin tones.
Adding tiny daisies makes it feel cottagecore-chic.
It’s basically sunshine in a bottle, and it’s impossible to look at these nails and be in a bad mood.
- Steps:
- Apply two coats of butter yellow polish.
- Use a large dotting tool to create five white dots in a circle.
- Place a tiny orange or yellow dot in the center.
- Add a matte or glossy top coat.
Pro Tip: Don’t worry about the daisies being perfect; organic shapes look more “hand-painted” and expensive.
5. Peach Matte with Pearl Dots
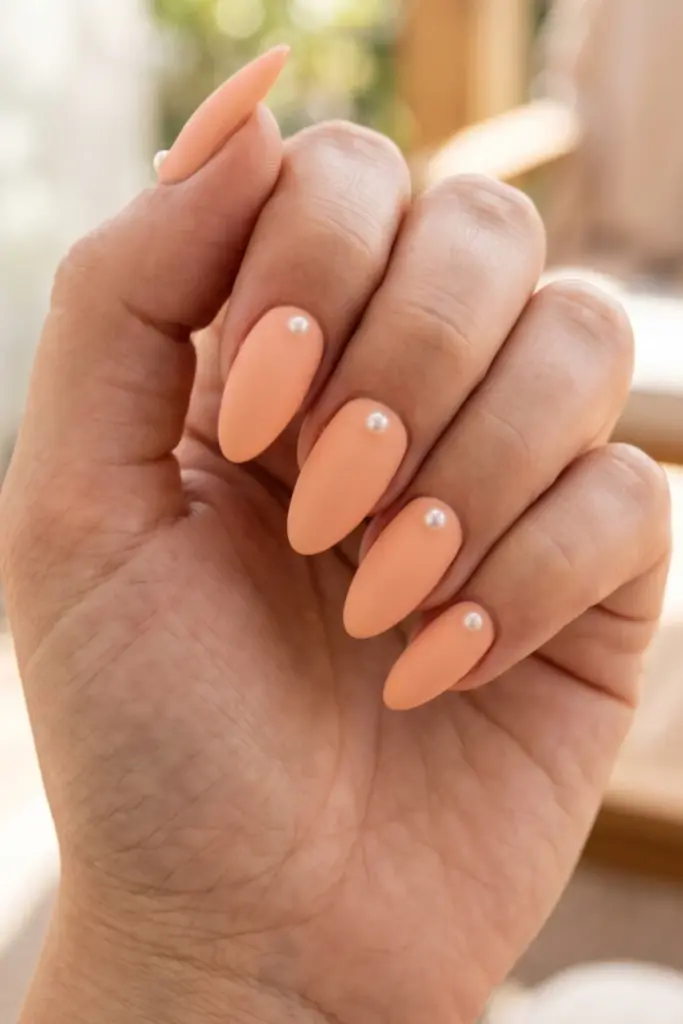
Peach is the underrated hero of the pastel family.
When you take away the shine, the color becomes velvety and rich.
Adding tiny 3D pearls gives it a Bridgerton-esque elegance that feels very high-fashion for a summer garden party.
- Steps:
- Paint your nails with a creamy peach polish.
- Apply a matte top coat and let it dry completely.
- Use nail glue to place tiny flat-back pearls near the cuticle.
- Press down firmly to secure.
Pro Tip: Use a wax picker tool to handle the tiny pearls without losing your mind.
6. Baby Blue Cloud Nails
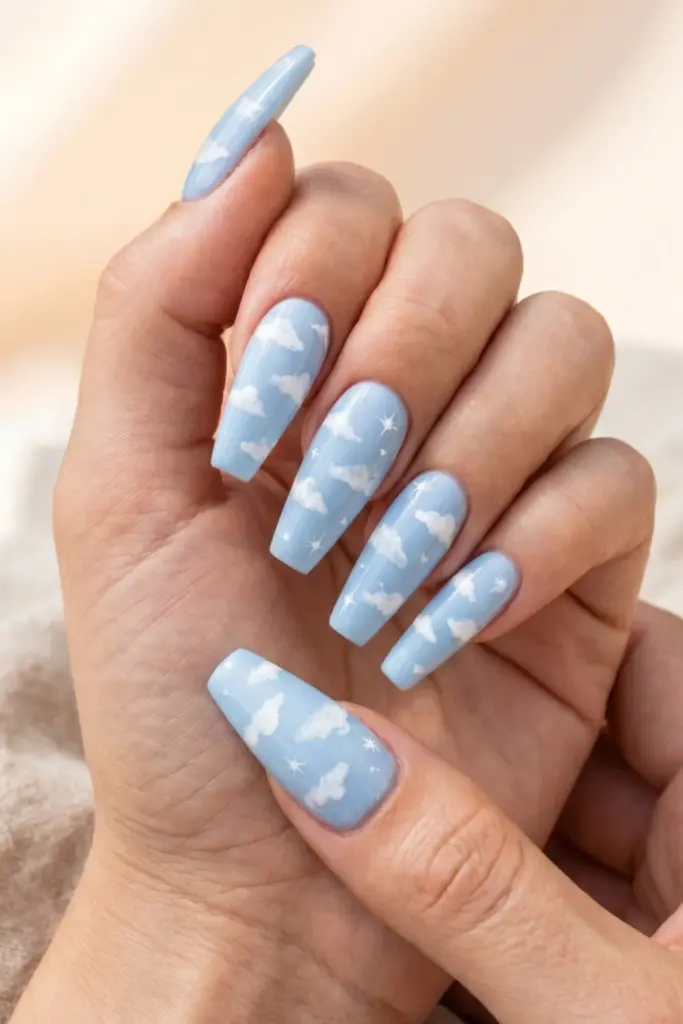
Dreamy, ethereal, and totally “Pinterest-coded.”
Cloud nails have been trending for a while, but in baby blue, they feel particularly fresh.
It’s like carrying a piece of the sky on your fingertips.
It’s a great way to experiment with nail art without it feeling too “busy.”
- Steps:
- Start with a soft baby blue base.
- Take a small sponge or a fluffy brush with white polish.
- Dab light, irregular shapes to mimic fluffy clouds.
- Add a few tiny white stars if you’re feeling extra.
Pro Tip: Keep the white polish very sparse on the brush to get that “see-through” cloud effect.
7. Pink Lilac Marble Swirl
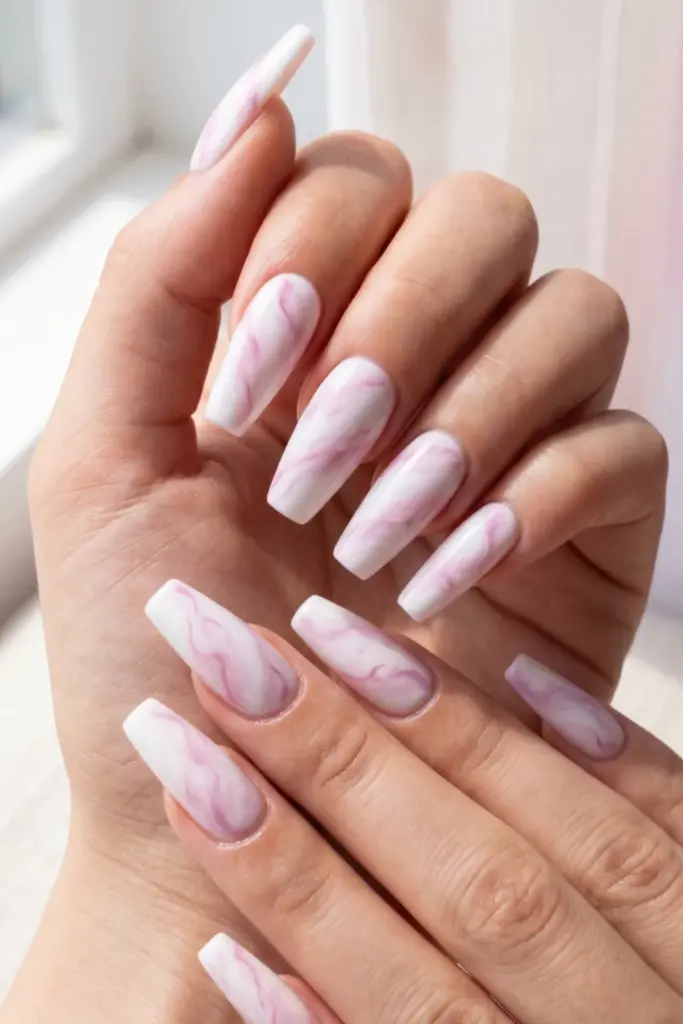
Marble is the ultimate “I spent a lot of money at the salon” look, even if you did it at home.
The mix of pink and lilac creates a soft, hazy dimension that looks different on every single nail.
It’s artistic and fluid.
- Steps:
- Apply a white base coat.
- Drop dots of pink and lilac polish onto the nail while the base is tacky.
- Use a toothpick or thin brush to swirl them together.
- Finish with a thick gel-effect top coat.
Pro Tip: Work on one nail at a time so the polish doesn’t dry before you can swirl it.
8. Pastel Tie-Dye
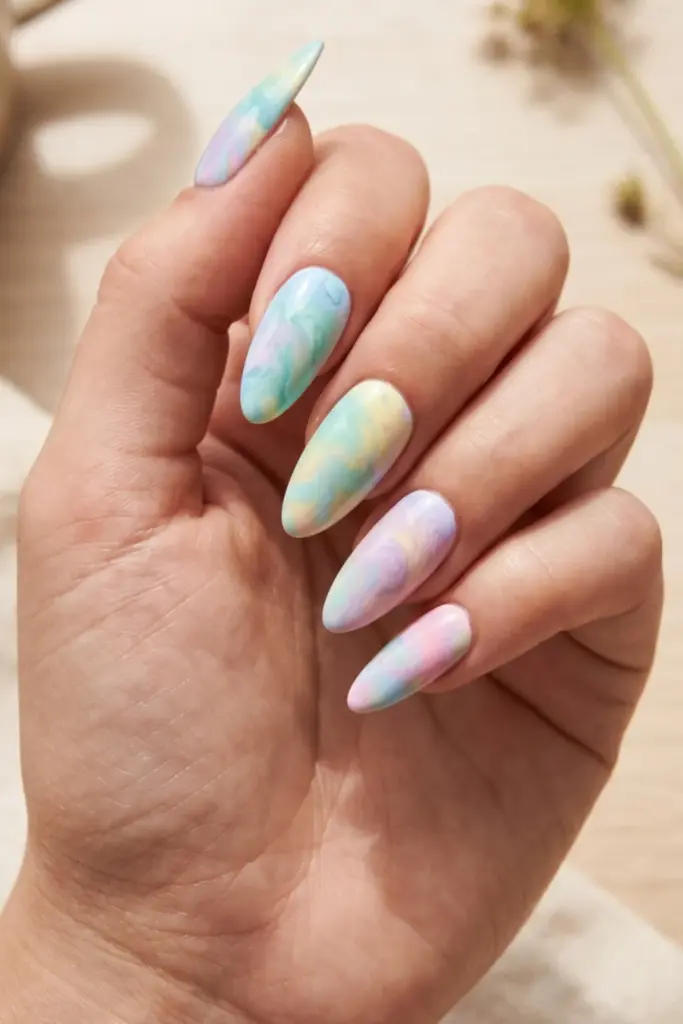
Why pick one color when you can have them all?
Pastel tie-dye is the fun, chaotic-good version of summer nails.
It’s less “60s hippie” and more “watercolor painting,” which keeps it looking sophisticated and intentional.
- Steps:
- Apply several dots of different pastel colors.
- Use a plastic wrap piece to “smoosh” the colors together.
- Lift carefully to reveal the marbled tie-dye effect.
- Clean the edges and seal.
Pro Tip: Use colors that are close on the color wheel (like blue, green, and yellow) to avoid a muddy look.
9. Lemon Sorbet Checkered
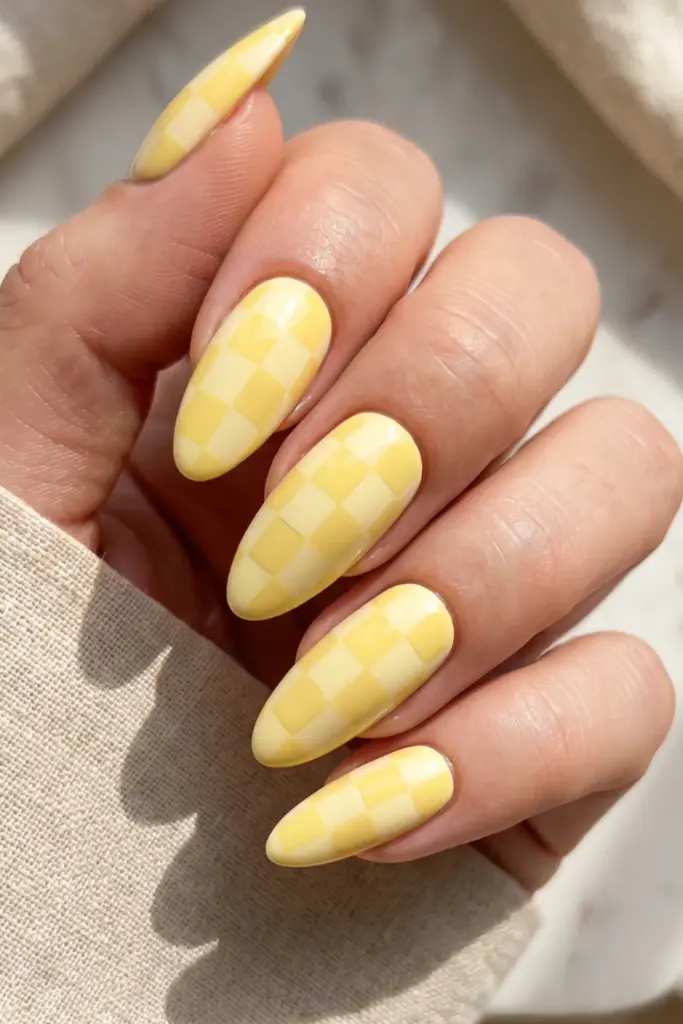
Checkerboard patterns are everywhere, from rugs to bags, and now nails.
A pale lemon sorbet yellow makes the grid look softer and less graphic.
It’s a bit retro but feels very current with the “maximalist” trends of 2026.
- Steps:
- Paint the nail a solid pastel yellow.
- Use a striper brush to draw two horizontal and two vertical lines.
- Fill in every other square with a slightly darker yellow or white.
- Top it off with a glossy finish.
Pro Tip: Keep your hand steady by resting your pinky finger on the table while drawing the lines.
10. Rose Quartz Glitter Fade
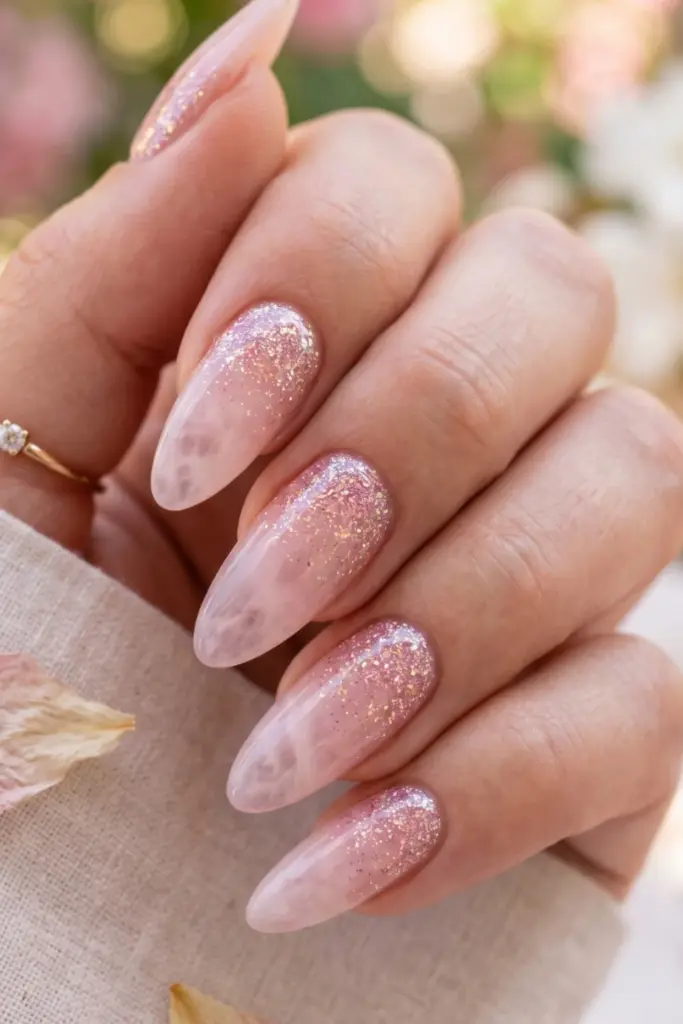
If you love a natural look but want a hint of sparkle, this is the one.
It mimics the look of a rose quartz crystal with just a touch of glitter at the base.
It’s low-maintenance because the regrowth is almost invisible.
- Steps:
- Apply a sheer, milky pink base.
- Concentrate a fine holographic glitter at the cuticle.
- Drag the glitter upward toward the middle of the nail with a dry brush.
- Apply a plump top coat.
Pro Tip: Use a makeup sponge to dab on the glitter for a more concentrated “fade” effect.
11. Speckled Easter Egg
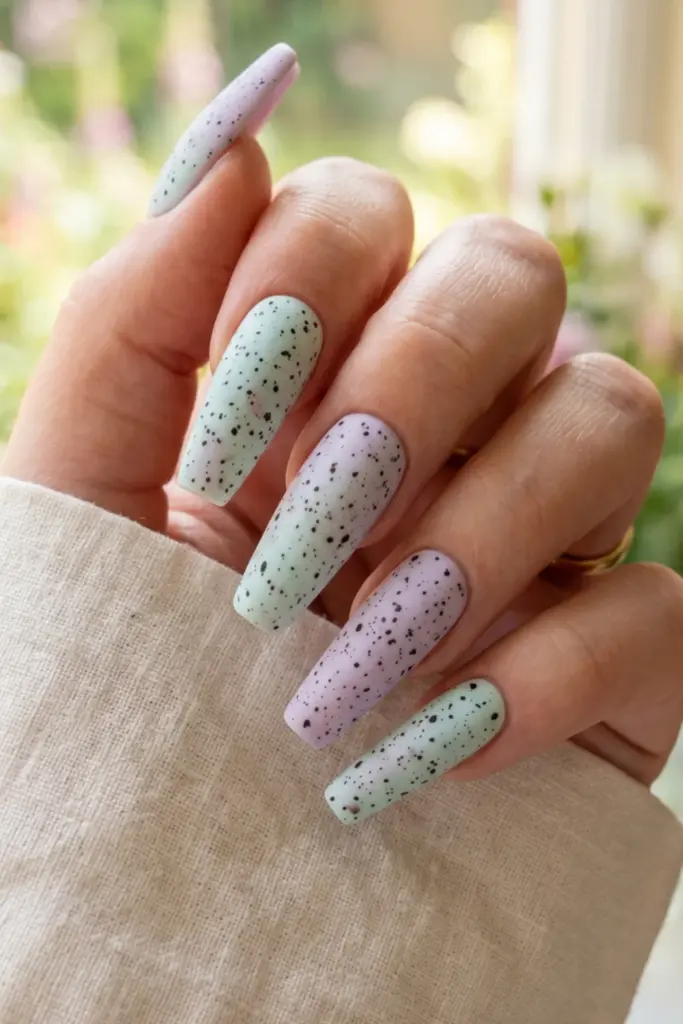
Who says speckled nails are only for April?
This look, featuring tiny black flecks over a pastel base, looks like a robin’s egg and adds instant texture.
It’s a great “minimalist” art choice that looks surprisingly edgy.
- Steps:
- Choose your favorite pastel base (mint and lilac work best).
- Use a “speckled” top coat or flick a toothbrush dipped in black polish over the nail.
- Apply a matte top coat to enhance the “eggshell” feel.
- Clean up any stray splatters on the skin.
Pro Tip: If using the toothbrush method, test the flick on a piece of paper first to control the dot size.
12. Lilac & Lavender Floral
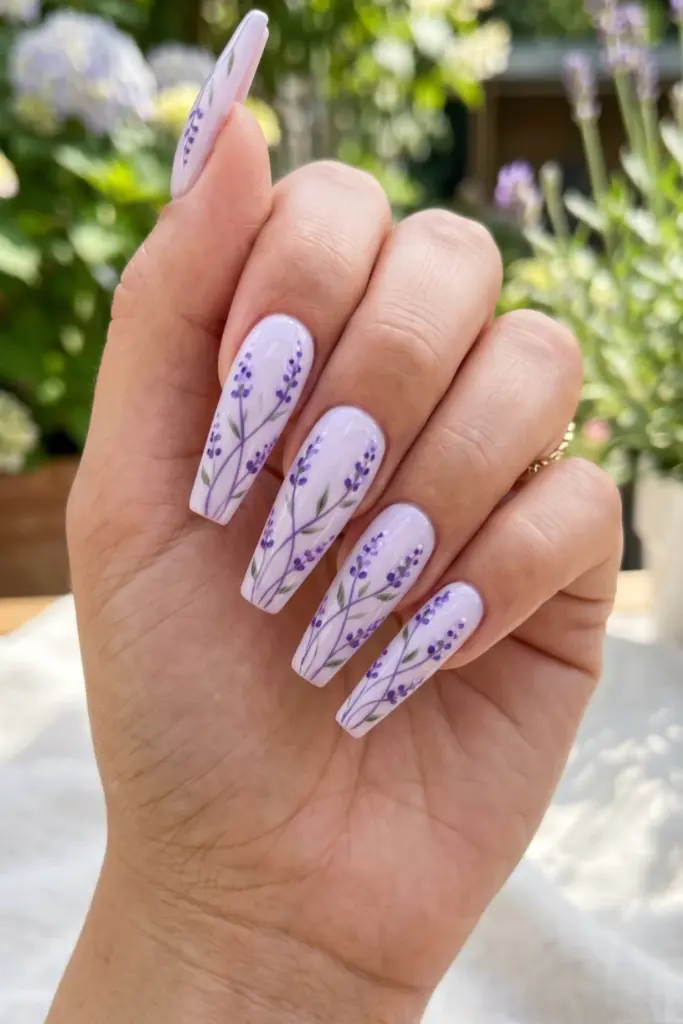
Monochrome, but make it fashion.
Using two different shades of the same color creates depth.
Tiny lavender sprigs on a lilac background feel very French-countryside and romantic.
It’s the perfect look for a summer wedding guest.
- Steps:
- Base coat in a very pale lilac.
- Use a dark lavender shade to paint tiny, thin lines for stems.
- Add small dots along the stems for the “flowers.”
- Seal with a high-shine top coat.
Pro Tip: Add a tiny bit of green for the leaves to make the purple shades pop even more.
13. Powder Blue Abstract Waves
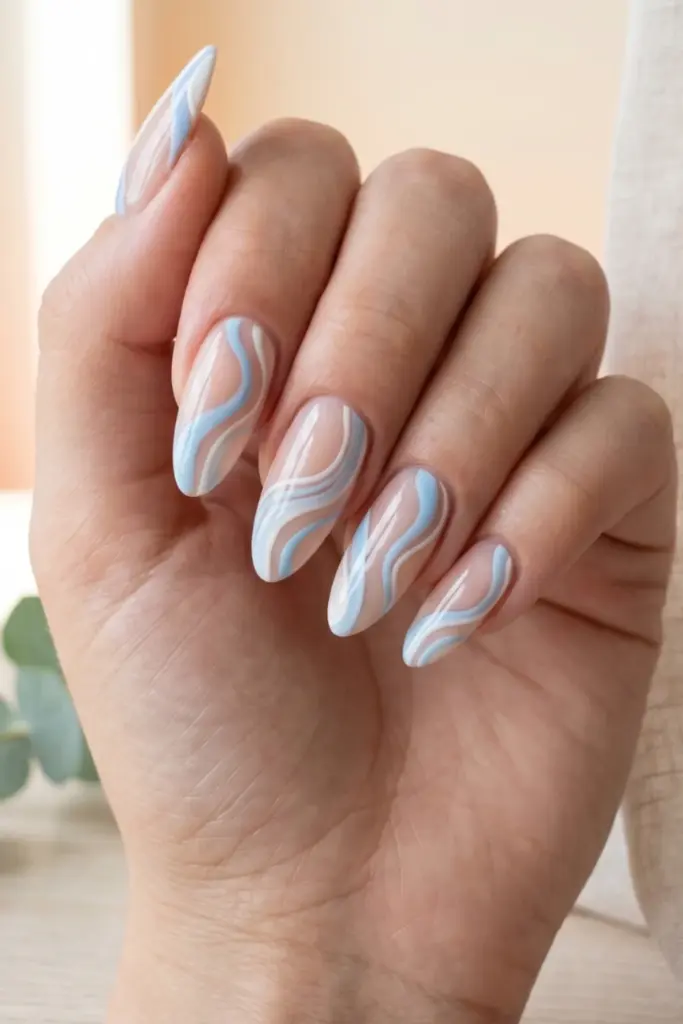
Abstract nails are great because there’s no “wrong” way to do them.
Flowing, organic lines in powder blue look like water or silk.
It’s a very calming aesthetic that looks great on shorter, natural nails.
- Steps:
- Start with a clear or nude base.
- Paint 2-3 wavy lines across the nail in powder blue.
- Add a second color (like white) for a layered look.
- Finish with a top coat.
Pro Tip: Vary the thickness of your waves to create more visual interest and movement.
14. Coral Cream Zigzags
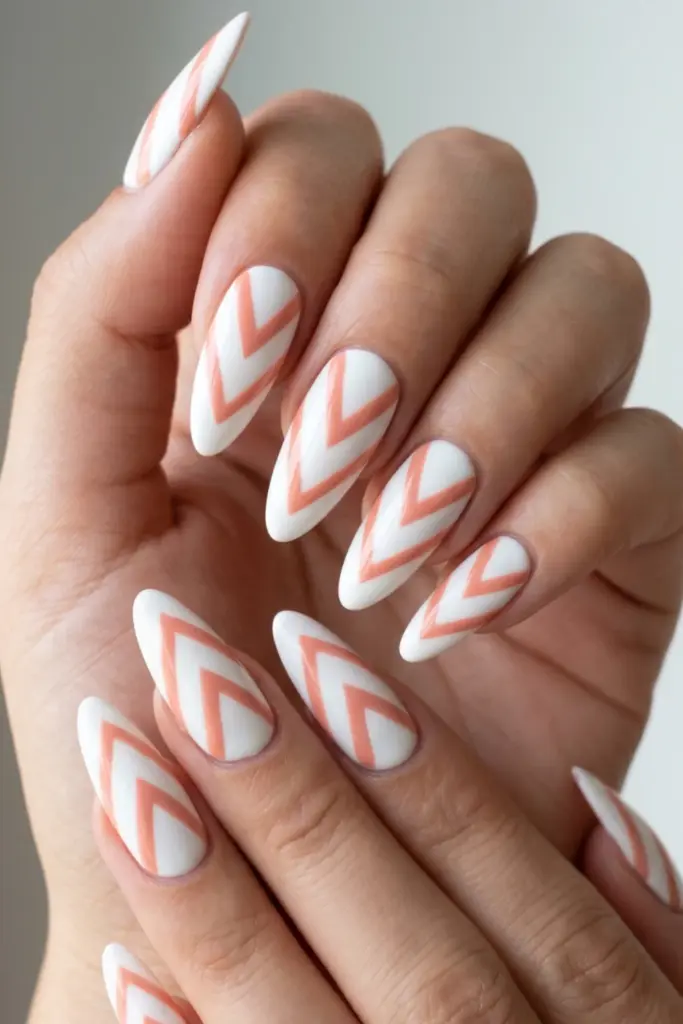
Coral is the “bridge” color between pastel and neon.
A muted, creamy coral feels tropical without being neon.
Zigzags add a 90s surf vibe that is just perfect for beach days and vacations.
- Steps:
- Apply a white base.
- Use striping tape to create “V” shapes down the nail.
- Paint over the tape with coral polish.
- Remove the tape while the polish is still slightly wet.
Pro Tip: Always pull the tape away from the direction of the polish to get the sharpest lines.
15. Vanilla & Mint Half Moons
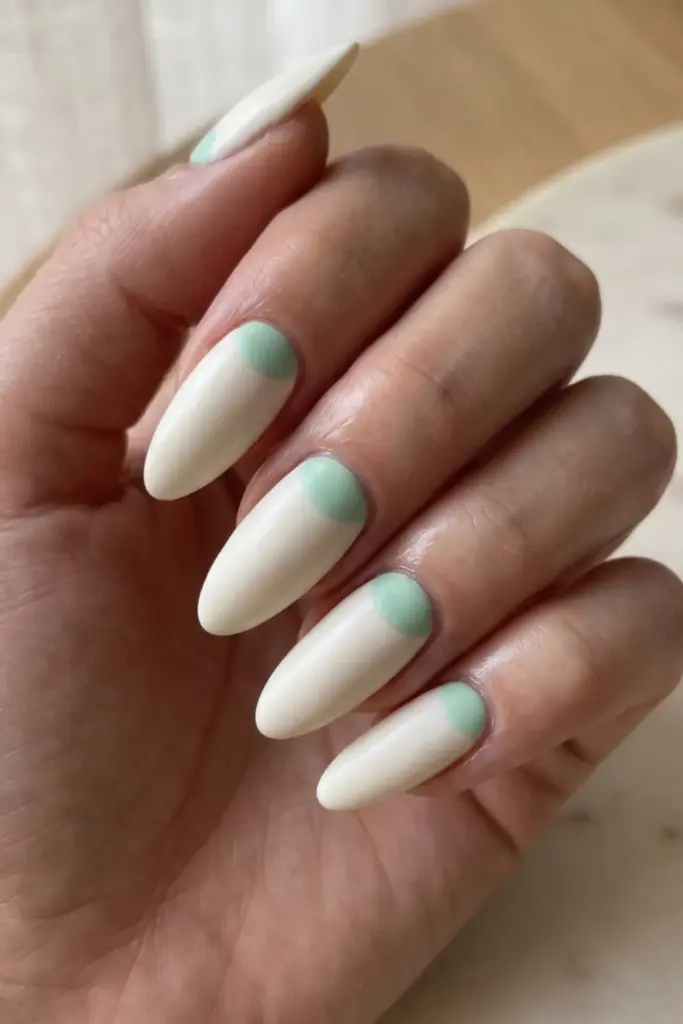
The “half moon” at the base of the nail is a vintage staple.
Pairing a vanilla cream with a mint green makes it feel modern.
It’s a subtle way to do “negative space” art that grows out beautifully.
- Steps:
- Paint the entire nail mint green.
- Once dry, place a circular reinforcement sticker at the base.
- Paint the rest of the nail vanilla.
- Remove the sticker and apply the top coat.
Pro Tip: Make sure the bottom layer is 100% dry before applying stickers, or it will peel right off.
16. Pastel Rainbow Stripes
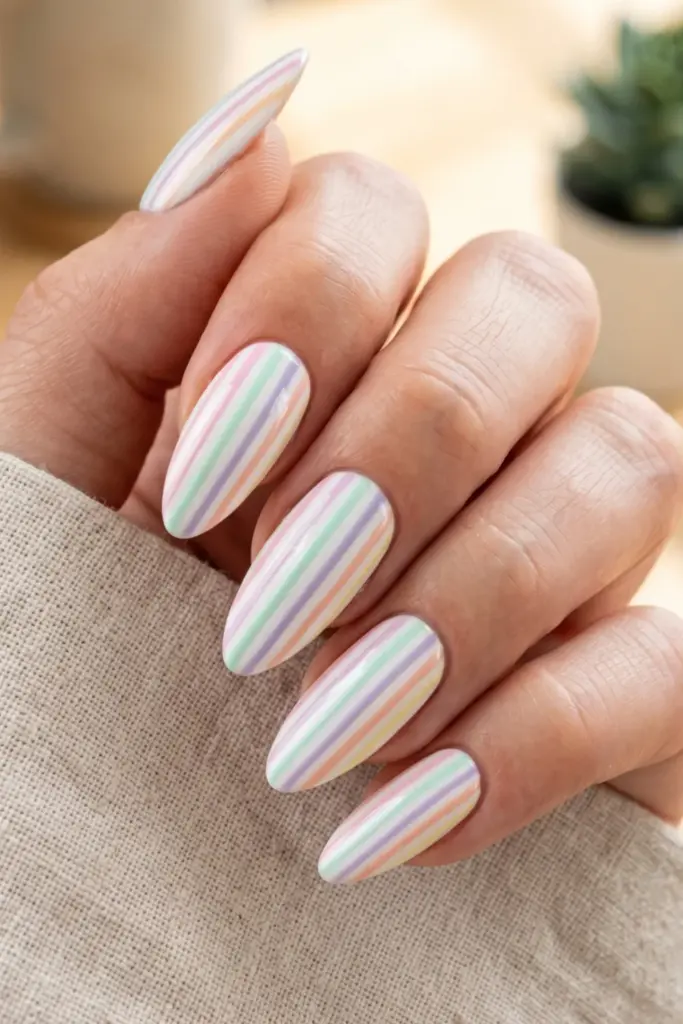
Can’t decide? Don’t!
Thin vertical stripes in every pastel shade create a “candy stripe” effect that is playful and bright.
It looks incredible on almond-shaped nails as it elongates the fingers.
- Steps:
- Start with a white base.
- Using a long striper brush, draw thin vertical lines in different colors.
- Keep the lines as close as possible without touching.
- Seal with a glossy top coat.
Pro Tip: Wipe your brush thoroughly between colors to keep the stripes crisp and distinct.
17. Blush Pink with Gold Foil
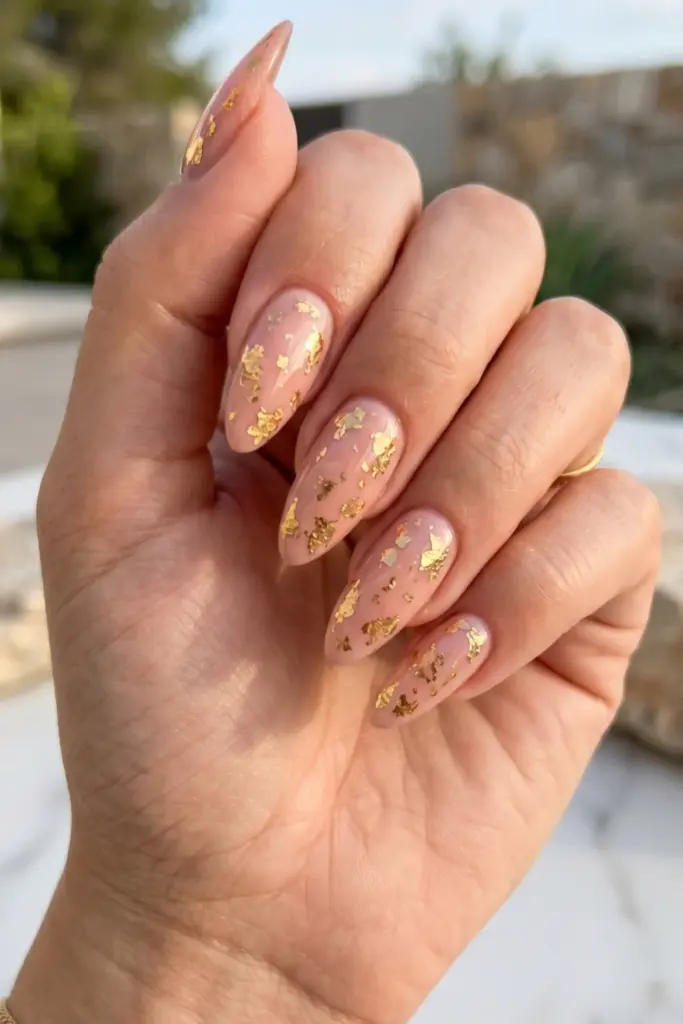
This is the “expensive” nail look.
A soft blush pink is the ultimate neutral, but adding jagged pieces of gold foil makes it look like jewelry.
It’s sophisticated, warm, and perfect for golden hour photos.
- Steps:
- Apply two coats of blush pink.
- While the second coat is tacky, press on small flakes of gold nail foil.
- Gently tap them down with a dry finger.
- Apply two layers of top coat to smooth out the foil edges.
Pro Tip: Don’t be too precise with the foil; random placement looks more authentic and artistic.
18. Periwinkle Starry Night
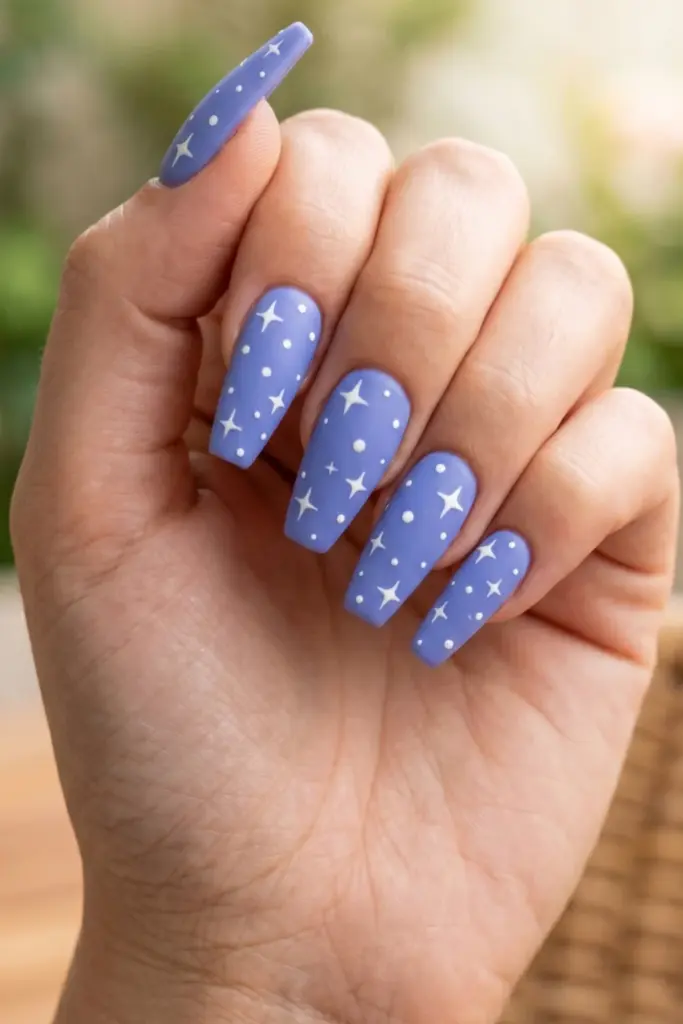
Periwinkle is that magical middle ground between blue and purple.
Adding tiny white stars or dots makes it look like a clear summer night sky.
It’s a bit whimsical but still very chic for everyday wear.
- Steps:
- Paint a solid periwinkle base.
- Use a toothpick or tiny dotting tool to add white dots of varying sizes.
- Draw a small “+” shape for a “twinkling” star.
- Finish with a glitter or plain top coat.
Pro Tip: Use a matte top coat for a “velvet sky” effect that really highlights the white stars.
19. Apricot Glazed Donut
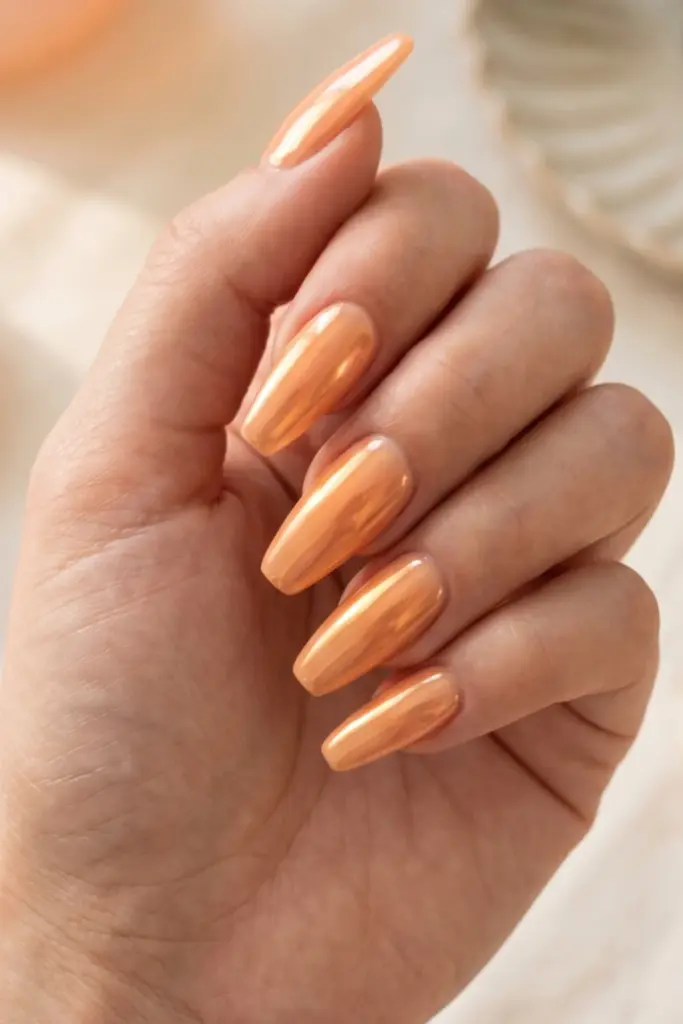
The “glazed” trend isn’t going anywhere, but we’re moving away from white and into apricot.
This has a warm, peachy glow that makes your skin look incredibly healthy.
It’s the “your nails but better” look for 2026.
- Steps:
- Apply a very sheer apricot or peach polish.
- Apply a chrome powder with an orange-gold shift.
- Buff until it looks like a mirror.
- Seal with a thin layer of top coat.
Pro Tip: Less is more with the powder; you want the apricot color to shine through the glaze.
20. Soft Sage Leaf Art
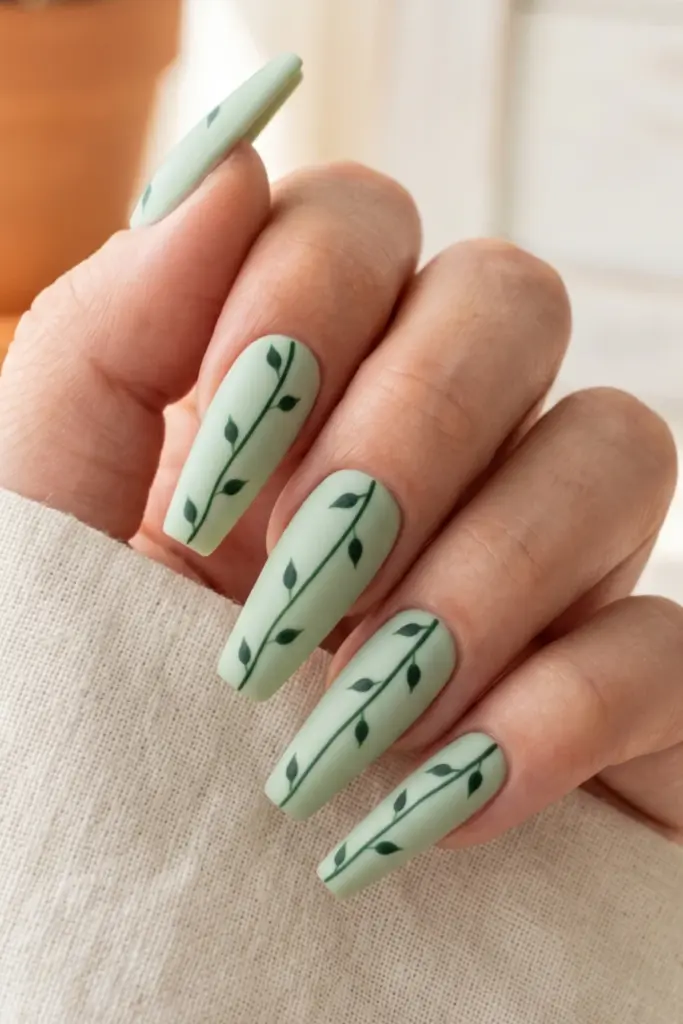
Sage is the “earthy” pastel.
It’s calming and grounded.
Adding simple leaf silhouettes in a darker green or white makes it feel like an botanical illustration.
It’s the ultimate “cool girl” summer nail.
- Steps:
- Base coat in soft sage green.
- Draw a thin line for the vine.
- Dab tiny almond shapes along the vine for leaves.
- Apply a matte top coat for a natural, organic finish.
Pro Tip: Use a dark forest green for the leaves to create a sophisticated tonal contrast.
Final Thoughts
Choosing the right nail design can honestly change your whole vibe for the week.
Whether you’re a DIY queen or you’re heading to the salon with these screenshots ready, the key to summer pastels is all in the finish.
Don’t be afraid to mix and match—maybe a mint French tip on one hand and a solid butter yellow on the other?
There are no rules in summer!
Just remember to hydrate those cuticles and wear your sunscreen, because even the best nails can’t hide dry skin.
Happy painting!
Stunning Top Pastel Nail Art Trends for Summer 2026
Discover the most stunning pastel nail art trends perfect for summer 2026. From soft pink French tips to dreamy lavender ombré and mint green accents, these chic designs are ideal for beach days, brunches, and summer parties. Elevate your look with these timeless pastel nail ideas. #PastelNails #SummerNailDesigns #NailArtTrends
Pin it on Pinterest