Luxurious, ready to turn heads this summer?
If you’re tired of the same old basic manicures, it’s time to level up.
The Fourth of July is the perfect excuse to go bold, festive, and undeniably chic.
Whether you’re heading to a backyard BBQ or a luxe rooftop party, your nails should be the main event.
We’ve rounded up 20 cute Fourth of July acrylic nails that look luxurious, blending patriotic spirit with high-end artistry.
You’ll find everything from intricate marble swirls to delicate gold-foiled designs that scream sophistication.
Stop scrolling and start saving these pins because your next salon visit just got a serious upgrade.
From minimalist stars to dazzling crystals, these nail ideas will ensure your manicure is just as explosive as the fireworks display.
Let’s dive into these show-stopping looks.
1. Star-Spangled Glitter Fade
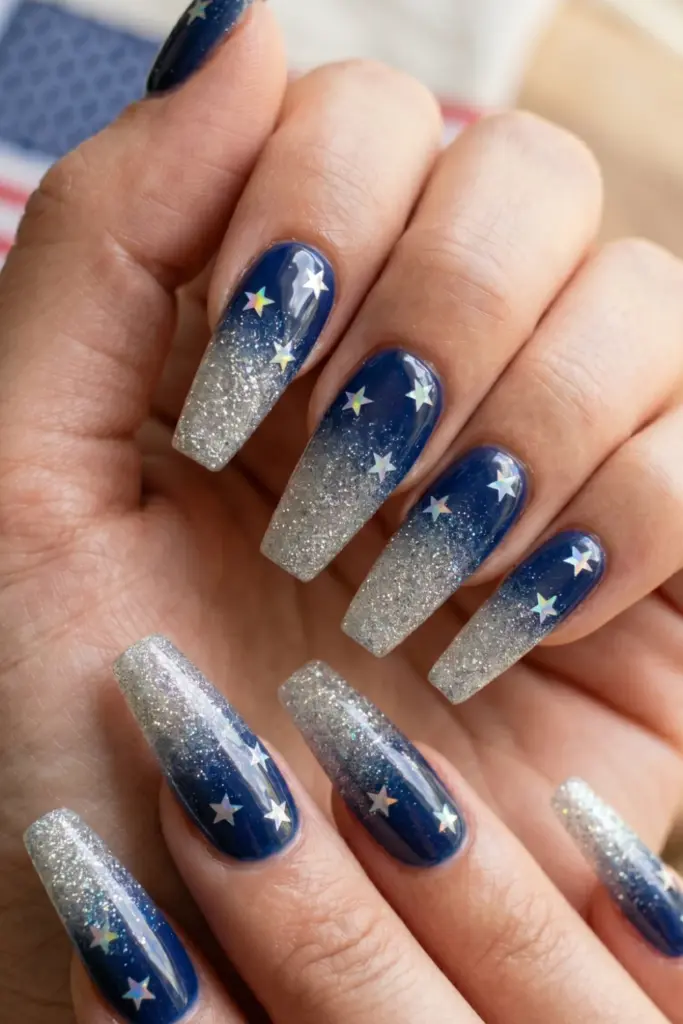
A soft, dreamy transition from deep navy to sparkling silver.
Steps:
- Apply a deep navy polish on the bottom half of the nail.
- Use a sponge to dab silver glitter polish starting from the tip.
- Place holographic star decals randomly near the cuticle.
Tip: Apply two coats of glossy top coat to lock in those stars.
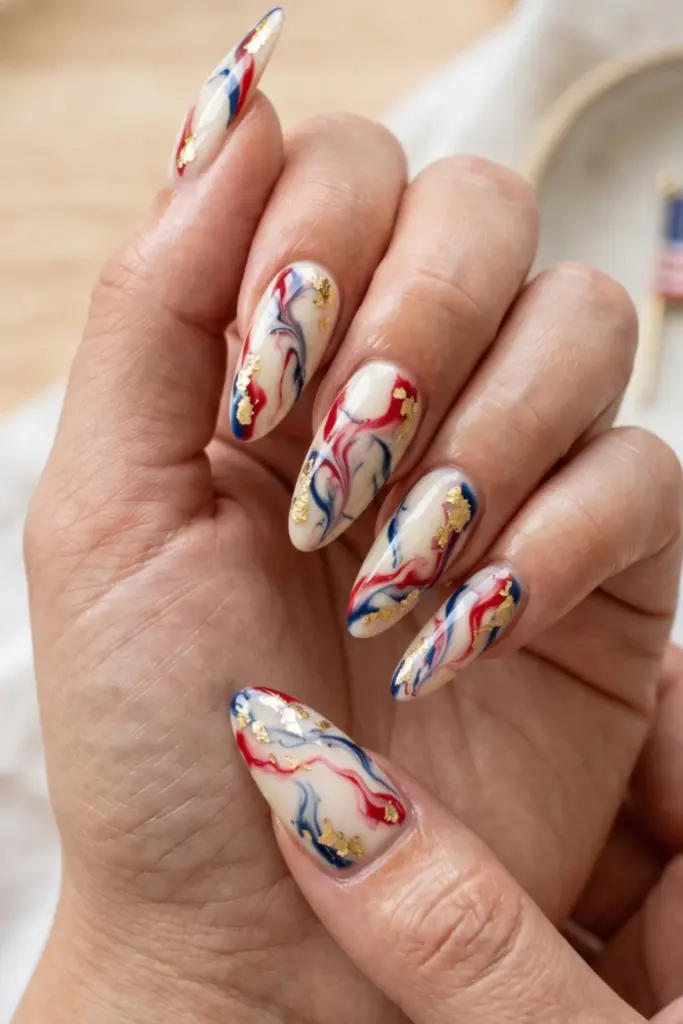
2. Red White & Blue Marble Swirl
This is effortless elegance at its finest.
Steps:
- Apply an ivory base coat.
- Drop tiny beads of red and navy polish into the wet base.
- Swirl them with a thin toothpick to create marble veins.
- Add gold leaf flakes for that luxe touch.
Tip: Work quickly while the polish is still wet for the best swirl.
3. Firework Burst Accent Nails
Bold, dark, and perfectly dramatic.
Steps:
- Paint nails in a matte navy base.
- Use a thin liner brush to draw thin lines radiating from the center.
- Place a small rhinestone at the very center of the explosion.
Tip: Use high-pigmented gel liners for the brightest lines.
4. Patriotic French Tips
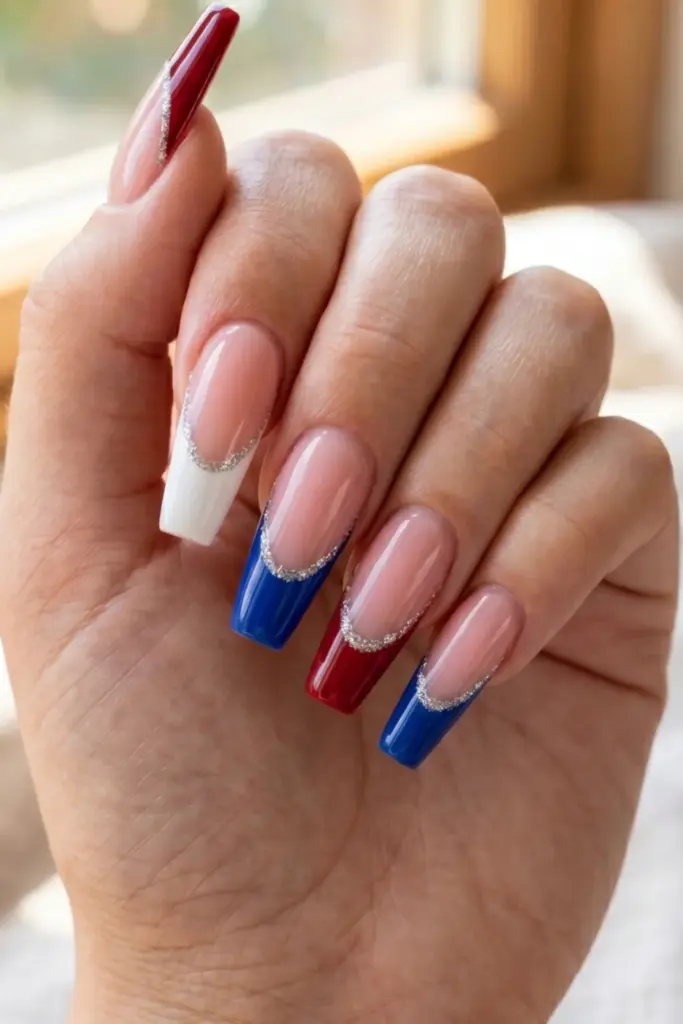
A modern twist on a classic staple.
Steps:
- Apply a clear, strengthening base coat to your acrylics.
- Alternately paint the tips in deep red, bright white, and royal blue.
- Add a thin line of silver glitter to separate the tip from the nail bed.
Tip: Use French tip guides if you struggle with steady hands.
5. Crystal Flag Miniature
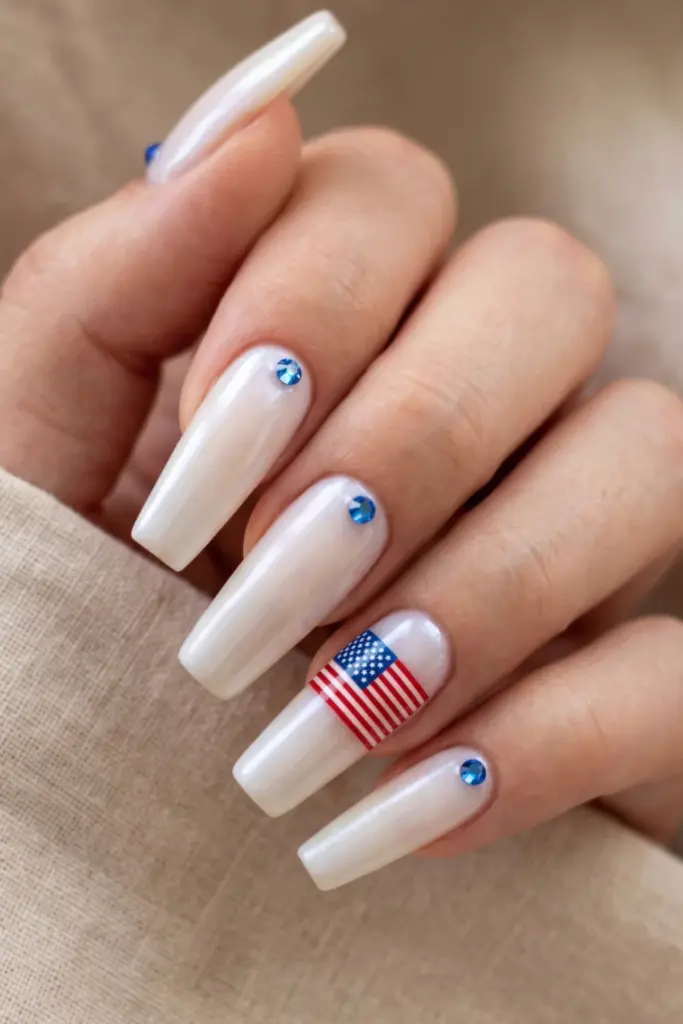
Delicate and incredibly detailed.
Steps:
- Paint nails in a milky pearl white.
- On the ring finger, paint a small rectangular flag.
- Add blue crystals to the corners of the other nails.
Tip: Use a dotting tool for the stars on the tiny flag.
6. Ombre Sparkle Stiletto
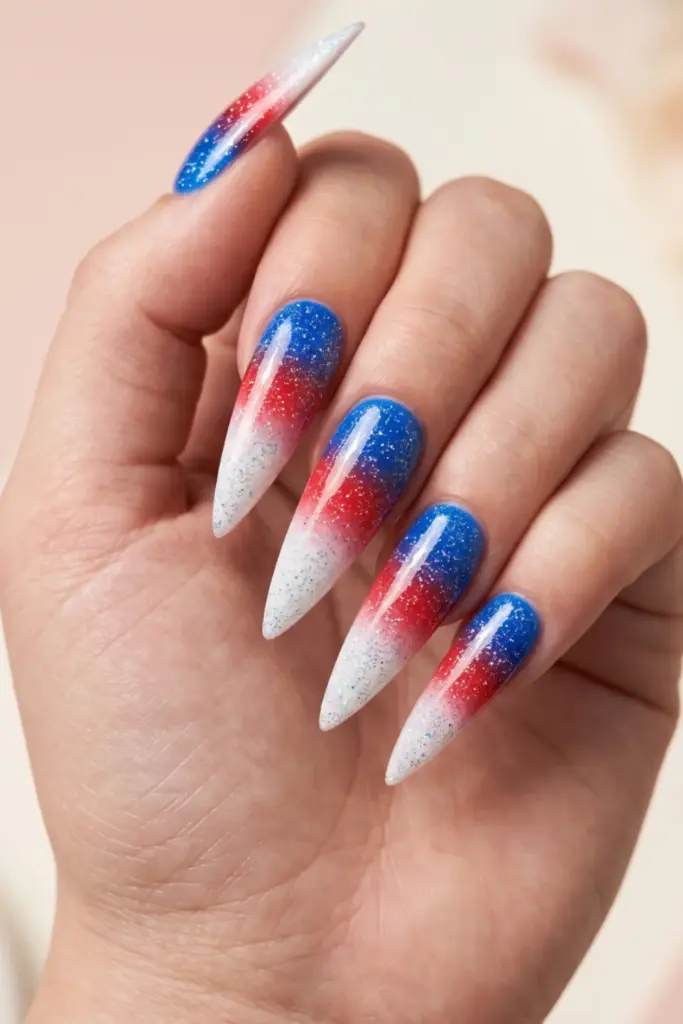
Sharp, sassy, and oh-so-festive.
Steps:
- Apply white, red, and blue polish in horizontal strips.
- Blend the colors with a makeup sponge.
- Dust the entire nail with holographic glitter.
Tip: Buff the acrylic surface smooth before applying the base.
7. Liberty Bell Gold Foil
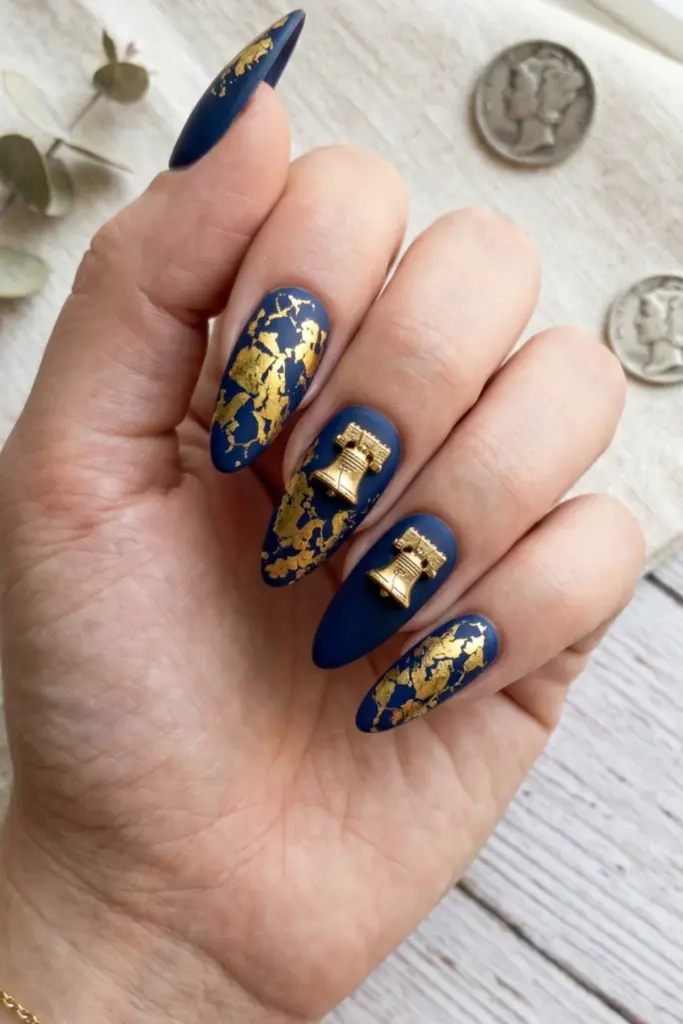
Textured, moody, and very high fashion.
Steps:
- Paint nails in a deep, matte navy.
- Apply gold foil in jagged, “cracked” patterns.
- Secure tiny bell charms with a dab of strong nail glue.
Tip: Matte top coat is essential for that sophisticated finish.
8. Stripes & Stars Coffin
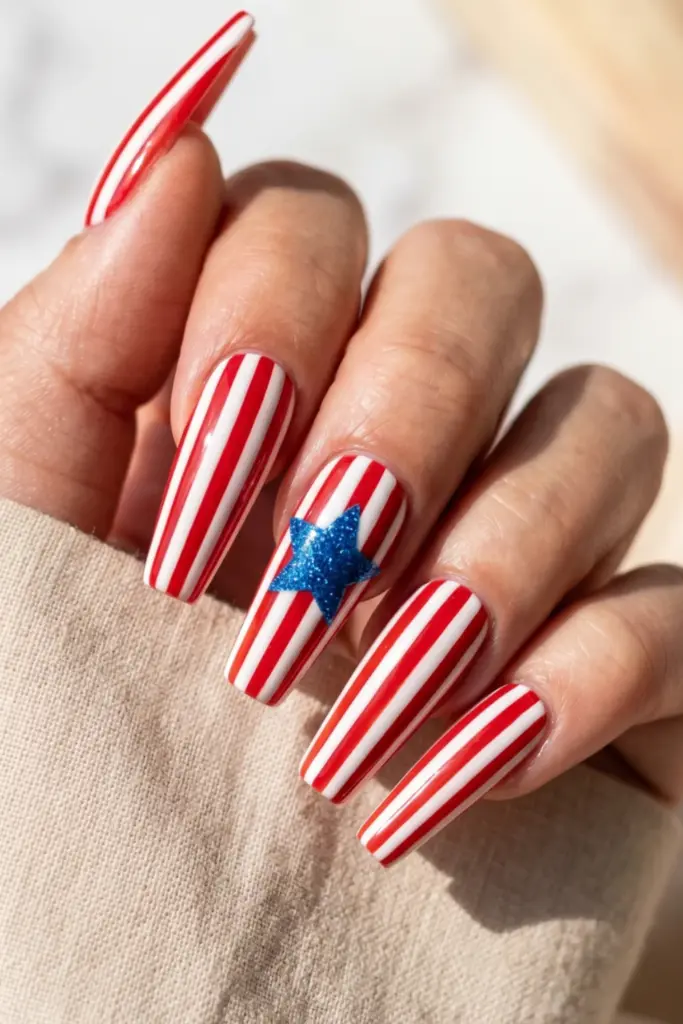
Classic, structured, and bold.
Steps:
- Use striping tape to create perfect vertical lines.
- Paint stripes in alternating red and white.
- Apply blue glitter star decals on the middle finger.
Tip: Remove the tape while the polish is still slightly tacky.
9. Rhinestone Firecracker
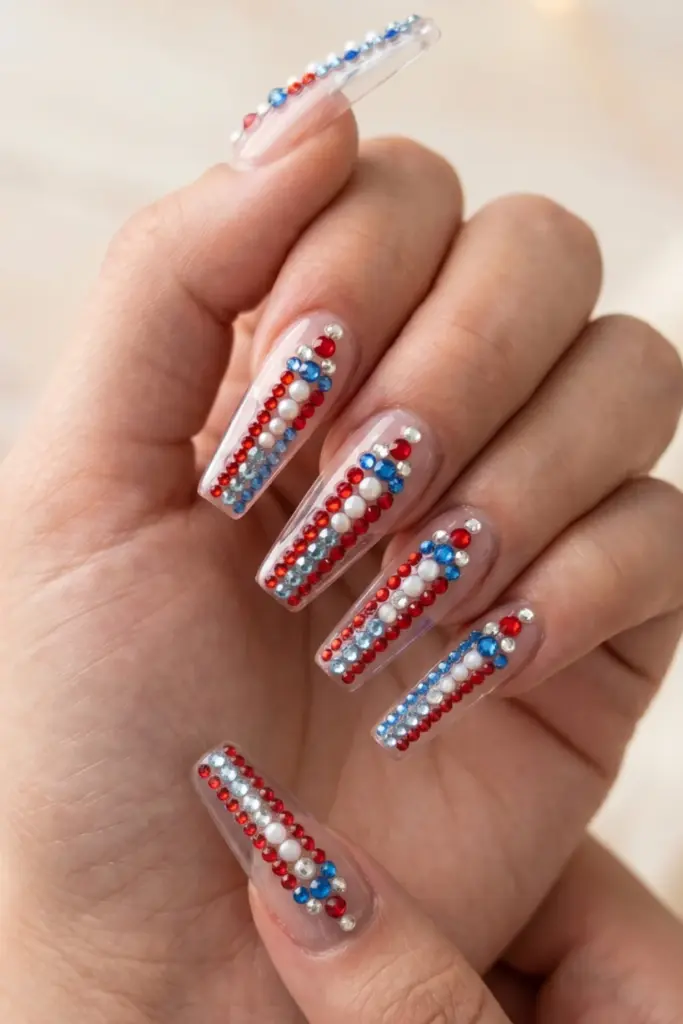
This one is all about texture and sparkle.
Steps:
- Use clear acrylic as your base.
- Arrange red, white, and blue rhinestones into long vertical shapes.
- Seal the edges with clear builder gel.
Tip: Don’t over-cure the gel before placing the stones.
10. Bald Eagle Feather Art
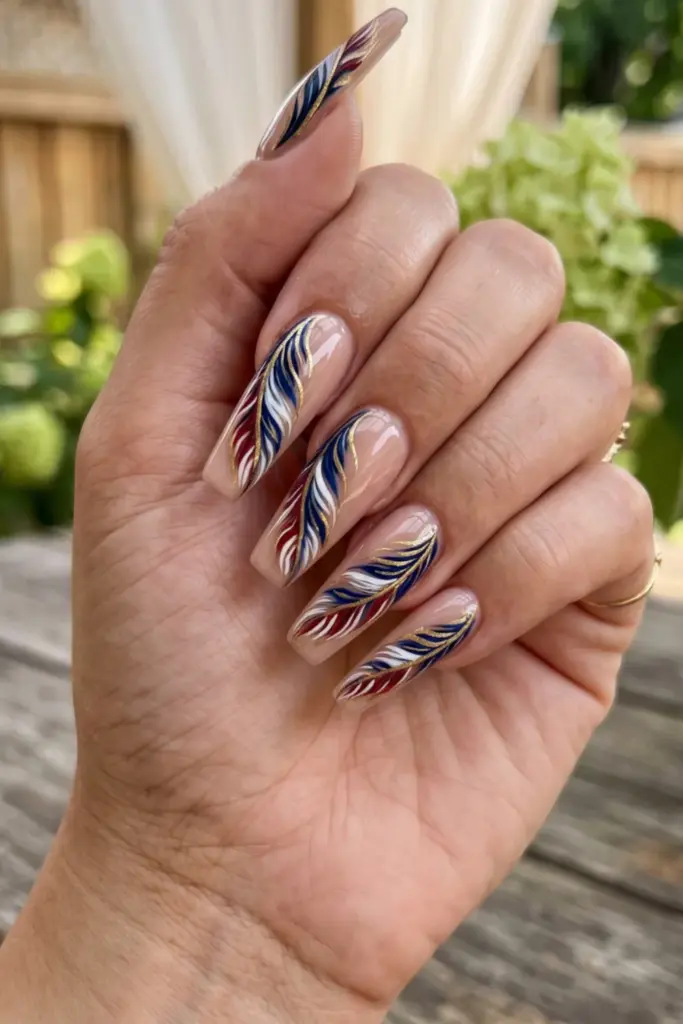
An artistic, earthy take on patriotism.
Steps:
- Use a soft, sheer nude base.
- Paint long, thin feathers using blue and white polish.
- Trace the outline with a metallic gold pen.
Tip: Practice the feather strokes on a plastic tip first.
11. Glitter Gradient Explosion
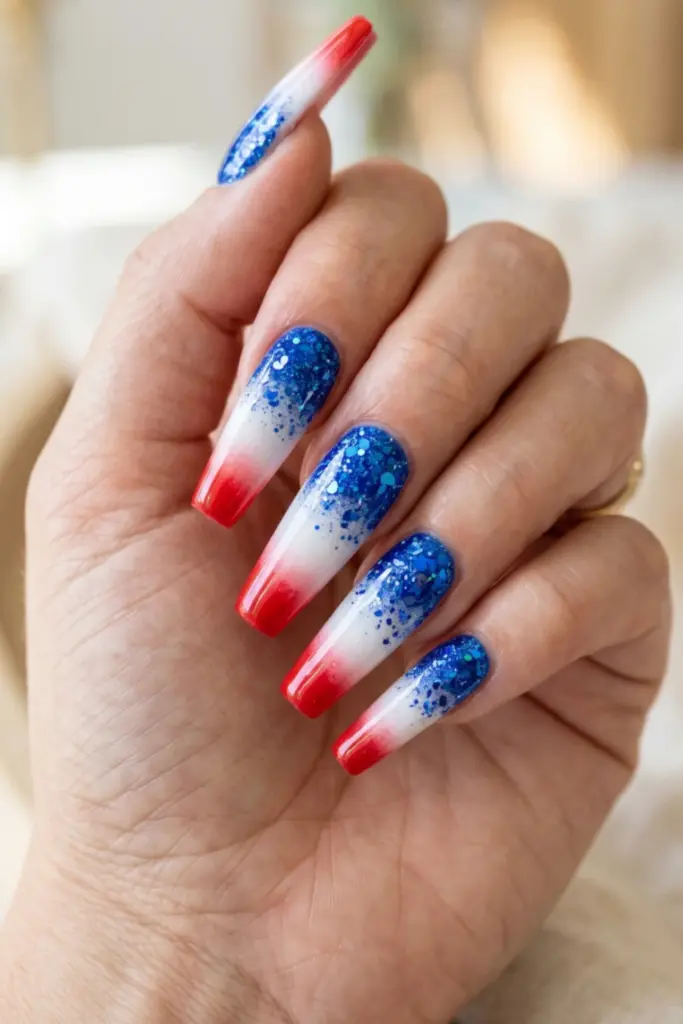
Serious sparkle that catches every bit of light.
Steps:
- Paint the tips red.
- Fade into a white middle section.
- Apply chunky blue glitter near the cuticle.
Tip: Use a fan brush to distribute the glitter evenly.
12. Cherry Pie Luxury
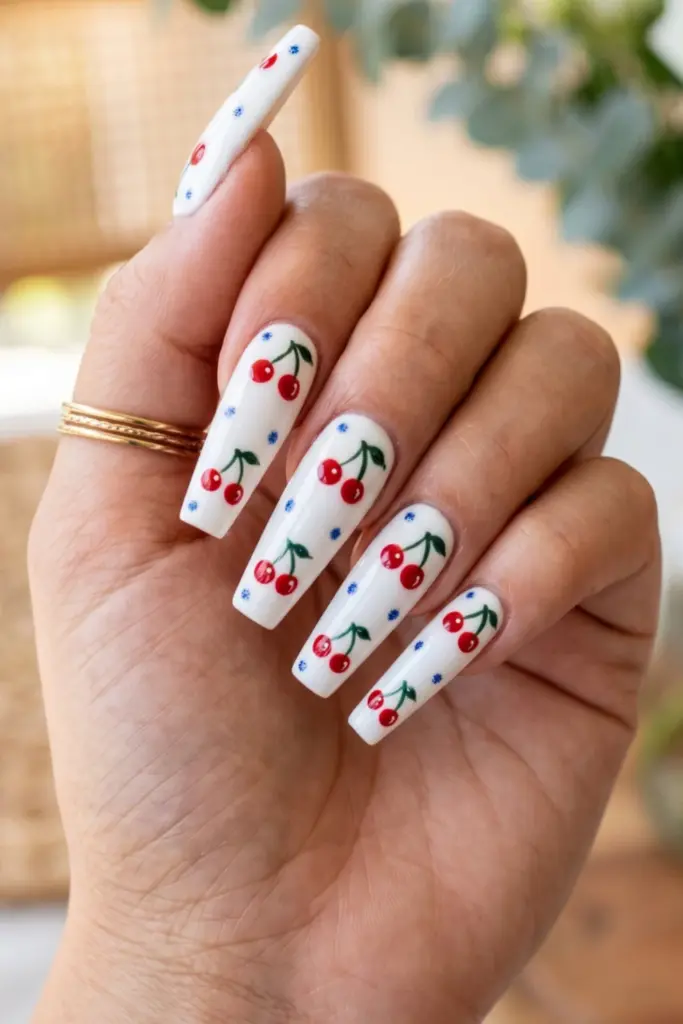
Sweet, nostalgic, and incredibly cute.
Steps:
- Use a glossy white base.
- Hand-paint tiny cherries using red polish.
- Add blue shimmer dots around the cherries.
Tip: Use a dotting tool for the cherries to keep them consistent.
13. Constellation Stars
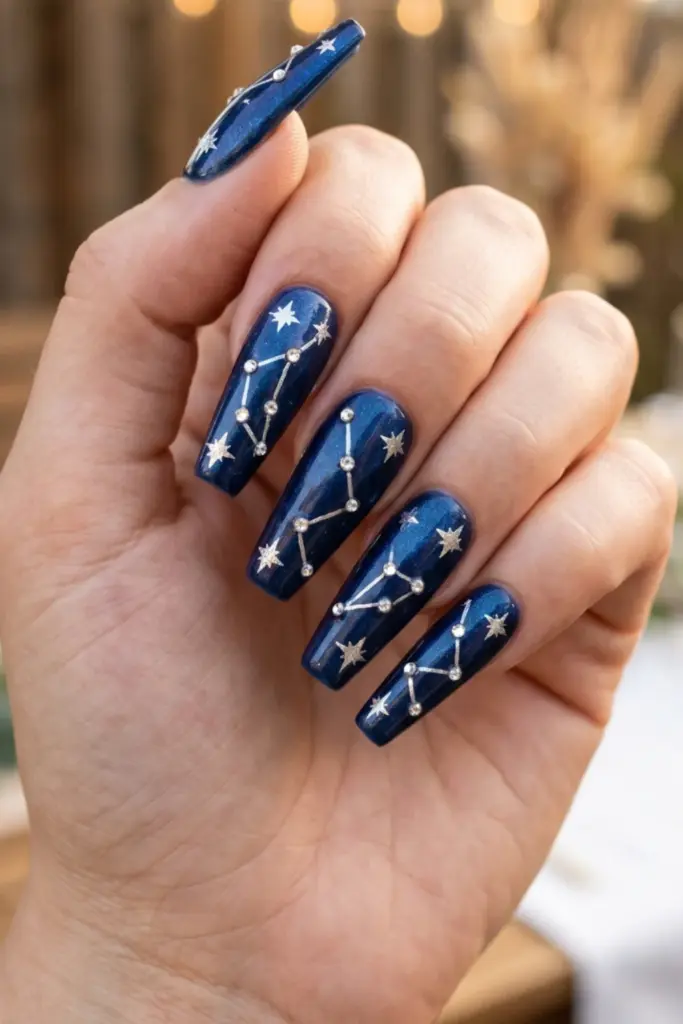
For the girl who loves celestial vibes.
Steps:
- Deep midnight blue acrylic base.
- Apply silver foil stars.
- Connect the stars with tiny Swarovski crystal “lines.”
Tip: Tweezers are your best friend for crystal placement.
14. American Rose Garden
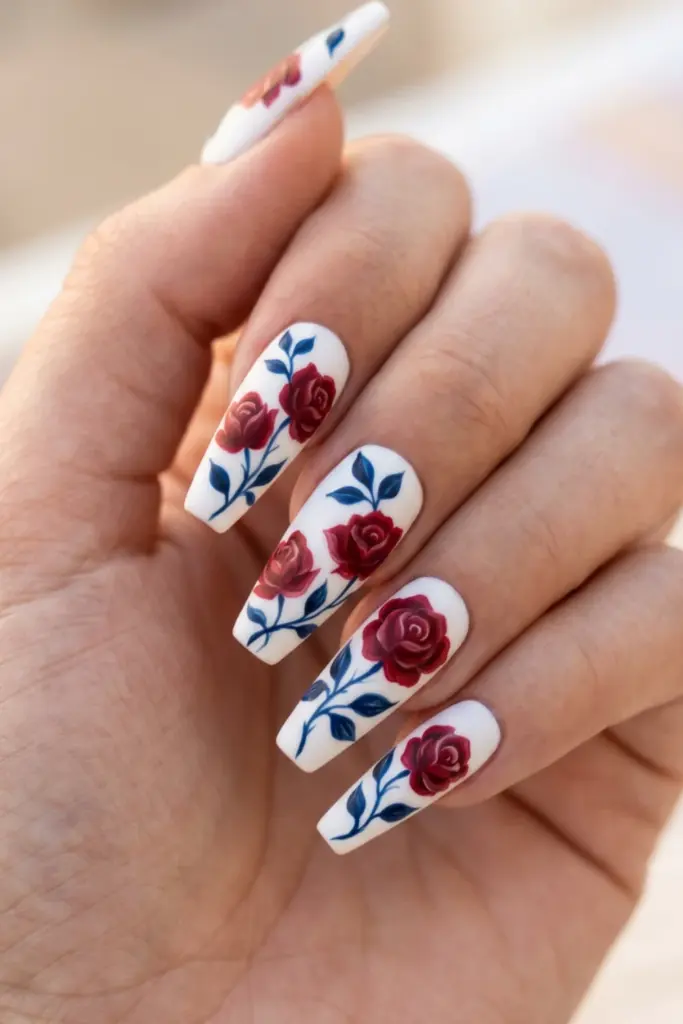
Romantic, floral, and deeply patriotic.
Steps:
- Clean white background.
- Paint roses in deep crimson.
- Add blue leaves instead of green for a twist.
Tip: Use a tiny brush for the shading on the petals.
15. Neon Pop Sparklers
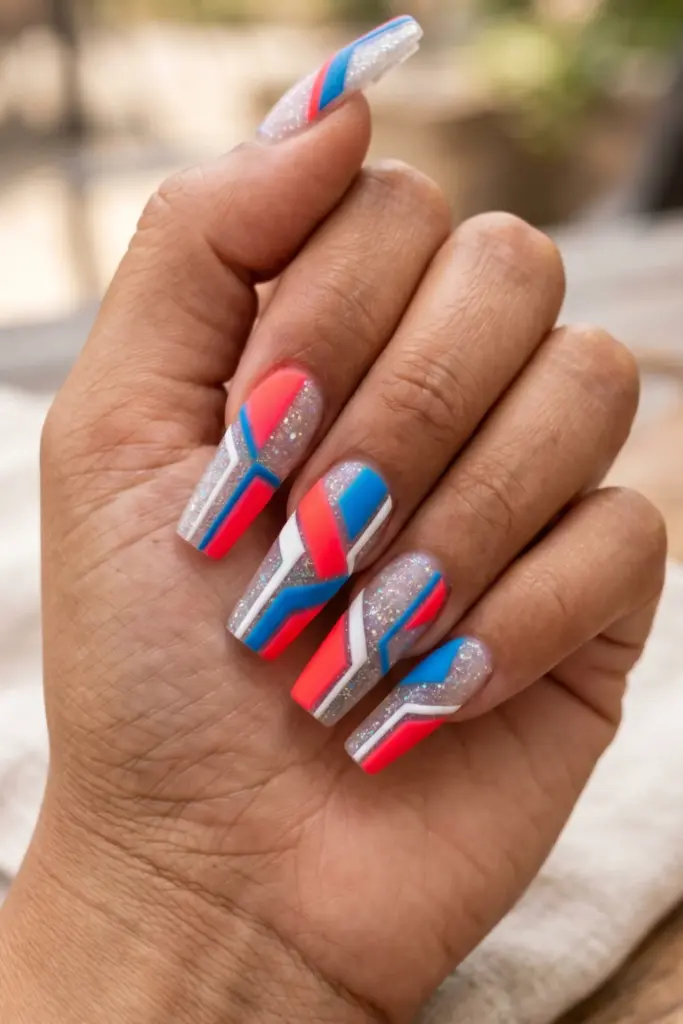
Modern art meets holiday fun.
Steps:
- Apply a clear glitter base.
- Create geometric blocks with neon red, white, and blue.
- Apply a matte top coat over the entire design.
Tip: Keep the blocks clean by using a small, flat brush.
16. Sequin Wave Ombre
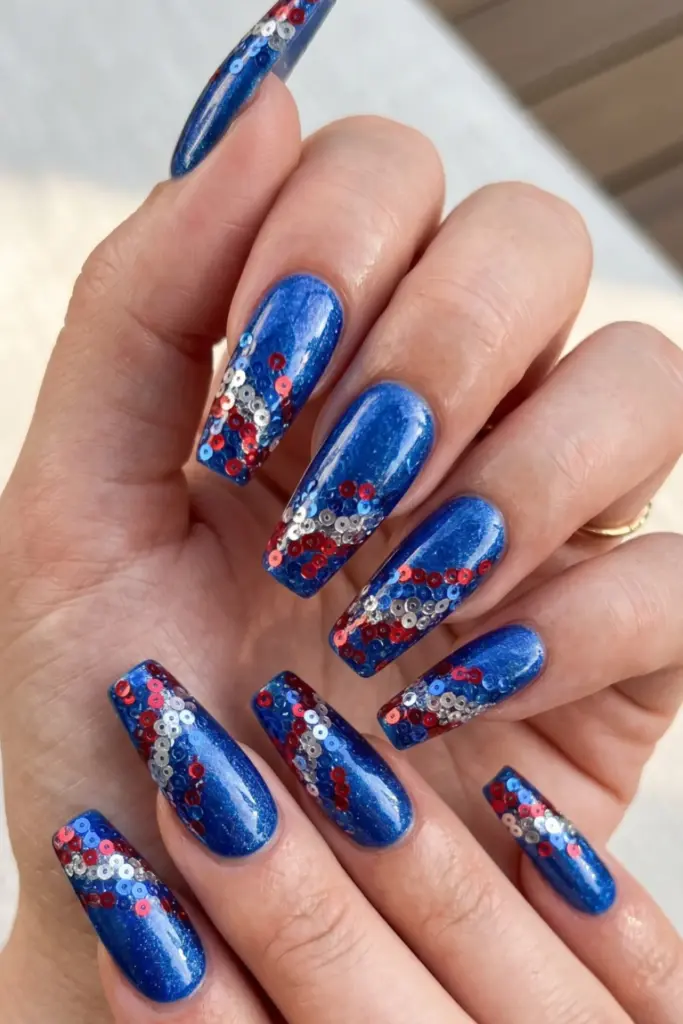
Shimmery and fluid movement.
Steps:
- Apply blue polish as the base.
- Place blue, silver, and red sequins in a wave pattern.
- Apply a thick layer of builder gel over the top.
Tip: File the edges of the sequins if they stick up.
17. Fireworks Lace Stamping
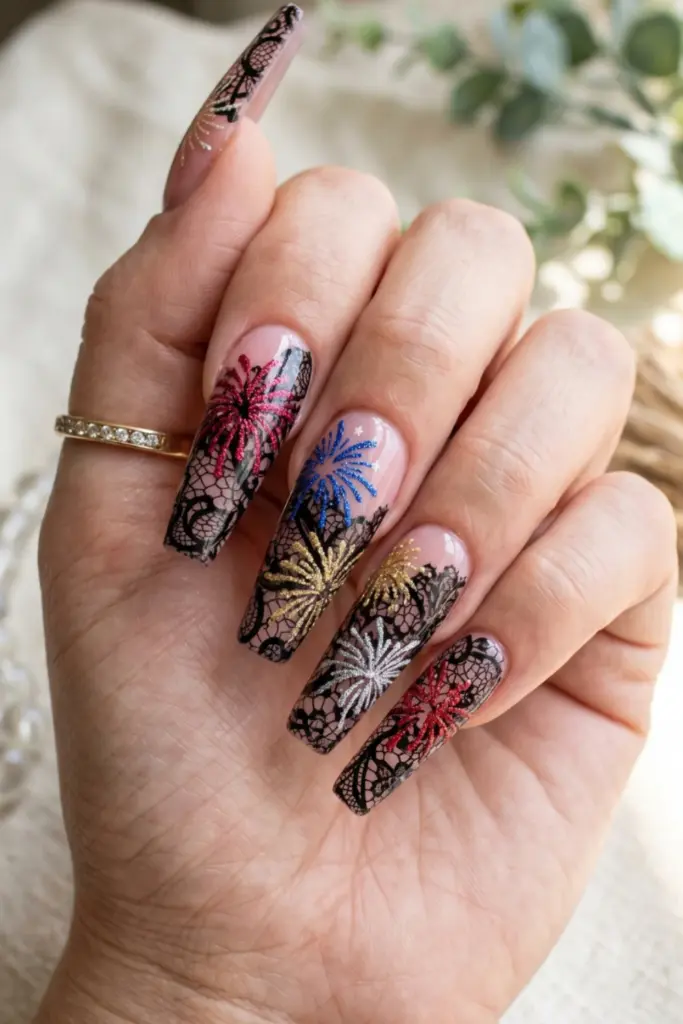
Elegant, intricate, and vintage-inspired.
Steps:
- Paint a sheer pink base.
- Stamp black lace patterns over the nail.
- Add colorful firework bursts over the lace.
Tip: Stamp while the base is fully dry.
18. Patriotic Pearl String
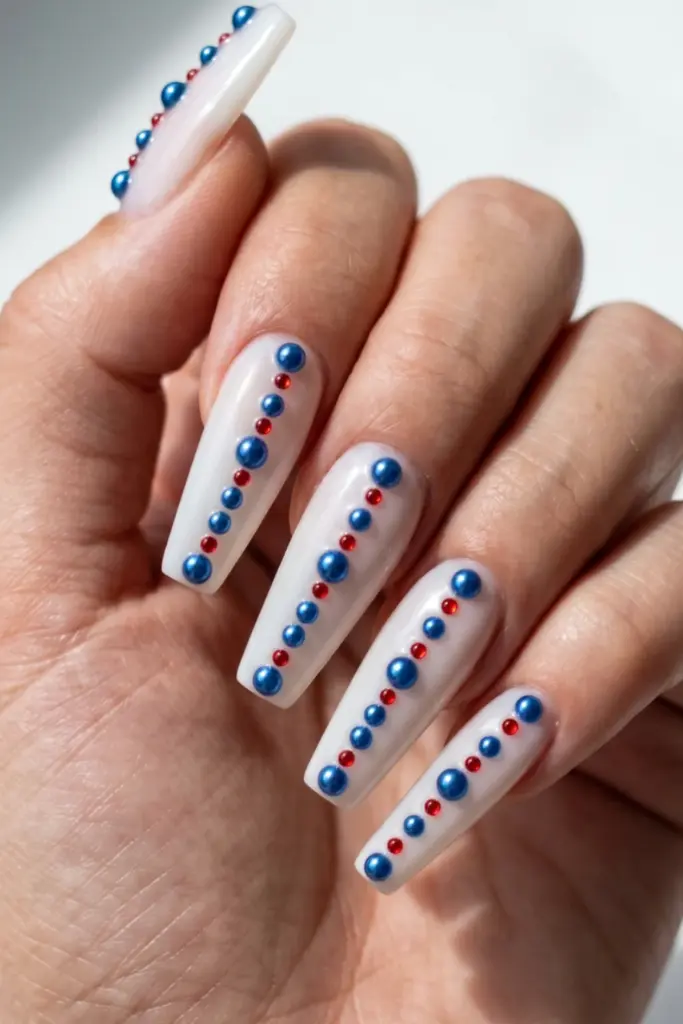
Sophisticated, clean, and dainty.
Steps:
- Apply a milky white base.
- Arrange blue pearls in a line from cuticle to tip.
- Add tiny red micro-beads between the pearls.
Tip: Use a wax pen to pick up those tiny micro-beads.
19. Abstract Flag Splatter
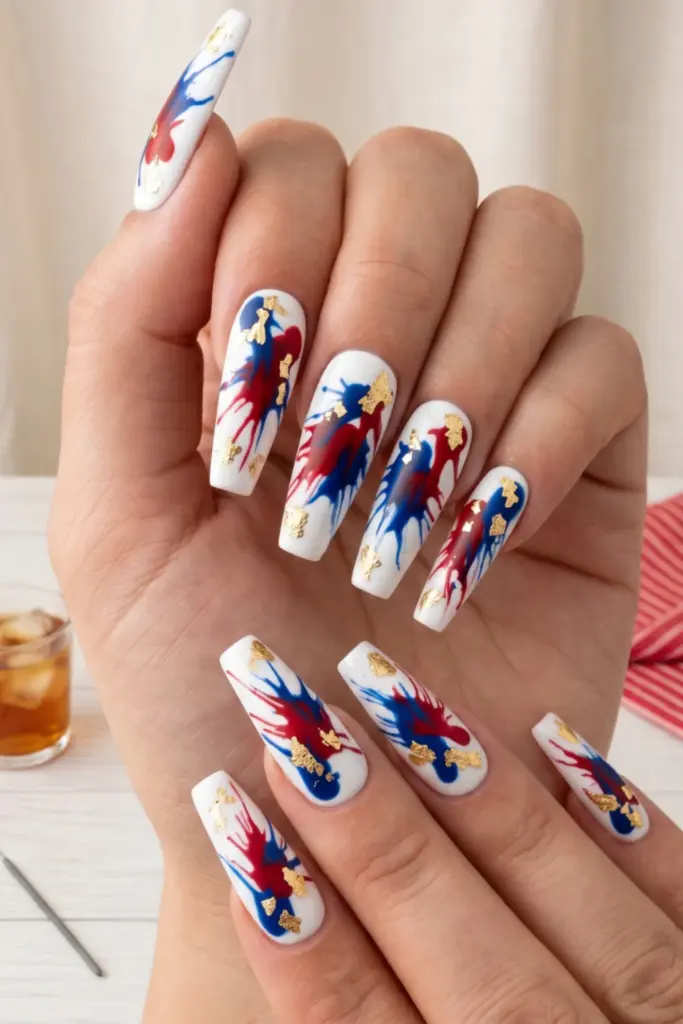
Edgy, fun, and very unique.
Steps:
- Start with a stark white acrylic base.
- Use a straw to blow red and blue polish across the nail.
- Add gold leaf flakes for contrast.
Tip: Protect your skin with latex barrier liquid first.
20. Goddess Liberty’s Torch
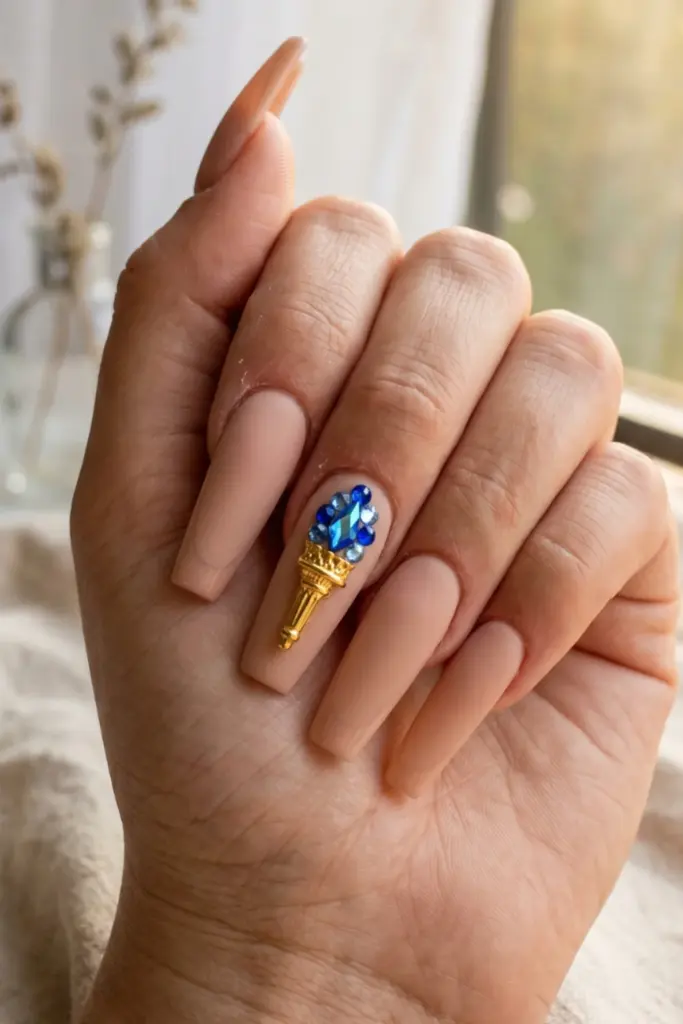
A whimsical, story-telling manicure.
Steps:
- Apply a matte nude base.
- Glue a tiny torch charm on the middle finger.
- Use blue crystals to represent the flame.
Tip: Keep your other nails simple to let the charm shine.
Final Thoughts & How to Maintain
Achieving a luxury manicure at home is all about patience and high-quality supplies.
For the best longevity, always use a professional-grade dehydrator before applying your acrylics.
Remember that hydration is key—apply cuticle oil nightly to keep your skin and nails looking fresh, even with elaborate designs.
- Prep: Always clean the nail bed with alcohol to ensure the acrylic adheres perfectly.
- Care: Avoid using your nails as tools; even the most beautiful set won’t last if you’re prying things open.
- Refresh: If your clear coat loses shine, add a fresh layer every three days to maintain that “just-left-the-salon” glow.
We hope these ideas spark your creativity for the upcoming holiday!
Which design are you pinning to your board?
Let us know in the comments, and don’t forget to check out our Ultimate Summer Nail Care Guide for more tips on keeping your manicure looking expensive all season long.