Looking for the ultimate way to make your Independence Day look pop?
Let’s talk nails!
When the summer sun sets and the sky lights up, your manicure should totally match the vibe.
Finding that perfect blend of patriotic and chic isn’t always easy, though.
That is exactly why you need these stunning firework nail designs perfect for Fourth of July holiday parties!
Whether you’re hitting up a backyard BBQ or watching the spectacular shows from a rooftop, having a festive manicure elevates your whole aesthetic.
Plus, it’s an amazing conversation starter! Actually, wait—one quick thing.
Don’t forget to prep your cuticles first!
In this post, you’ll get 20 jaw-dropping design ideas, complete with simple steps and pro tips to recreate them.
From minimalist accents to neon explosions, there is something here for every skill level.
Grab your favorite polish, and let’s get into it!
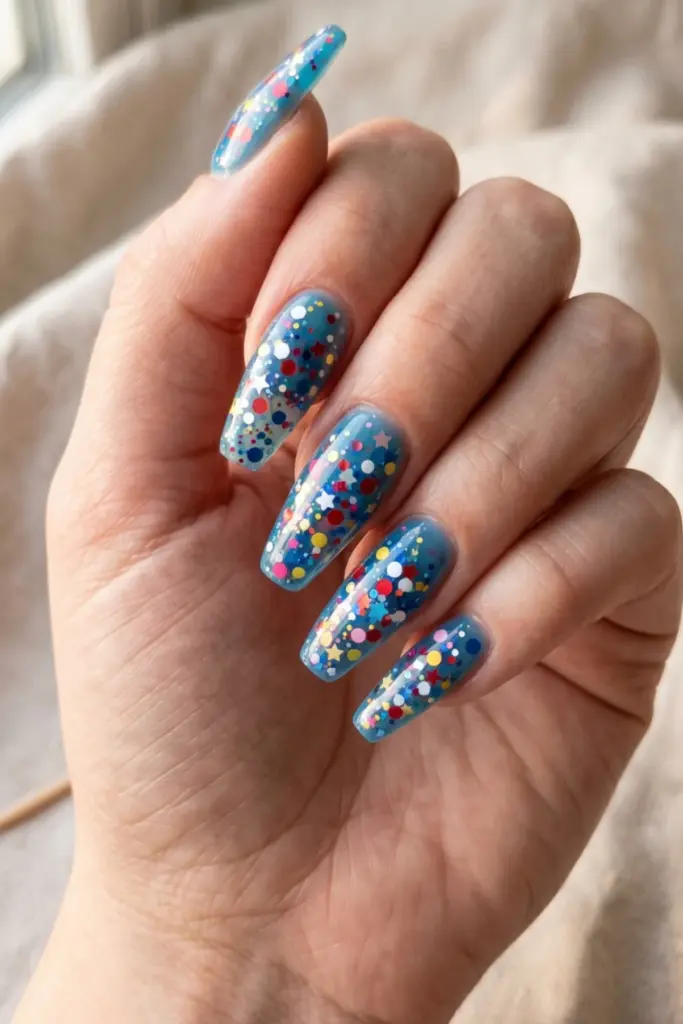
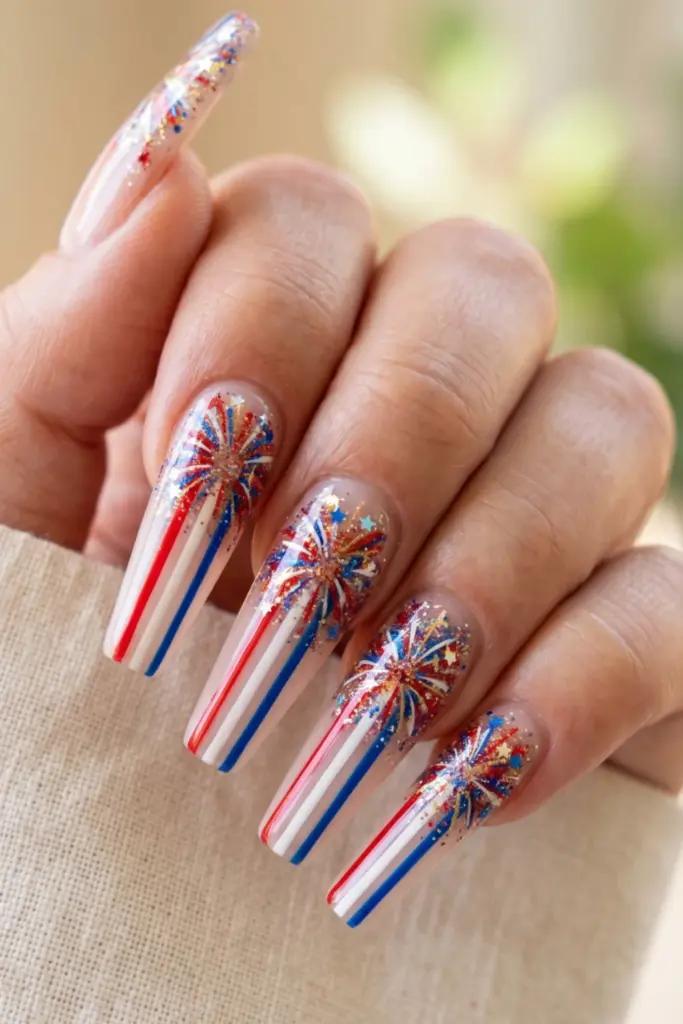
1. Red White Blue Glitter Burst
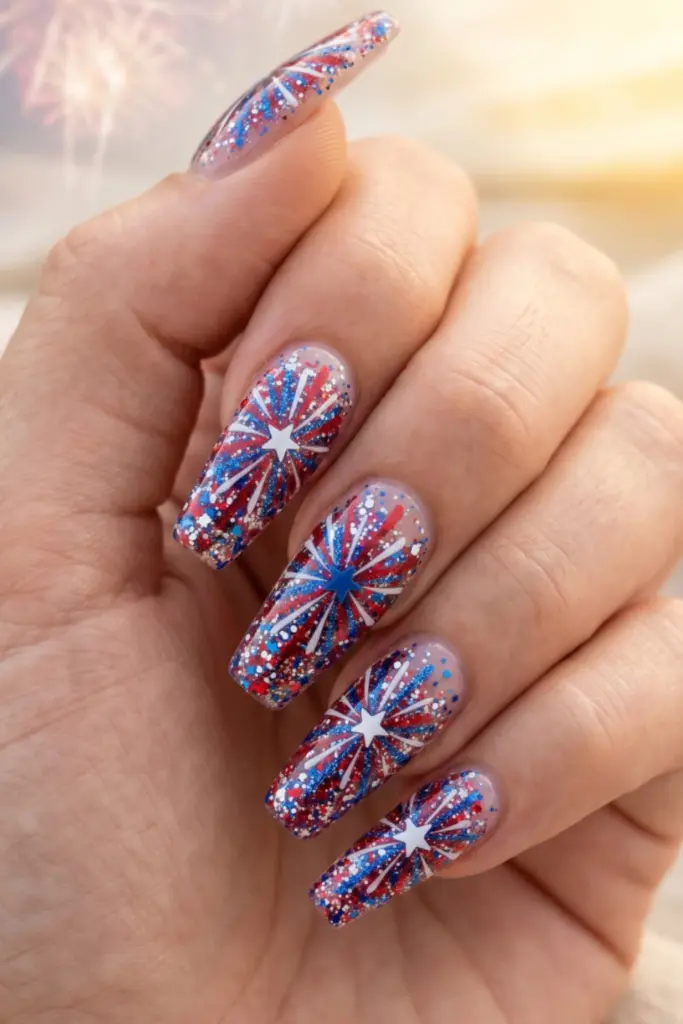
A patriotic explosion of red, white, and blue glitter with a central star.
Kick things off with a classic!
This look screams summer holiday.
It’s bold, sparkly, and captures that magical moment when a firework hits its absolute peak.
Steps:
- Paint a clear or nude base coat.
- Dab red, white, and blue glitter polish in a starburst shape.
- Place a small star decal right in the center.
- Seal with a thick, glossy top coat.
Tip: Use a makeup sponge to dab the glitter—it packs the sparkles much tighter than a brush!
2. Firework Explosion Tips
French tips transformed into colorful firework bursts.
French manicures are having a huge moment right now.
Why not give them a festive twist?
It’s a slightly subtler take on the theme, but it is still super fun for a daytime pool party.
Steps:
- Apply a sheer pink base layer.
- Instead of a white line, paint thin, outward strokes of red and blue at the tip.
- Add a few tiny dots of gold for a spark effect.
Tip: A super fine detailing brush is your absolute best friend here.
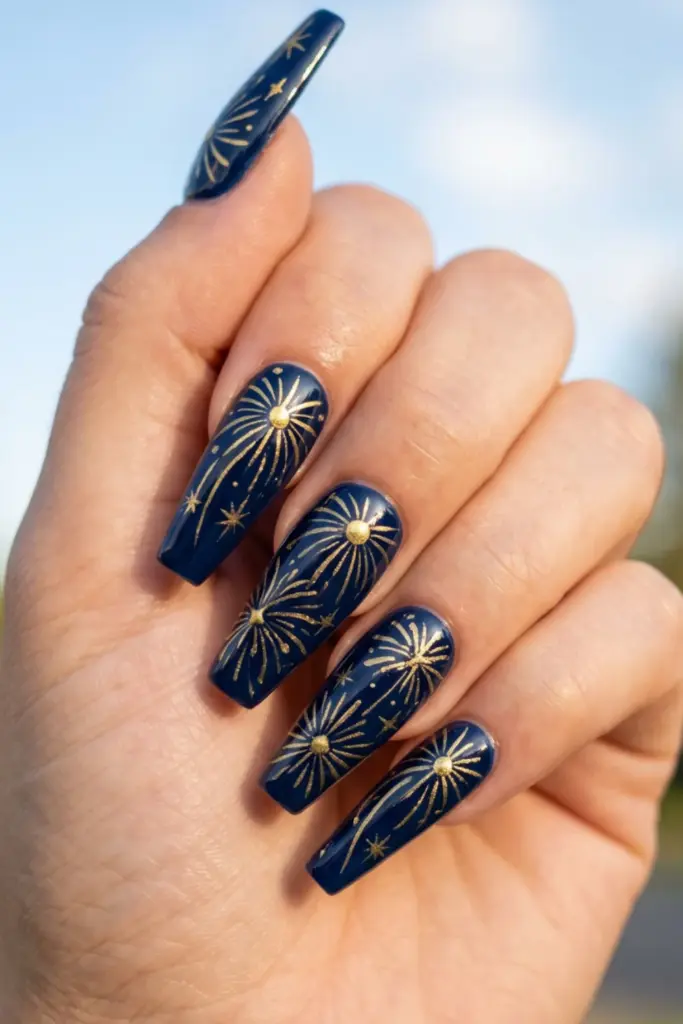
3. Star-Spangled Sparkle
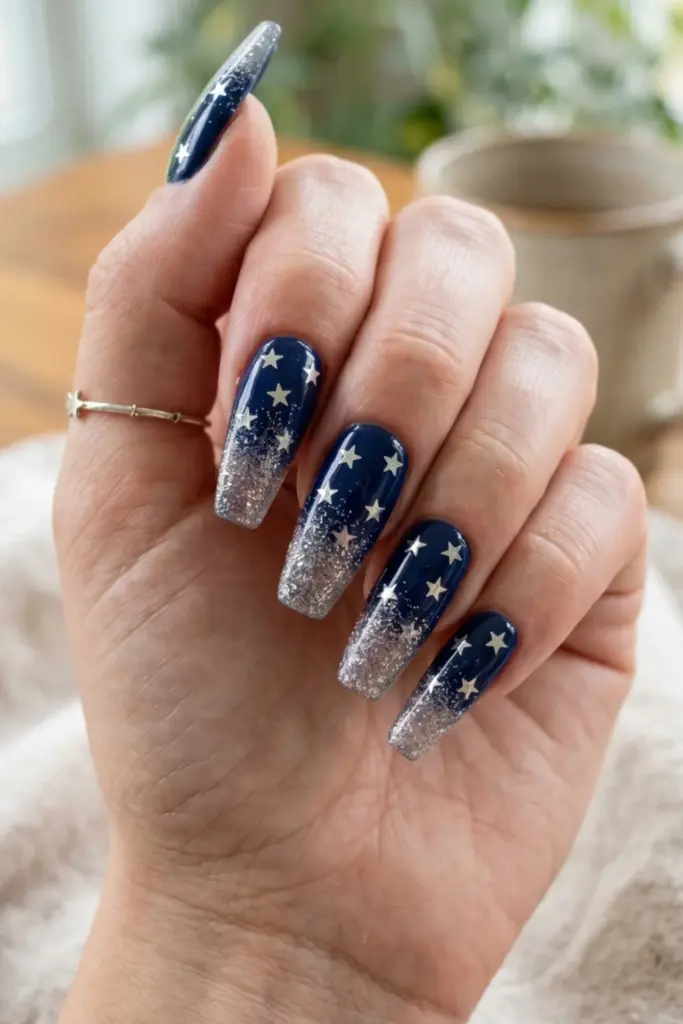
Navy blue nails with silver stars and trailing glitter.
Moody dark nails in the summer? Yes, absolutely!
Navy provides the ultimate night-sky canvas for your starry designs to truly shine brightly.
Steps:
- Paint two coats of deep navy blue polish.
- Apply silver star stickers randomly across the nail.
- Drag a sheer silver glitter polish down from the cuticle.
Tip: Tweezers make placing those tiny stars a thousand times easier!
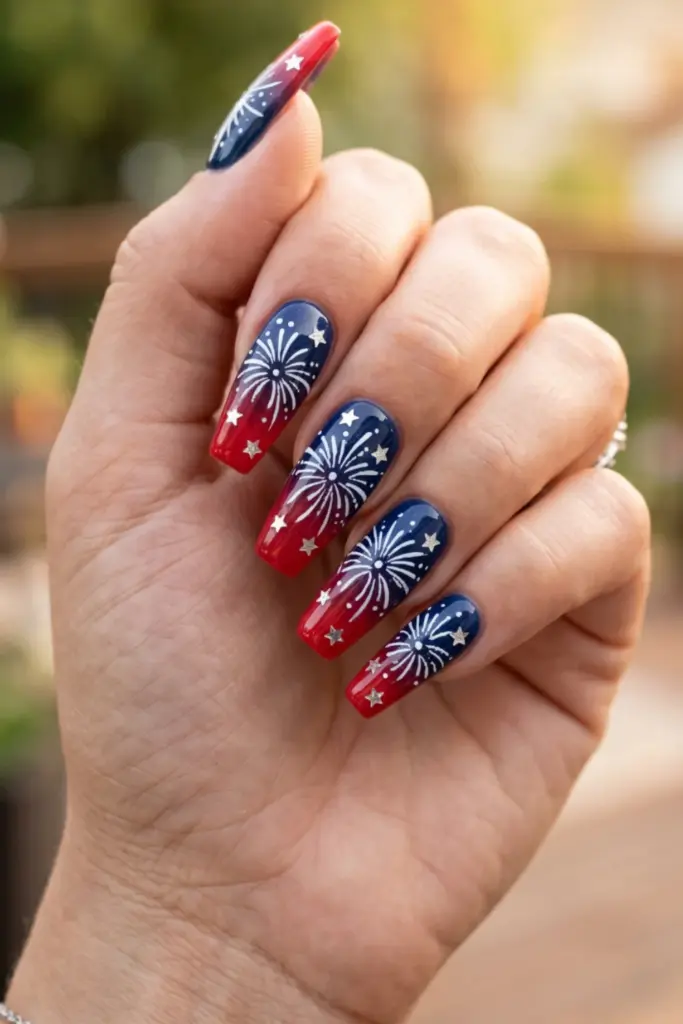
4. Patriotic Ombre with Glitter Trails
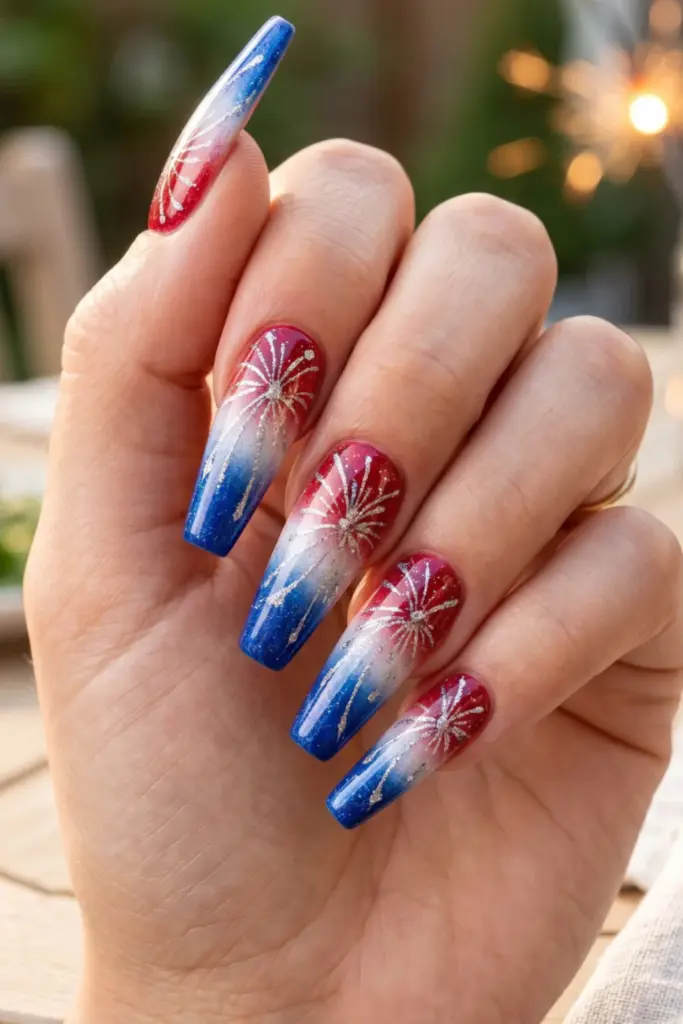
Red-to-white-to-blue ombre finished with metallic firework streaks.
Ombré nails are always a major crowd-pleaser.
Adding metallic streaks takes this gradient look from basic to completely breathtaking.
Steps:
- Sponge on a gradient of red, white, and blue polish.
- Let it dry completely.
- Flick thin strokes of metallic silver outward from the center.
Tip: Liquid latex around your cuticles will save you so much messy cleanup time after sponging!
5. Neon Firework Splatter

Bright neon splatters on a dark base mimicking aerial fireworks.
Want to stand out?
Ditch the traditional colors for vibrant neons!
This abstract design is edgy, chaotic in the best way, and genuinely hard to mess up.
Steps:
- Lay down a jet-black base coat.
- Dip a stiff brush into neon pink, yellow, and green.
- Flick the bristles to splatter the polish across the nail.
Tip: Definitely do this over a piece of scrap paper—it gets messy fast!
6. Metallic Gold Burst on Navy
Deep navy nails with dramatic gold explosion patterns.
Elegance meets celebration.
Gold and navy are a timeless combo that looks incredibly chic while holding onto that festive spirit.
Steps:
- Apply an opaque navy polish.
- Use a dotting tool to place a gold dot near the cuticle.
- Drag delicate gold lines outward from the dot.
Tip: Stamping plates are a great cheat code if you aren’t confident in your freehand line work.
7. American Flag with Firework Accents
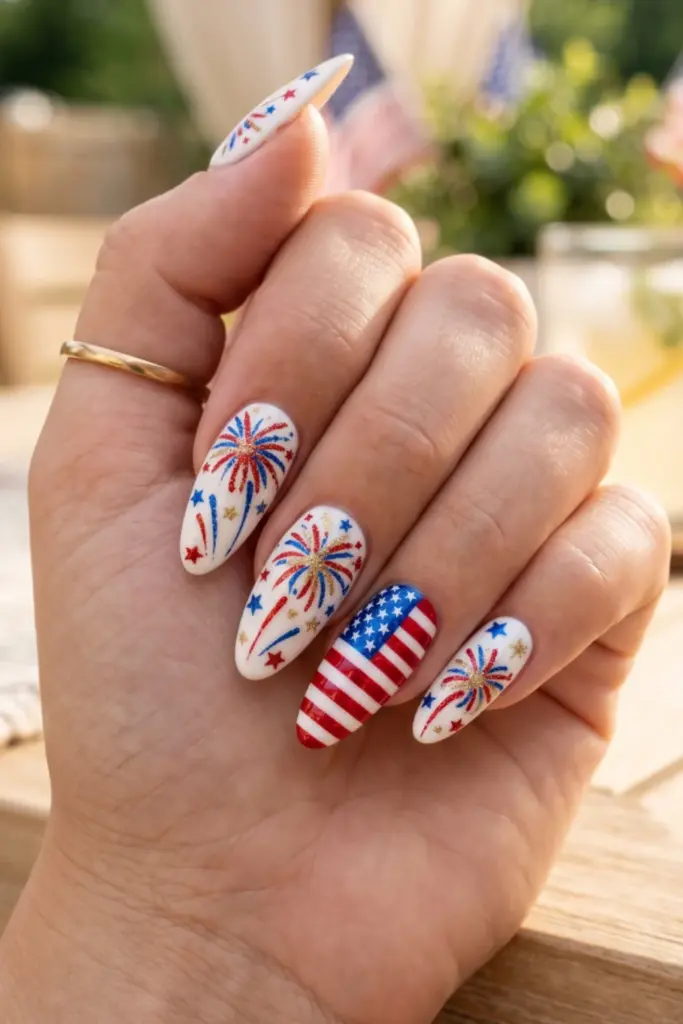
Flag design on ring finger plus firework bursts on others.
For those who love an accent nail!
This look mixes iconic flag imagery with the explosive, loud fun of pyrotechnics.
Steps:
- Paint all nails (except the ring finger) crisp white.
- Draw red and blue bursts on the white nails.
- Paint the ring finger with a striped and starry flag pattern.
Tip: Vinyl nails guarantee crisp, perfectly straight lines for your flag stripes.
8. Crackle Effect Nails
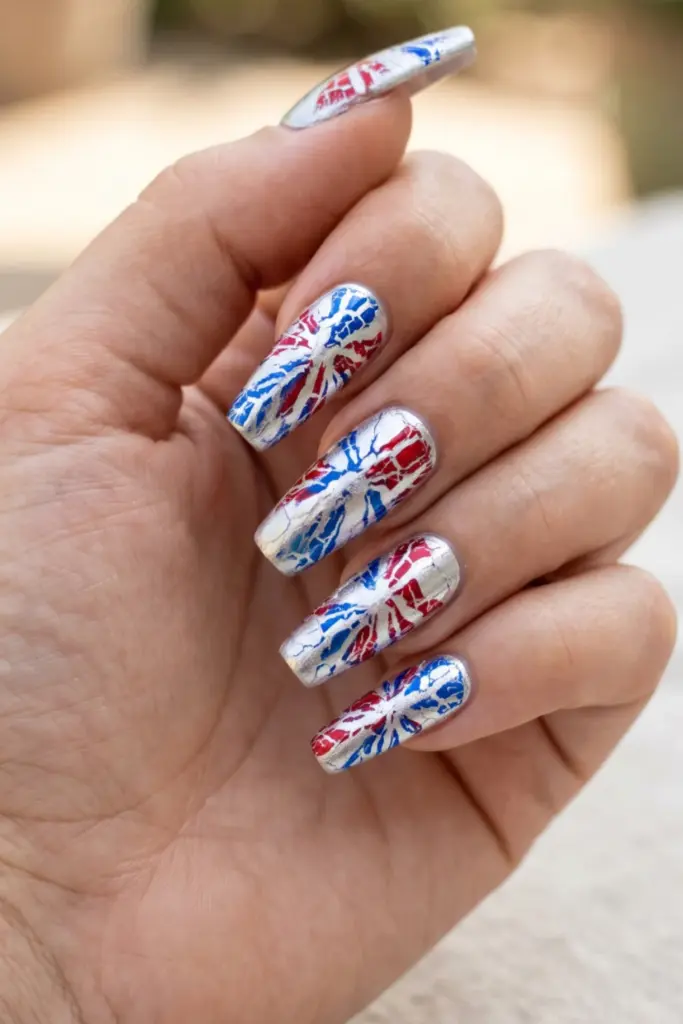
Crackled top coat in red, white, and blue like sky explosions.
Remember crackle polish?
It’s back and surprisingly perfect for mimicking the unpredictable, shattered look of fireworks lighting up the night.
Steps:
- Paint a bright metallic silver base.
- Apply a red or blue crackle top coat.
- Watch the magic happen as it dries and splits apart.
Tip: Apply the crackle layer generously; if it’s too thin, it won’t shatter properly.
9. Glitter Gradient with Firework Stencils
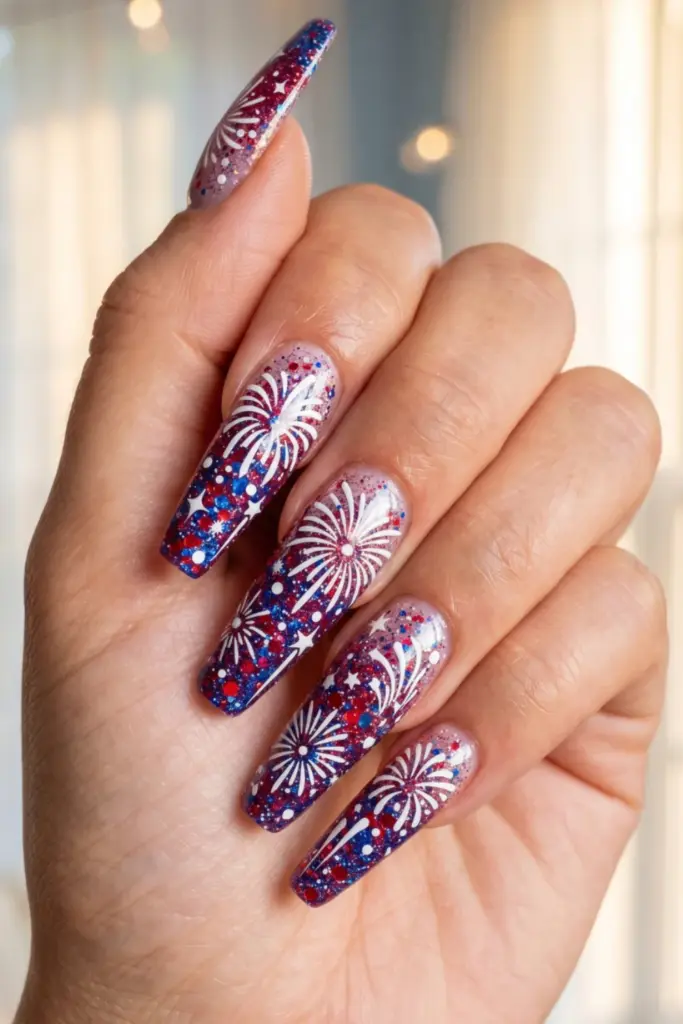
Glitter fades from cuticle to tip with stenciled firework shapes.
Stencils make intricate nail art accessible to absolutely everyone.
Combining them with a glitter fade gives that dynamic “fading sparks” illusion.
Steps:
- Create a glitter fade starting from the cuticle.
- Apply a firework stencil once fully dry.
- Paint over it with opaque white polish and peel immediately.
Tip: Always peel the stencil while the polish is still wet for the sharpest edges.
10. Rocket Ship and Firework Combo

Whimsical rocket and colorful burst designs on accent nails.
Bring a little whimsical, youthful energy to your manicure!
This playful look is guaranteed to get tons of compliments at your holiday bash.
Steps:
- Paint a dark, starry sky base.
- Paint a tiny rocket on your thumb.
- Draw colorful bursts on the remaining fingers.
Tip: Acrylic paints are sometimes easier to draw detailed shapes with than regular nail polish!
11. Confetti Explosion Nails
Multicolored confetti dots over a sheer blue base.
Not great at drawing lines? No problem!
Confetti polish gives you that party-in-a-bottle look with zero artistic skill required.
Steps:
- Apply a jelly or sheer blue base coat.
- Layer a chunky, multi-colored hex glitter polish over top.
- Use a toothpick to arrange any stubborn glitter pieces.
Tip: Two layers of top coat will smooth out any bumpy, annoying glitter texture.
12. Blue Base with Silver Burst Lines
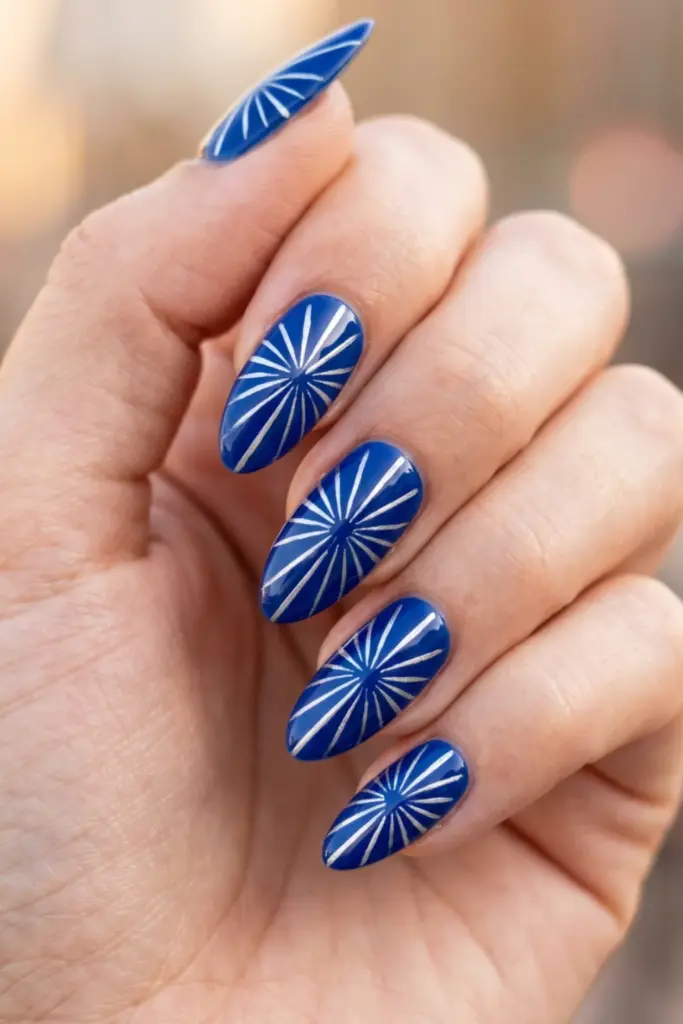
Royal blue nails with thin silver lines radiating from a center point.
Clean, striking, and undeniably modern.
his minimalist approach uses high contrast to make the burst design really pop off the nail.
Steps:
- Paint two coats of vibrant royal blue.
- Dip a striping brush into metallic silver polish.
- Pull lines radiating out from the center of the nail.
Tip: Thin your silver polish slightly with a drop of thinner so it flows smoothly off the brush.
13. Red Glitter Fade to White
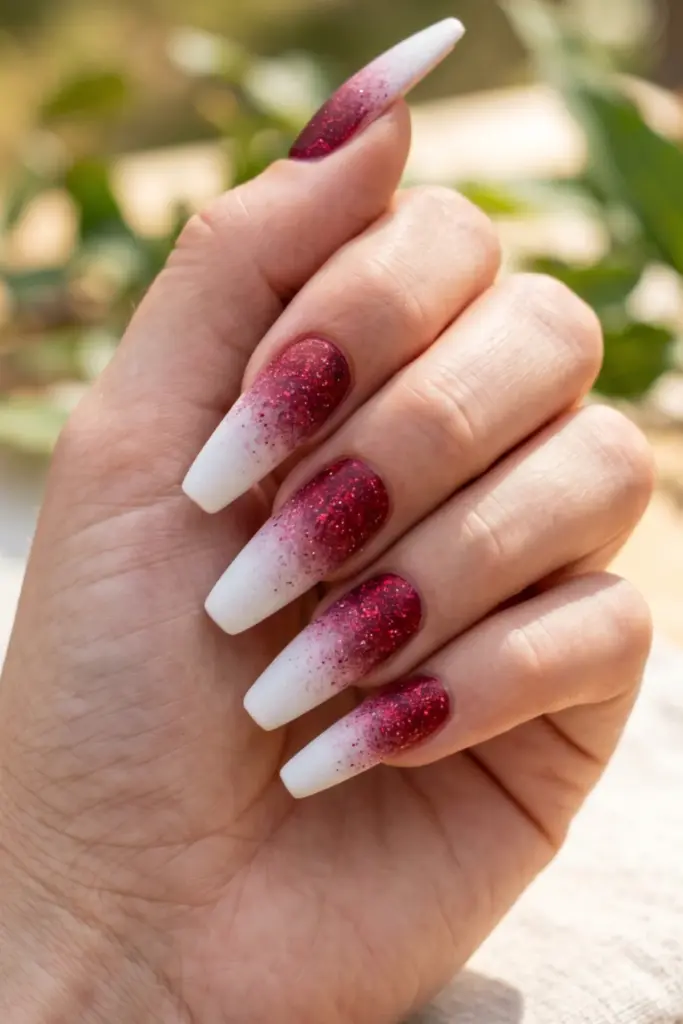
Deep red glitter fading into opaque white at tips.
Think of a bright red flare trailing through a cloudy sky. It’s a gorgeous gradient that feels festive but wearable all summer long.
Steps:
- Paint the entire nail opaque white.
- Sponge ruby red glitter polish at the cuticle base.
- Lightly feather the glitter downward to create a fade.
Tip: A matte top coat over this specific design creates a really cool, unexpected contrast!
14. Firework French Manicure
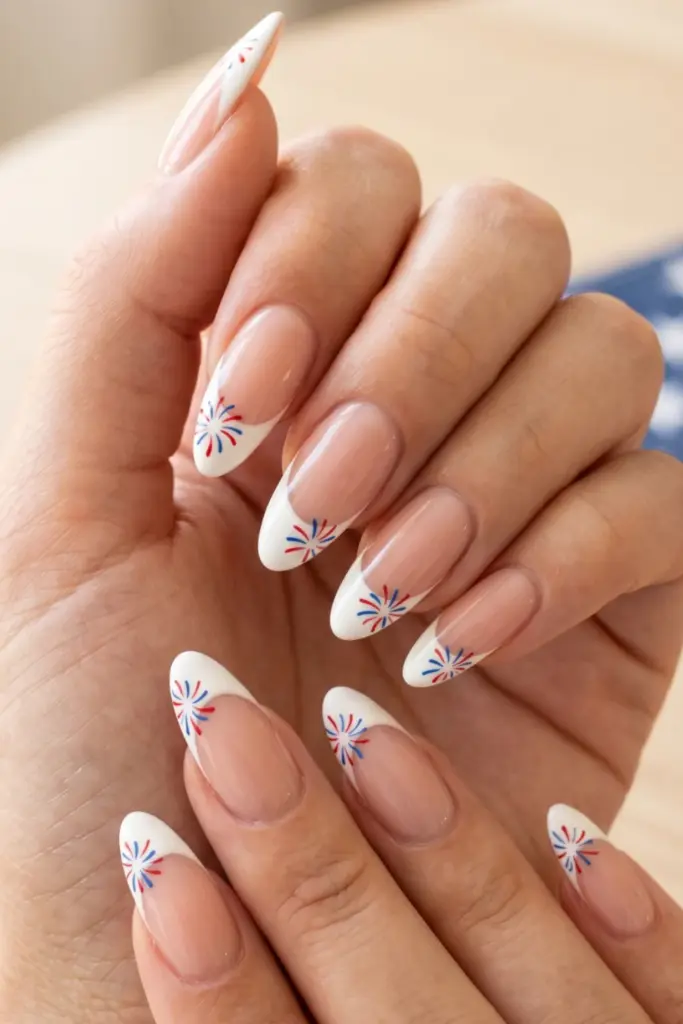
Classic French with tiny firework designs on the white tip edge.
Dainty and delicate!
If you prefer a neat, understated look, placing tiny bursts just on the white tips is a total genius compromise.
Steps:
- Create a standard French manicure with a crisp white tip.
- Using a fine brush, add miniature red and blue bursts strictly on the white area.
- Seal with a glossy top coat.
Tip: Rest your painting hand on a flat surface to keep those tiny lines from getting shaky.
15. Watercolor Firework Art
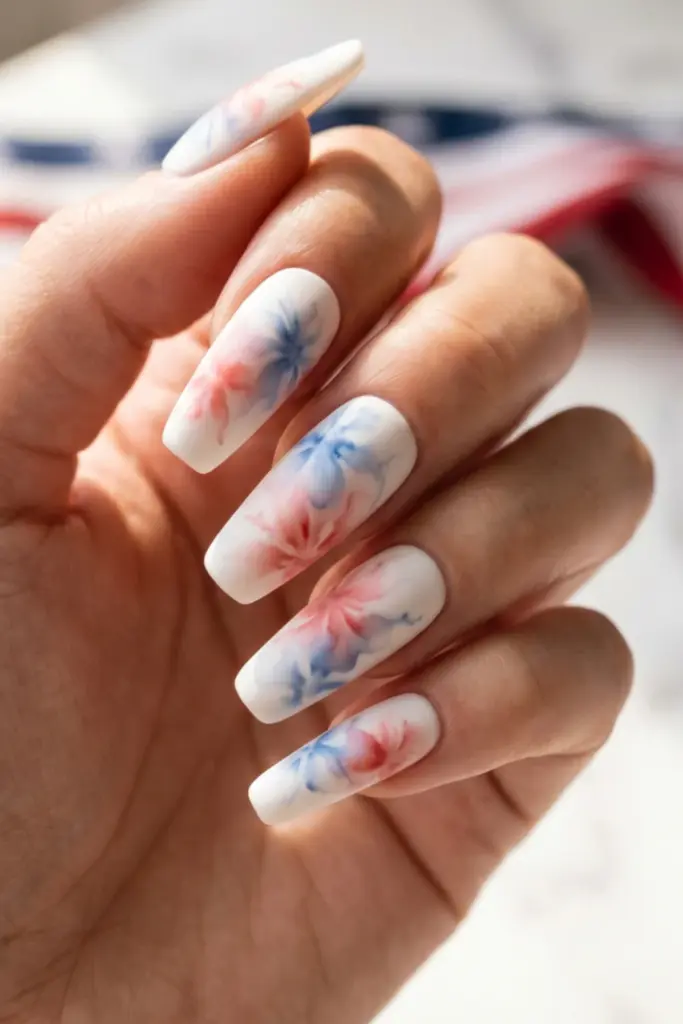
Soft watercolor bursts in patriotic shades on a pale background.
Artistic and soft.
The watercolor technique gives the fireworks a dreamy, smoky appearance, like the lingering haze after a big finale.
Steps:
- Apply a white matte base.
- Dilute red and blue polishes with acetone.
- Dab the diluted colors on the nail to create soft, spreading blooms.
Tip: Rubbing alcohol works too if you’re using gel polish instead of regular lacquer!
16. Glow-in-the-Dark Firework
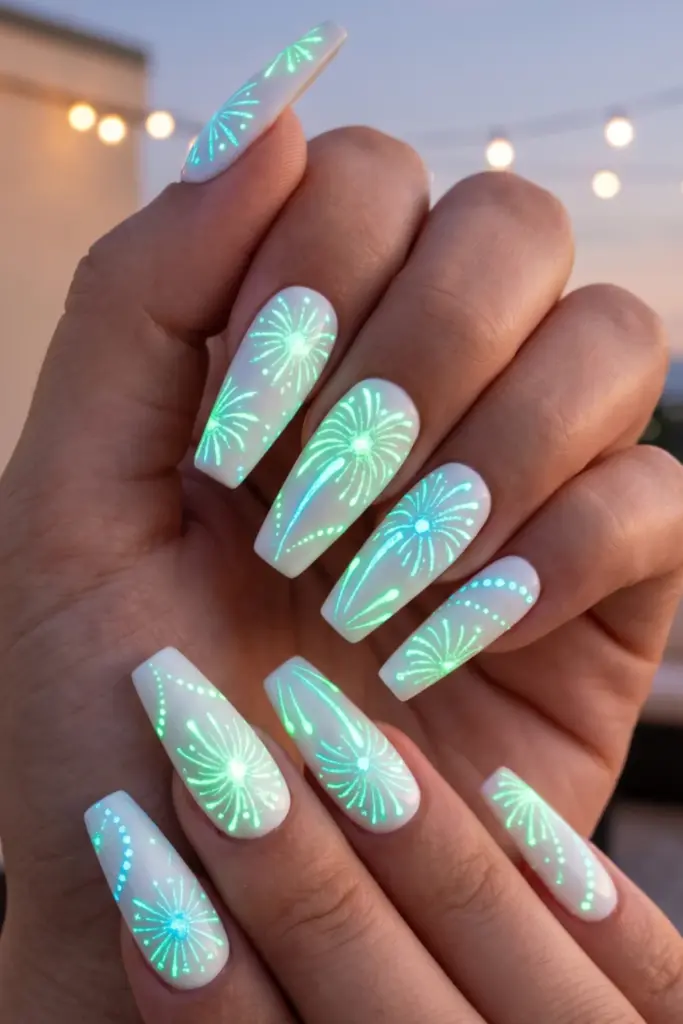
Nails that glow green/blue in the dark, shaped like fireworks.
The real party starts when the sun goes down!
Glow-in-the-dark nails are the ultimate flex for a late-night fireworks viewing.
Steps:
- Paint your base color (white or nude works best).
- Use a glow-in-the-dark polish to draw your explosion patterns.
- Charge them under a UV light or bright summer sun!
Tip: Layering the glow polish twice makes the night-time effect way brighter.
17. Rhinestone Firework Burst
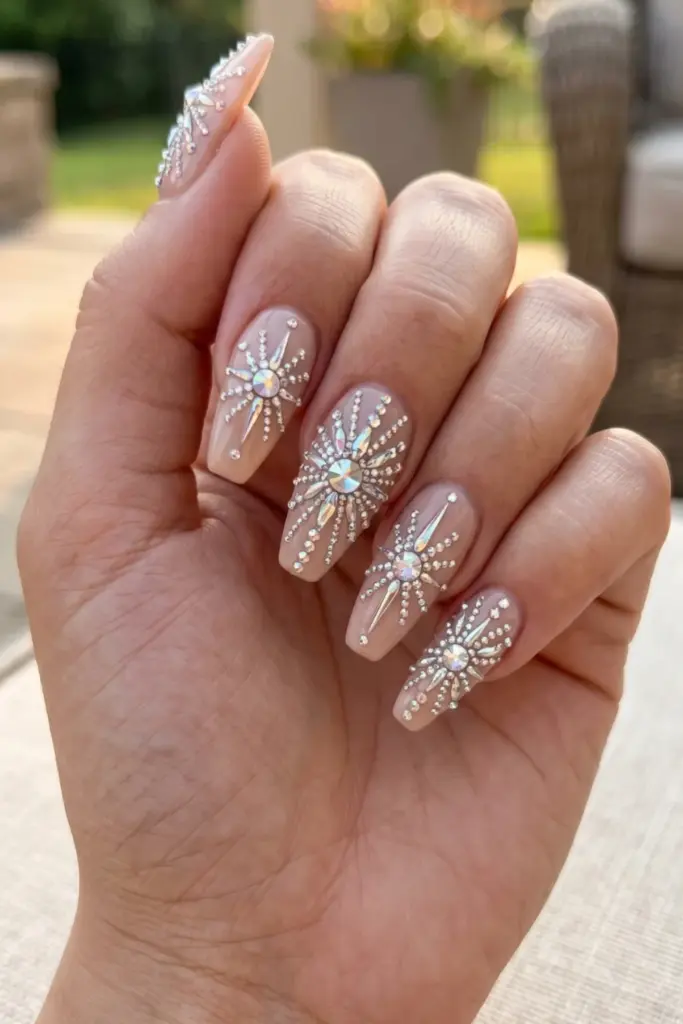
Crystals arranged as bursting fireworks on a nude base.
Bring on the bling!
If you love 3D nail art, using tiny rhinestones to build your fireworks gives an incredibly luxurious, textured finish.
Steps:
- Paint a neutral nude base.
- Apply a tiny dot of nail glue.
- Place a central gem, then arrange smaller gems radiating outward.
Tip: A wax pencil tool is absolutely essential for picking up and placing tiny rhinestones.
18. Striped Firework Trails
Vertical or diagonal stripes that morph into starburst patterns.
This design is all about movement.
It tricks the eye by blending geometric stripes right into chaotic, sparkly bursts at the tips.
Steps:
- Paint your base coat.
- Draw three vertical stripes in red, white, and blue.
- Turn the ends of the stripes into exploding starbursts at the nail tip.
Tip: Use striping tape to get the bottom halves of your lines perfectly straight.
19. Ombre Star-Spangled Burst
Ombre navy to red with layered stars and burst details.
Why choose just one element when you can have them all?
This is the maximalist, all-out Independence Day look of your wildest dreams.
Steps:
- Sponge a navy-to-red ombre base.
- Stamp or draw white firework bursts over the gradient.
- Add small silver star decals around the bursts.
Tip: Let the ombre layer dry for at least 15 minutes before applying decals so you don’t accidentally smudge it.
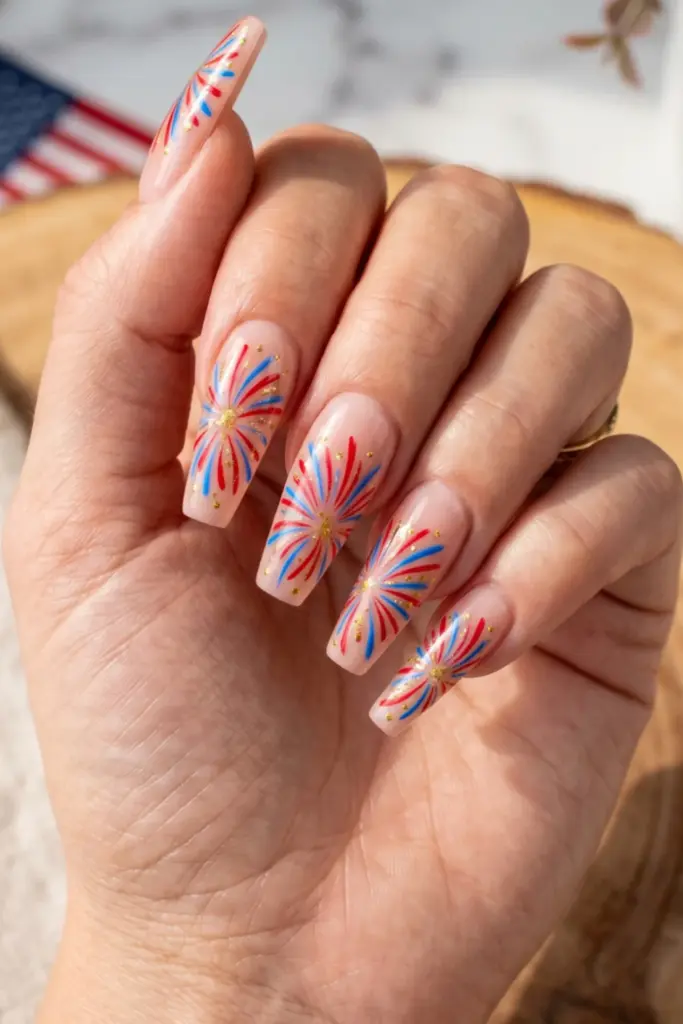
20. Minimalist Single Firework Accent Nail
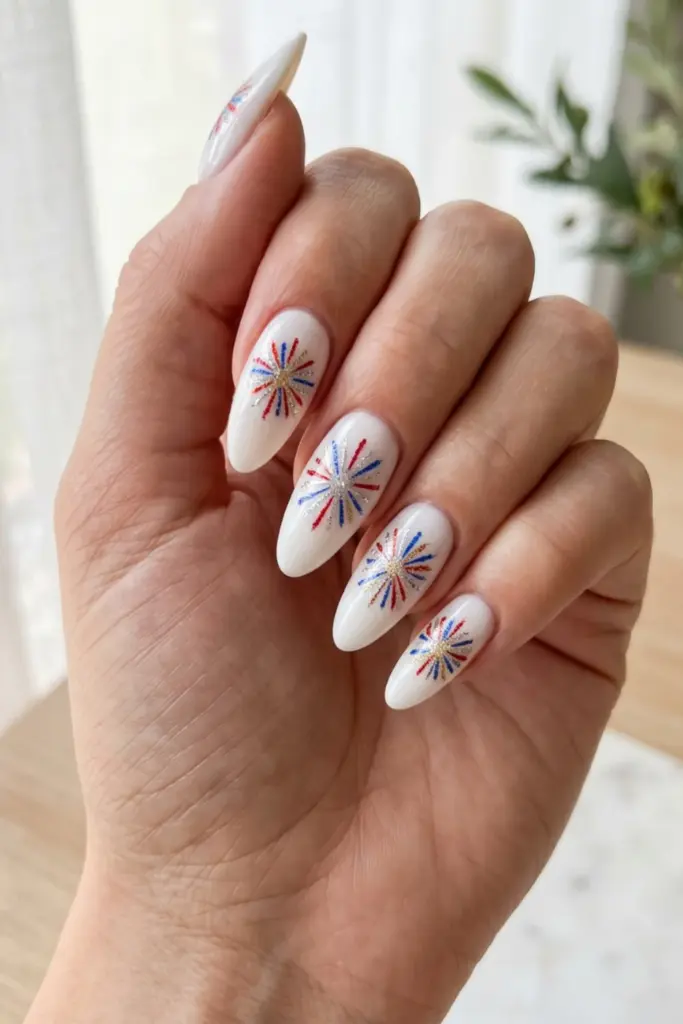
One bold firework per nail on a clean white or nude base.
Less is sometimes so much more.
A single, perfectly executed design on a clean background looks incredibly modern and chic.
Steps:
- Paint a milky white or sheer nude base.
- Draw exactly one bold, multi-colored firework on the center of the nail.
- Keep the rest of the nail completely bare of extra details.
Tip: Use highly pigmented polishes for the burst so it really pops against the neutral background!
Final Thoughts
Creating the perfect Fourth of July manicure is all about having fun and expressing your festive spirit!
To make sure your gorgeous firework nail designs last through every barbecue and beach trip, I always recommend prioritizing nail health and using quality tools.
If you want to dive deeper into DIY nail art, here is how you can elevate your routine:
Essential Nail Art Care Steps:
- Hydrate Daily: Apply cuticle oil every single night.
- Cap Your Edges: Always swipe your top coat across the very tip of your nail to prevent chipping.
- Use the Right Tools: Invest in a good set of dotting tools and striping brushes.
Bonus Tips for Flawless Execution:
- Always let your base color dry 100% before adding your firework details.
- If you mess up a line, don’t panic! A tiny brush dipped in acetone can clean up stray marks easily.
I hope you found the perfect spark of inspiration here!
Be sure to pin this post to your favorite beauty boards so you can find it later.
Want to see the exact brushes, polishes, and stencils I recommend?
Click through to my Pinterest profile to shop my favorite nail art supplies directly!
Have a safe, sparkly, and beautiful Fourth of July